
Last revised: 27 September 2021. Welcome to my in-depth beginner’s guide to Frontier Development’s space simulation Elite: Dangerous.
A PDF version of this beginner’s guide is now available for download! Many thanks to CMDR Aurelius Borealis for creating, maintaining, and hosting this PDF version.
And also a big thanks to Commander Chanurr for providing a Spanish translation of my guide, which is also available as a PDF.
Lastly, a few people have been asking me about my plans for updating the guide with respect to the Odyssey expansion. So, I’ve written a short blog post explaining why that’s probably not going to happen anytime soon. Sorry folks!

Beginner’s guide contents:
- Introduction
- Useful resources to get you started
- Choosing a game mode
- Starter’s zone (Pilots’ Federation District)
- Controls and general flight
- Normal flight fundamentals
- Docking
- Supercruise, interdiction, and low and high waking
- Hyperspace, FSD supercharging, and the galaxy map
- Ships, modules, and power management
- Combat vs. Analysis Mode
- Combat, weapon and distributor fundamentals, and repairing damage
- Ship transfer and module storage
- Death and insurance
- Crime, punishment, and system security
- PvP, PvE and being interdicted/attacked by other players
- Squadrons
- Reputation, rank, factions, and civil wars
- The Codex
- Unidentified Signal Sources (USSs)
- The endgame, career paths, and ways to make money:
- PowerPlay
- Elite Dangerous: Horizons and Beyond expansions
- ARX and the in-game store
- Fleet carriers
1. Introduction
Let’s be honest, Elite: Dangerous (ED) doesn’t exactly go out of its way to explain things to players (though it is now starting to get much better in this respect!). As such, it can be quite daunting to the newcomer, particularly those unfamiliar with the previous Elite games or space sims in general. I personally find it very rewarding to figure out game mechanics for myself through a process of discovery and experimentation, but others may find this a bit frustrating!
In light of this, I created this beginner’s guide back in January 2015 and have continued working on it since. The guide is aimed at Commanders just starting out in Elite: Dangerous as well as those looking for a relatively simple resource for the game’s core mechanics. It’s broken down into sections that you can jump to using the contents list above.
Over the past five years, the game has grown and evolved, and so has this guide. Whenever possible, I will continue to update the guide to reflect changes to the game and to improve the usefulness of the information.
It’s worth noting that because game’s UI has been tweaked and added to over the past few years some older screenshots in the guide may differ slightly from the current UI.
I hope this beginner’s guide is useful and I’m happy to answer any questions posted in the comments. Also please feel free to inform me of any errors, glaring omissions, out-of-date info, broken links, or typos (an belief mee this thint if ridddled mith typos).
However, if you don’t like Elite: Dangerous or have issues with Frontier Developments, I totally respect that, but the comments section of this guide is not a place to vent your feelings. There’s the official forum for that!!!
Fly safe Commanders o7
2. Useful resources to get you started
Before getting started on your imaginary space career, it’s worth checking out some of the in-game and external resources for Elite: Dangerous. External resources come in both official and community (unofficial) flavours.
In-game resources
It didn’t always, but Elite: Dangerous now contains several in-game resources aimed at newer players.
Fledgeling Commanders must first undergo a Pilot’s Assessment in order to get their Pilot’s Federation licence prior to starting the game. Essentially, this is just an interactive tutorial that gently introduces players to the basic concepts and controls of flight, combat, and space travel.
Additional tutorials in the form of training simulations, challenge scenarios, and online videos are also available from the Training section of the main game menu. These tutorials can also be safely accessed at any time while playing the game, from the home tab of the right-hand panel (systems) of your ship’s cockpit.
Lastly, the Codex, which is also accessible from the home tab of the right-hand cockpit panel, contains the:
- Knowledge Base, which outlines key aspects of Elite: Dangerous lore, including information and history about the main factions
- Pilot’s Handbook, which explains the basics of some of the game’s main activities and professions, such as mining, exploration, trading, and bounty hunting
External resources
If you haven’t already, I recommend checking out the Elite: Dangerous community page, where you will find a series of tutorial videos, patch notes, and some general information on different aspects of the game.
There’s also a comprehensive old-school game manual in PDF format that does a decent job of covering controls, HUD, flight, travel, combat, and basic game mechanics/concepts. However, this manual hasn’t been updated since 2017, so some aspects of the UI and gameplay have now changed.
You can also access many of these official resources from the top right of the game launcher.
Two other excellent resources are the Elite Dangerous Wiki and ED Tutorials. Both are community-made resources for learning more about specific aspects of Elite: Dangerous. In particular, ED Tutorials has a large number of detailed, well-written and easy-to-follow tutorials covering “all styles of play from exploration and mining to Thargoids and PvP combat”.
It’s also worth signing up to the official forums as you will find a wealth of information and advice there, plus it’s the best place to keep yourself informed about any changes or additions to the game. Members are generally quite helpful if you have any questions, but always remember to do a search first before posting a query.
Alternatively, there’s also the officially-endorsed Elite: Dangerous subreddit.
Also, there are two excellent sites for experimenting with ship loadouts: EDSY and Coriolis. Both can be used to save loadouts as well as share them with friends.
Other useful external resources:
- Galactic Academy — a Frontier-endorsed, community-run Discord server geared towards helping new players and finding friends to play with.
- Elite Dangerous Discord server — official Elite: Dangerous Discord server/forum, useful for finding friends, wings, clans, etc.
- Other Elite: Dangerous Discord servers — a fairly comprehensive list of public Elite: Dangerous-related Discord servers and communities.
- EDDB — an unofficial online database that provides relatively up-to-date info on stations, factions, and commodities. It’s a great tool for planning trade routes and sourcing mission items and ship equipment.
- INARA — similar to the EDDB, but also provides detailed information on engineer access requirements, blueprints, and modification outcomes.
- Elite Dangerous Utilities — a collection of tools for finding interesting/fun systems as well as good mining and bounty hunting locations.
- Fuel rats — if you ever run out fuel, these guys are more than happy to help.
- The Git Guide to Trading in Open — video tutorial with some great tips for surviving in Open, which is of use to all playstyles, not just trading; it’s pretty funny too.
3. Choosing a game mode
Currently, there are four main game modes, all of which are online. Every single person plays within the same persistent universe. There is no fully offline mode nor are there any plans to implement one. You can switch between these game modes at any time:
- Open Play — this “instances” you with up to 32 other players who happen to be present within the same star system; other nearby players (i.e. Commanders) will be listed in your comms panel and appear on your scanner as hollow markers.
- Private Group — only instances you with members of a private group (invitation only).
- Solo — effectively a single player mode. You will never be instanced with other players, but you do share the same universe and, therefore, background simulation as every other Elite: Dangerous player. It’s worth noting that this mode requires significantly less internet bandwidth than the other two.
- Arena — a PvP only mode (previously branded CQC Championship) that is entirely independent of the main game, i.e. separate to the above three game modes.
4. Starter’s zone (Pilots’ Federation District)
After completing the Pilot’s Assessment tutorial, brand new players are now given the choice to either begin the game in the Dromi system or one of the standard starting locations.
Dromi is part of the Pilot’s Federation District, which is a cluster of 10 systems near Sol that are restricted to new Commander characters who have yet to gain their first Combat, Trade, or Exploration rank. It is impossible for more-experienced Commander characters to enter these systems.
The starter’s zone systems are marked on the galaxy map and in the navigation panel by a Pilot’s Federation icon and include Azoth, Dromi, Lia Fail, Matet, Orna, Otegine, Sharur, Tarnkappe, Tyet, and Wolfsegen.
Essentially, the starter’s zone provides a safe haven for new players while they find their (space) feet. Starports in these systems offer simpler missions and more basic outfitting options that are geared towards newcomers flying Sidewinders.
Once a player gains their first Pilot’s Federation rank, they will be offered an optional graduation mission. Completing this mission will take them out of the district and they will not be able to re-enter (unless they clear their save data and start afresh).

5. Controls and general flight
Flight can be tricky at first, particularly if you have little experience of flight/space sims, but practice makes perfect. Before you do anything, it’s important to choose and configure a controller set-up that’s right for you.
The best place to experiment without risk is within the in-game tutorials that can be found in the Training menu. Here, you can learn how to dock, travel, and dogfight. There are also tutorials related to mining, SRV driving, and ship-launched fighters, while advanced combat scenarios can be found under Challenge Scenarios.
You can also access some training videos from here, but these will open in your default web browser.

Personally, I prefer to play the game on keyboard and mouse (kb/m) but you might want to consider using an Xbox controller or similar, or investing in a HOTAS (Hands On Throttle-And-Stick) joystick – these start at around £50–£60 (e.g. the Thrustmaster T-Flight Hotas X), but the better ones can set you back up to £300–400, which is a pretty serious investment.
For those trying out kb/m, I’d definitely recommend setting:
- pitch/yaw to mouse
- roll to A and D
I’d also advise trying:
- both relative mouse control on and off (I prefer relative on these days),
- playing about with mouse sensitivity/deadzone
- binding spacebar to pitch up — a neat trick I learnt from flying jets in the Battlefield games
You’ll definitely want to configure key bindings to your own taste and as a guide, I’ve listed my own below (any controls not stated are set to default):
Click here to reveal key binds
| Mouse controls: | |
| mouse x-axis | yaw |
| mouse y-axis | pitch |
| relative mouse x-axis & y-axis | on |
| Flight rotation: | |
| roll left | A |
| roll right | D |
| pitch up | space |
| Flight thrust: | |
| thrust left | Q |
| thrust right | E |
| thrust up | W |
| thrust down | S |
| thrust forward | mouse 4 |
| thrust backward | mouse 5 |
| Flight throttle: | |
| increase throttle | + mouse wheel |
| decrease throttle | – mouse wheel |
| throttle increments | 10% |
| set speed to 0% | 1 |
| set speed to 25% | 2 |
| set speed to 50% | 3 |
| set speed to 75% | 4 |
| set speed to 100% | 5 |
| Flight miscellaneous: | |
| disable flight assist | z |
| engine boost | tab |
| toggle frame shift drive | J |
| supercruise | – |
| toggle orbit lines | O |
| Targeting: | |
| select target ahead | T |
| cycle next target | G |
| cycle previous ship | F |
| select highest threat | H |
| cycle next hostile ship | ] |
| cycle previous hostile ship | [ |
| select wingman 1 | F1 |
| select wingman 2 | F2 |
| select wingman 3 | F3 |
| select wingman’s target | F4 |
| wingman nav-lock | F5 |
| cycle next subsystem | Y |
| cycle previous subsystem | U |
| target next system in route | P |
| Weapons: | |
| primary fire | mouse 1 |
| secondary fire | mouse 2 |
| cycle next fire group | N |
| deploy hardpoints | backspace |
| firing deploys hardpoints | off |
| Cooling: | |
| silent running | delete (toggle) |
| deploy heat sink | V |
| Miscellaneous: | |
| ship lights | L |
| cargo scoop | home |
| jettison all cargo | *not set!* |
| landing gear | insert |
| use shield cell | / |
| use chaff launcher | C |
| charge ECM | X |
| night vision | num – |
| Mode switches: | |
| target panel | 7 |
| comms panel | 6 |
| quick comms | enter |
| role panel | 8 |
| internal panel | 9 |
| open galaxy map | M |
| open system map | K |
| headlook | mouse 3 |
| open discovery | num * |
| switch cockpit mode | F12 |
| enter FSS mode | num enter |
Note that my full spectrum system (FSS) scanner key binds are listed in section 21.9 Exploration and fuel scooping. My SRV key binds are listed in section 23.2. SRV basics
Don’t forget to back up the file containing your control settings! For the standard 64-bit Windows version, this can be found at:
C:\Users\username\AppData\Local\Frontier Developments\Elite Dangerous\Options\Bindings Or try typing the following into the explorer address bar:
%LOCALAPPDATA%\Frontier Developments\Elite Dangerous\Options\Bindings.I have no idea where this config file is stored on the Mac, PS4, or Xbox One versions!
Whether you use kb/m or a dedicated controller, I’d also recommend checking out Voice Attack, a neat app that allows you to bind keys to voice commands. It works surprisingly well and there’s a 21-day free trial available — it only costs $10 USD anyway. Plus it’s great if you’ve always fancied yourself as a bit of a Jean-Luc Picard. You can better train it to your voice using the Speech Recognition software in the Windows Control Panel.
6. Normal flight fundamentals
Normal flight is the low-velocity flight mode (sub-light speed) you enter when you drop out of supercruise (jump to Supercruise, interdiction and low and high waking section). It is used for docking and landing on planets (Horizons expansion only), dogfighting, mining, and exploring points of interest, such as signal sources, navigation beacons, and asteroid fields. Basically, all the fun stuff.
Right, I’ll try to explain this as best as I am able!
Your ship has forward (main), reverse, lateral, and vertical thrusters; as well as thrusters for rotating the ship in three dimensions. These thrusters work in pairs to counter each other so, relative to your current orientation, you can accelerate forwards or backwards, left or right, up or down.

For gameplay reasons, each direction has a maximum speed that can be reached (in m/s). This limit is determined by the ship you’re flying, your total mass, the rating of your thrusters, and the number of pips you assign to the engines capacitor (jump to Combat, weapon and distributor fundamentals section).
The sweet-spot for manoeuvrability is 50% throttle, which is the blue section on your speed indicator. Overall manoeuvrability is increased by putting more pips into engines.
Yaw, which is turning the ship around its vertical axis (i.e. turning the nose left and right), has been deliberately limited in Elite: Dangerous. As such, yaw only allows for minor adjustments so you will need to get used to using roll and pitch for turning — think WWII fighter planes or the X-wings/tie fighters from Star Wars.

Boosting applies a very large amount of forward thrust in a very short space of time to quickly and temporarily accelerate your ship well beyond your normal maximum speed. Boosting drains the engines capacitor and generates a considerable amount of heat, reducing its spamability (jump to Combat, weapon and distributor fundamentals section).
With flight assist (FA) on (default), the computer will maintain a constant forward or reverse velocity (as set by you) and will automatically counter any lateral or vertical acceleration that you apply. So if you apply throttle to the right thrusters, you will start heading left. But as soon as you release the throttle, the computer will apply an equal amount of thrust in the opposite direction to restore a purely forward or reverse velocity.
In a similar manner, the computer will stabilise the pitch, yaw and roll of the ship. This means that the ship’s velocity and orientation will always be one and the same, i.e. the ship is moving towards wherever you point the nose (or at least will always try to!).
With flight assist (FA) off, the computer will not counter your movements. So if you apply thrust to the right, you will keep heading left until you apply an equal of thrust to the left. If you roll the ship, you will keep rolling in that direction until you counter the movement.
As such, it is much trickier and more laborious to control your ship with FA off. However, this means that the ship’s orientation can be different from its current velocity. Your current velocity is indicated by the direction and speed of the “space dust”.
FA off can be quite useful during a dogfight, allowing you to travel in one direction and shoot in another. It also potentially allows for quicker turning and a few fancy manoeuvres, which I won’t go into here. To learn more, check out Look Inverted’s Flight Assist On & Off video tutorials.
7. Docking
Docking is something you will need to become proficient at as you’ll be doing it constantly. Plus, being able to enter a starport at speed is crucial to avoiding scans for criminal status and illegal cargo.
Facilities you can dock at include:
- starports (most common)
- orbital outposts
- some megaships and space installations
- planetary ports (Horizons only)
- player-owned fleet carriers (jump to section on fleet carriers)
Before you can land, you need to get within 7.5km of the facility and then request docking permission via the contacts tab of the targets panel. Trying to dock without permission will earn you a fine and eventually obliteration (the space traffic control guys don’t mess around!).
When permission is granted, you’ll be designated a specific landing pad, the location of which will be indicated by the nav compass on your dashboard. If permission is denied, you may have to wait patiently until a free pad becomes available.
How you proceed after gaining docking permission depends on the type of facility:
1. Starports: These come in a variety of shapes and sizes, but the principal for docking is always the same. The entrance, or “mail slot”, will usually be facing towards the planetary body the station is orbiting. When flying through the mail slot, you’ll need to match its rotation — especially in larger ships. Go through the green side of the slot to avoid oncoming traffic.
Once inside, your ship will automatically correct its orientation to match the rotation of the station. For extra fun, rotational correction can be turned off through the ship tab of the systems panel (you can also bind a key for this). And for those looking for a challenge, try combining this with FA off!
2. Orbital outposts and megaships: These are small orbital platforms where you land on an exterior pad. They do not rotate. As such, they are generally easier and quicker to dock at. However, they often have fewer facilities available than at starports (check the system map for details).
3. Planetary ports: Only players with the Horizons expansion can land on planets. Docking at planetary ports is covered in the Planetary flight and landing section.
Regardless of where you’re docking, always watch for oncoming traffic (check your scanner!) and don’t block the mail slot or loiter over other pads. Otherwise, you may land a fine or worse — stations resort to quite drastic measures when dealing with “blockages”!
When over a landing pad, your scanner will change to display a schematic of your ship relative to the pad. You need to line up the centre of your ship with the centre of the pad and then touch down. Your ship also needs to be facing forwards on your scanner — you can’t land if you’re facing the wrong way!
Remember to lower your landing gear first. Doing so also reduces your max speed and prevents you from accidentally boosting.
Some general docking tips:
- lateral and vertical thrusters are your friends; use forward and reverse thrusters for minor adjustments
- it’s generally not a good idea to boost inside the starport or when going through the slot
- if you’re worried about collisions stick 4 pips to systems (i.e shields) and 2 pips to engines (you don’t need power to weapons when not fighting)
- crashing into another ship while “speeding” (>100m/s) can land you a fine or even a murder bounty if you manage to destroy them; so it’s generally a good idea to avoid unnecessary speeding

7.1 Docking computers
To make landing easier, there are two types of docking computer available to purchase from the outfitters (under flight assist modules):
- standard docking computer: assists with landing
- advanced docking computer: assists with both landing and launching
Both of these computers fully automate the landing process and kick in as soon as docking permission is granted and throttle is set to zero. They work for all types of facility. As an added bonus, you also get to listen to Strauss’ Blue Danube for a bit of classic Elite nostalgia.
The advanced docking computer will also automate taking off and leaving the facility.
You can disable autodocking and autolaunching at any time through the flight assistance subsection of the ship tab in the systems panel.

Both types of docking computer take up a class 1 internal slot, so you’ll need to decide whether it’s worth installing one. Besides, once you’ve got the hang of the flight controls, docking really is not that difficult. Manual docking is often much faster and can be essential if you need to avoid those pesky authority scans.
That said, flying larger, less agile ships through the mail slot can sometimes be a pain, so docking computers definitely have their uses. At the end of the day, installing one is a matter of personal preference (I don’t bother with them myself).
8. Supercruise, interdiction, and low and high waking
Supercruise is the mechanism for travelling within star systems — distances to starports and points of interest (POIs) can be enormous. I mean, you may think it’s a long way down the road to the chemist, but that’s just peanuts to space.
Trust me, you’ll be spending a lot of time in supercruise. Essentially, it’s a faster-than-light mode and works in similar a vein to normal flight with FA on, but with no reverse, lateral or vertical movement possible. Careful control of acceleration and deceleration (the computer assists you in both) is required in order not to overshoot your destination.
The trick to supercruise is following the infamous “6-second rule”:
- lock onto your destination and set throttle to 100%
- when you are 6-seconds away (or just before) drop the throttle to 75%
- simples 🙂
This way you will never overshoot. When both lines are in the blue zones of the alignment scales in the target panel, the “Safe Disengage” message will appear above your scanner and pressing the supercruise key drops you at your destination.
Alternatively, you can install the supercuise assist module (see 8.1 below), which partially automates travelling to a location in supercruise.

Possible destinations are listed in the navigation tab of the systems panel and can be filtered by type. The icons to the left of the destination give an indication of possible activities that you can engage in there. Clicking on a specific location will bring up more details.
Further information about planetary bodies, starports and the system, in general, can be viewed in the system map, which can be accessed via the navigation tab or through the galaxy map. I strongly recommend setting up a hotkey for quick access to the system map.
Points of interest (POIs) such as navigation beacons, tourist beacons, installations, megaships, and resource extractions sites are permanent. Other POIs such as conflicts zones, military checkpoints, distribution centres, etc are dependent on the political and economic situation of the system, which will change over time.
A set of unidentified signal sources (USSs) will also spawn randomly whenever you enter a system (jump to Unidentified Signal Sources (USSs) section).
Transitioning to supercuise is known as low waking, because you leave a low energy wake behind. These wakes can be targeted and travelled to, allowing you to follow other ships in and out of supercruise.
General supercruise tips:
- even with 0% throttle, you will still be travelling at 30km/s
- to safely disengage from supercruise you need to be travelling less than 1000km/s
- if travelling over 1000km/s, you can perform an emergency stop at any time by double pressing the supercruise key, but this will cause minor damage to your ship and its modules
- keep your distance from stars and planetary bodies, etc, as these will slow you down (bloody gravity!) and if you get too close your ship will automatically perform an emergency stop
- orbital lines can be turned off in the ship tab of the system panel (you can also bind a key for this)
- obscured destinations will appear as grey hashed circle in your HUD
- the frame shift drive (FSD) is responsible for both supercruise and hyperspace jumps; however, you can bind separate keys for both
- if you’re a real glutton for punishment, why not take a trip out to Hutton Orbital in Alpha Centauri; don’t forget to buy a souvenir mug when you land 😉
8.1. Supercruise assist
The supercruise assist module semiautomates flying to a location while in supercruise.
To use supercuise assist:
- click on a destination from the navigation tab to bring up more info about the location
- click on the supercruise assist icon (second from left at the bottom)
- align your ship with the target destination
The module will then take over flying the ship and will automatically drop you out of supercruise when you reach the destination. You can deactivate supercruise assist at any time by heading back to the destination’s info screen in the navigation tab.
If you prefer, you can also set supercruise assist to manual throttle in the ship tab of the right-hand panel.

For surface locations, supercruise assist will only take you as far the planet’s orbit. You’ll need to take the ship down to the surface yourself (jump to planetary flight and landing section).
A useful feature of the supercruise assist module is the hyperspace dethrottle function. This automatically sets your throttle to 0% when you exit hyperspace and prevents you from getting too close to the star.
However, like the docking computer, the supercruise assist module takes up a class 1 internal slot. It’s generally also quicker to use the 6-second rule for getting about in supercruise.
8.2. Interdiction and low and high waking
Interdiction allows pilots to force other ships out of supercruise and into normal flight. It requires a special module, which is installed in an optional internal slot. This module needs to be assigned to a fire group and is activated using the relevant fire button, but first, you must get close enough to your target and approach from behind.
This triggers a mini-game where the aggressor has to remain on the tail of the target ship for success; the victim can evade interdiction by remaining aligned with the escape vector. Be warned, pulling a clean ship out of supercruise will land you a 400cr fine (jump to Crime and punishment section).
A successful interdiction results in both ships taking damage and spinning out of control as they enter normal flight. The aggressor will also take damage and drop out of supercruise if they lose the battle, whereas a successful evader will carry on in supercruise unharmed. As a safer alternative to interdiction, you can follow ships in and out of supercruise by targeting and travelling to the low energy wakes they leave behind.
When being interdicted, you can “submit” at any time by setting the throttle to 0%. This way you receive no damage, have full control of your ship when you drop out, and the FSD cooldown timer will be much reduced. More importantly, it leaves you in a much better position for both fighting and fleeing.
When fleeing from a larger ship in normal flight, it is always much quicker and safer to jump to a new system. This is known as high waking. Larger ships will mass lock your ship when you attempt to transition to supercruise (low waking), significantly increasing the time it takes for your FSD to charge. You never get massed locked when high waking.

9. Hyperspace, FSD supercharging, and the galaxy map
Hyperspace is the mechanism for jumping from one system to another. It is also known as high waking, because you leave a high energy wake behind after jumping.
The distance you can jump is dependent on the type of ship and its total mass, frame shift drive (FSD) class/rating, and available fuel. You can significantly increase jump range by:
- upgrading or engineering your FSD
- installing a Guardian FSD booster (only available from Technology Brokers)
- installing lighter modules
- carrying less fuel
- emptying your cargo hold
Journeys are planned through the galaxy map, but you can also select nearby systems quickly via the bottom of the navigation tab. The galaxy map allows you to plot multi-jump routes of up to 20,000LY. Remember to select between economical and fastest route computation via the route tab. It’s far more fuel efficient to perform multiple short jumps than a single long-distance jump, but doing so will dramatically increase journey time.
When plotting a route: a solid line indicates you have enough fuel to make the jump, whereas a dashed line means you have insufficient fuel (see screenshot below). If you have a fuel scoop, the plotted route will also indicate the last scoopable star.

The galaxy map also features:
- a search function
- the ability to display trade routes (jump to trading section)
- the ability to filter systems by things like allegiance, economy, government, state, security, station services, trade data availability, and star class; these filters can be applied to the route plotter in real time.
You will also be informed of a system’s security, economic state and star class on your HUD just prior to jumping. And don’t forget to bookmark your favourite systems!
It is important to properly plan your journeys, especially if you have a small fuel tank. For long trips, you may want to consider installing a fuel scoop (jump to exploration section).
Oh, and don’t try to supercruise from one system to another; it’s not actually possible and you will run out of gas trying.
If you do ever run out of fuel and get stranded, don’t hesitate to contact the Fuel Rats. These selfless heroes will dispatch a ship to refuel you and get you back on your way.
General hyperspace tips:
- it’s worth setting a hotkey for quick access to the galaxy map (M is a great choice!!!);
- jumps can be cancelled, up until the drive finishes charging, by pressing the relevant key a second time
- an FSD cooldown timer will appear underneath the fuel indicator after jumping
- your ship will heat up while the FSD is charging so you may need to allow your ship to cool between successive jumps or move away from that giant ball of fire you’re orbiting (jump to Combat and weapon fundamentals section)
- you don’t get mass locked by other ships when hyperspace jumping (high waking), but you do when transitioning to supercruise (low waking); therefore if being chased by a hostile, it is usually quicker/safer to jump to a new system than enter supercruise
- with a wake shift scanner, you can analyse high energy wakes to follow pilots through hyperspace
- if you have a binding for 0% throttle, pressing this key while going through the hyperspace animation will stop you accelerating into the star when you finally exit the jump; alternatively, the supercruise assist module does this for you automatically if you have hyperspace dethrottle set to on.
9.1. Supercharging your FSD
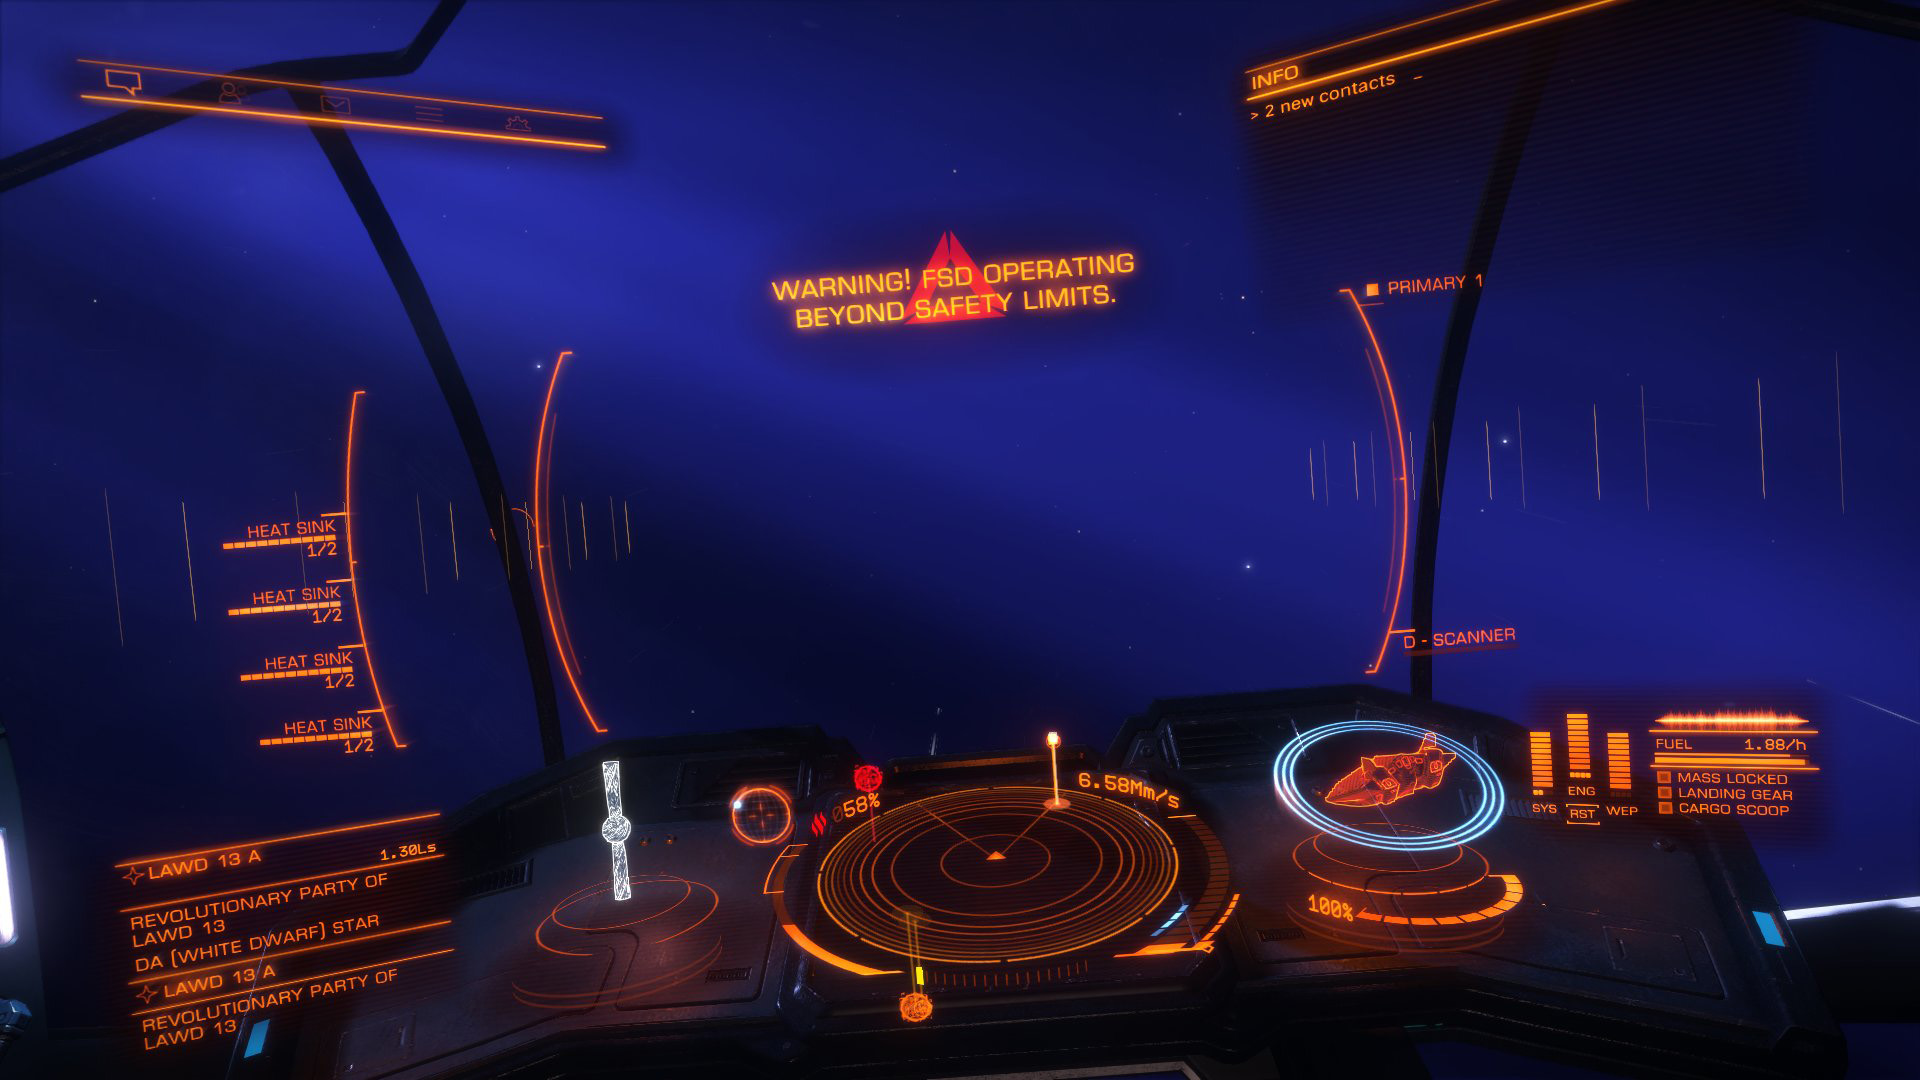
If you’re feeling brave, you can attempt to “supercharge” your FSD at white dwarfs and neutron stars, a process that can potentially triple the range of your next jump. Be warned, it’s risky and it will cause minor damage to your FSD. If it goes wrong you could also seriously damage or destroy your ship. You also need an active fuel scoop.
To begin the process, simply head into one of the polar jets while in supercruise. You’ll be warned that your FSD is operating beyond safety limits and your ship will become difficult to control. It takes a little while, but you’ll be notified when the supercharge is complete. Leave the polar jet and then check the galaxy map to see what the range of your next jump will be.
The trick is to fly slowly and remain as far from the star as possible. If you drop out of supercruise, your ship will start spinning out of control, heating up and taking damage. Without a stack of heat sinks, you’ll be lucky to survive. White dwarfs seem to provide around a 50% boost and neutron stars around 300%.
You can also boost a single jump by up to 100%, if you have the right materials, using the FSD injection recipe in the synthesis menu (Horizons only; jump to Synthesis and materials section). However, the supercharging and FSD injection processes cannot be combined, that would just be silly!


10. Ships, modules, and power management
New ships are purchased from shipyards and new modules via the outfitting menu. Note that these facilities are not always present at smaller outposts (check the system map for details) and that the availability of ships and modules varies considerably from system to system. Generally, high populations systems with a high-tech economy are your best bet. However, Sola Prospect in the Brestla system and the Jameson Memorial in the Shinrarta Dezhra system (permit required) always stock all ships and modules. Convenient!
When buying a new ship or module, you will be given the choice to either store or part exchange the old one (jump to Ship transfer and module storage section). You can experiment with different ships and module loadouts using the online tools at EDSY and Coriolis.
Before buying and outfitting a new ship, it’s important to think what do you actually want to do with it. Some ships are dedicated fighters (Eagle, Viper, Vulture, etc), others dedicated haulers (e.g. Hauler, Type-6, Keelback). Some are better suited for exploration (e.g. Diamondback and Asp Explorers, Krait Phantom), some perform well as multi-role ships (e.g. Adder, Cobra, Imperial Courier, Python). Multi-role ships are well suited to things like mining, pirating, and taking on a variety of missions, or just generally being a jack of all trades.
From the outfitting menu, ship modules are broken down into several main categories:
- hardpoints — weapon systems
- utility mounts — scanners, countermeasures, shield boosters
- core internal — essential components such as thrusters, power plant, FSD, bulkheads, etc
- military compartments — a subset of core internal and only available in some ships; these provide additional slots specifically for hull and module reinforcement packages and shield cell banks
- optional internal — this is where the majority of modules are installed, such as shields, cargo racks, fuel scoops, limpet controllers, passenger cabins, etc, etc
- livery — cosmetic and naming features (i.e. skins, decals, nameplates and bobbleheads) for your ships and auxiliary vehicles; these are pruchased using ARX (jump to ARX and the in-game store section), a virtual currency that can be bought in bundles from the Elite: Dangerous store.
Modules and module slots come in different sizes, with class 1 being the smallest (and lightest) and class 8 the largest (and heaviest). Larger slots are compatible with smaller modules. In general, modules are also rated A to E, with A being the best and most expensive and E being the cheapest and least effective. And, within a specific class, B-rated modules are always the heaviest and D-rated the lightest; A, C and E will all have the same mass and integrity.
Note that this rating system does not apply to all module types. For instance, all cargo racks are E rated and hardpoints are rated according to size and targeting system (jump to Combat and weapon fundamentals section).
10.1. Module power management
Each ship has a total power capacity based on the output of its power plant, and bigger and better modules need more juice. If this capacity is exceeded then modules will be turned off automatically according to the priority set (1-5) in the modules tab of the system panel (see screenshot below). Modules assigned a lower priority (higher number), will be switched off first. You can also choose to manually deactivate modules not currently in use. Don’t forget to turn them back on when needed and remember that most modules have a bootup time.
As weapons and scanners only require power when deployed, it is possible to exceed the total capacity of your power plant (within reason) with careful management and planning. For instance, modules such as the FSD, interdictor, fuel scoop, cargo hatch, etc, are not used during combat, so by assigning them a low priority, they will be automatically disabled when you deploy hardpoints, freeing up the power needed for your weapon systems.

11. Combat vs. Analysis Mode
As of Beyond 3.3, there are two main HUD modes: Combat Mode and Analysis Mode. To switch between these two modes, you need to bind a key for “Switch HUD mode” under the “Mode Switches” section of the control options.
The main differences between these two modes is in which equipment you can use:
- Combat Mode (central HUD = orange) is the default mode. Weapons and combat-related scanners, such as the kill warrant scanner, can only be used when in this mode.
- Analysis Mode (central HUD = blue). Mining equipment and exploration scanners, such as the FSS and DSS, can only be used in this mode.
However, most other modules can be used in both modes. The HUD will tell you to switch modes if you try to use something that doesn’t work in your current mode. Depending on the context, Analysis Mode may also display different information and overlays on the screen, such as planetary grids.
12. Combat, weapon and distributor fundamentals, and repairing damage
You will generally want to avoid combat until you can afford some more effective weapons/modules or a better ship. You certainly won’t want to take on anything bigger than a Cobra in your Sidewinder, or ships working together in a wing.
That said solitary NPC ships are generally not very challenging and you’re not really losing anything if your free Sidewinder gets wrecked (jump to Death and insurance section).
Be aware that the skill of NPC pilots and the strength of their loadout correlates directly with their combat rank (see ED Wiki for a list of pilot federation ranks). However, low ranking Commanders are less likely to encounter high-ranking NPCs.
Generally, to destroy another ship, you need to knock out its shield and reduce the hull integrity to 0%. Ideally, you want to be on your opponents tail as much as possible; throttle control is very important, once you get on a target’s tail you need to closely match their velocity in order to stay there. Obviously, this is easier to do in a more agile ship.
12.1. Fire groups
To use weapons and scanners, they must first be assigned to a fire group via the systems panel. However, some countermeasures can also be given a hotkey and therefore don’t actually need to be assigned to any fire group to be used. For each fire group, you can set individual weapons or utilities to either primary fire, secondary fire, or none. Multiple groups can be created and these are cycled through sequentially when you press the fire group key. Current weapon groupings are displayed on your HUD if your hardpoints are deployed.

12.2. Combat loadouts
Weapons are installed at hardpoints and are rated by size/class:
- small = class 1
- medium = class 2
- large = class 3
- huge = class 4
Generally, larger weapons do greater damage and penetration, but cost more, require extra power, generate additional heat, and put a bigger drain on your distributor. Utility mounts are used for installing scanners, countermeasures, shield boosters, and heat sinks. For further details about weapon and utility types, classes and ratings see the weapon guides on the Elite: Dangerous Wiki.
In terms of weaponry, lasers are best for taking down shields but overheat more quickly than kinetic weapons. Burst and beam lasers have a higher DPS (damage per second) than pulse lasers, but require more power and cooling, and will heat up your ship more quickly.
Projectile/kinetic-based weapons (e.g. multicannons, canons, fragment cannons) will wreak havoc on an unshielded hull, but require ammo. Projectiles also have a travel time, so you need to lead targets — the HUD will show you where to aim.
Railguns and plasma accelerators are more specialist weapons, effective for both shields and hull, but are generally expensive; they have limited ammo, longish reload times, high power consumption, produce a lot of heat, and require practice for effective use. Missiles are good for targeting subsystems but are expensive, limited by small ammo capacities, and can be thwarted by countermeasure (see below). Mines are more of a defensive option and useful for hindering pursuers.
AX class weapons are intended for fighting the thargoid aliens.
For flexibility, it’s often best to have a combination of different weapon types. However, this is not as essential as it used to be thanks to the ability to engineer modules.
12.3. Fixed, gimballed, or turreted?
Many weapon types also come in fixed, gimballed, and turreted flavours. This affects how they are aimed and used.
Fixed weapon variants must be aimed manually, essentially by pointing the nose of your ship at the target — or slightly leading them if using kinetic weapons. Note that, depending on the hardpoint placement on your ship, your weapons may not all converge to a single point.
Gimballed weapon variants are semi-automated and auto track targets within a limited radius, meaning all you have to do is get the target in front of you and press fire. These are very useful on less nimble ships or those with less effective hardpoint placement or convergence. However, they do reduced damage per hit compared to their fixed counterparts and some gimballed variants have increased distributor draw or reduced clip sizes and/or increased reload times. They’re also less reliable at range and their ability to target accurately can be temporarily disrupted by chaff.
Turreted weapons are fully automated and have a wide targeting arc, allowing them to also engage enemies that are not directly in front of you. But, they have the least damage and accuracy of the three flavours and are also affected by chaff. They are more of a defensive solution and better suited to large ships with numerous hardpoints.
Turrets must be assigned to a fire group and are activated by pressing fire once. If you switch to a fire group in which the turrets are not present, they will stop firing. They can be configured via the ship tab of the systems panel to:
- target only = engage your current target only
- fire at will = engage any hostile target within range
- forward fire = work like fixed, manually-fired weapons
12.4. Utilities and countermeasures
These modules are installed in a utility mount slot. Scanners must be assigned to a fire group and are fired like weapons. Countermeasures can be assigned to a fire group or activated by a hotkey.
Available utilities and countermeasures include:
- kill warrant scanner — scans target for bounties linked to the current jurisdiction’s superpower allegiance
- manifest scanner — scans target for cargo
- wake scanner — scans high wakes to determine jump destination
- pulse wave scanner — scanning highlights high-value asteroids
- chaff — temporarily disrupts targeting of gimbals and turrets and possibly missiles, requires ammo
- ECM — breaks missile locks and counters limpets; 10-second cooldown
- heat sink — temporarily dissipates all heat from the ship; requires ammo
- shield booster (passive) — strengthens shield by a set percentage and stacks additively; fill unused slots with the highest rated you are capable of powering and can afford
- point defence turrets (passive) — attempts to shoot down incoming missiles and hatch breakers; requires ammo; these do not need to be deployed or assigned to a fire group
12.5. Distributor management
The secret to dogfighting is good power distribution management. Firing your guns drains the weapons capacitor, replenishing your shield drains the systems capacitor, and boosting drains the engines capacitor. There is a total of 6 pips to be allocated between the three capacitors; a max of 4 pips can be placed in any one.
Allocating more pips increases the recharge rate of that capacitor:
- for sustained firing, put more pips into weapons
- if you’re under fire, putting more pips into systems will significantly strengthen your shields; however, this has no effect on replenish or reactivation rates (unless the capacitor empties).
- if you’re in pursuit or trying to make a hasty retreat, you will need to put more pips into engines – this increases your max speed, manoeuvrability and boost recharge rate

12.6. Shields and SCBs
Shields slowly replenish when not being hit. Once the shields are down, they will take a while to reboot and come back online; the bigger the shields, the longer this will take. Shields reactivate and replenish twice as fast when in supercruise, and even quicker when docked.
Knocked out shields can be “bump-started” by running the reboot/repair sequence in the ship tab, significantly reducing downtime. However, this is of no use during combat scenarios as you need to be travelling <50m/s and must avoid being hit for it to work. Shields will also protect you from collisions.
Shield cell banks (SCBs), installed in an optional internal slot, can partially or fully restore active shields in a short space of time. But, they also generate significant heat when triggered (that can damage your modules) so you may need to also simultaneously deploy a heat sink. You can install multiple SCBs — keep one powered-up in the modules tab and switch between them as they run out of “ammo”.
12.7. Module damage, targeting subsystems and heat
Once a ship’s shields are down, modules will start taking damage if directly hit. In fact, specifically targeting subsystems can be a very effective tactic. You can lock onto subsystems of a targeted ship either via the “sub-targets” tab of the targets panel or by cycling through them using a hotkey.
Damaged modules have a chance of malfunctioning and if completely destroyed will cease to function altogether. For instance, disabling drives can leave a ship stranded; whereas taking out the powerplant halves their power output, which can potentially leave them stranded and/or defenceless. Knocking out the powerplant also has a small chance of instantly destroying the ship.
However, this applies to your own ship as well, which is why it’s very risky to continue fighting after your shields go down. Always know when it’s time to do a brave Sir Robin!.
Also, if your canopy is shot out, you’ll switch to emergency life support and lose some HUD functionality. With only an E-rated life support module, that gives you just 5 minutes to get to a starport. Note that if you have Horizons, with the required materials, you can actually synthesise oxygen to top up your life support (jump to Synthesis and materials).
Modules also take damage from excessive heat. This can be from getting too close to a star, being attacked by certain engineer-modified weapons, boosting too much, and the heat generated from firing your own guns. You will receive a warning when close to the temperature damage threshold; beyond this, internal modules will start taking damage, increasing the chance of malfunction. One way to counter this is by popping a heat sink.
12.8. Repairing your ship in space
Your ship and its modules can take a lot of damage and still be fully functional. Generally, though, you will still want to head to the nearest starport and get it fixed pronto. However, ship modules can also be repaired in space using an auto field-maintenance unit (AFMU).
The AFMU is a module itself and takes up an internal slot. It consumes “ammo”, takes time to do its job, and temporarily disables the target module. The AFMU is activated in the module power management tab and is fairly straight forward to use. It cannot repair the power plant, nor can it repair the hull or canopy. However, if you have two AFMUs, they can be used to repair each other. AFMUs are not so useful for combat-orientated ships but they can come in handy for long exploration expeditions.
To repair the hull/canopy you need repair limpets. These work in much the same way as collection and fuel limpets (jump to mining and collection drones). They require a repair limpet controller (internal slot), a supply of programmable limpets (which take up cargo space), and must be assigned to a fire group. When launched, they will slowly repair the target vessel. If no target is selected, they will fix your own ship. Once again, these are of little use during combat and generally more suited to intrepid explorers.
If your thrusters or FSD get destroyed and you don’t have an AFMU, then you’re pretty much up shit creek without a paddle. However, as a last desperate measure, you can run the emergency repair sequence (“reboot/repair” in the functions tab), which will cannibalise non-essential modules in order to fix your drives. This will take a little time and you will be entirely at the mercy of any hostiles. Failing that, you can always self-destruct 🙂
13. Ship transfer and module storage
13.1. Ship transfers
It is possible (and fun) to own multiple ships — up to 30 per station I believe. These can be stored, free of charge, at any starport or planetary port with a shipyard. For a fee, it is possible to request the transfer of a remote ship to the port you’re currently docked at.
The cost and duration (in real time, bot game time) of this procedure is dependent on ship type and distance and can get quite expensive and lengthy. Generally, it will be quicker to fly it yourself. If money is an issue and you want all your ships in one place, then you can always purchase a cheap ship as a taxi and sell it when you switch to the stored ship. It is also possible to sell stored ships remotely.

13.2. Module storage and transfers
In a similar manner, it also possible to store up to 120 modules. This is particularly useful for changing or trying out new loadouts, especially if your modules have been modified by an engineer (Horizons expansion only, jump to Engineers section).
When purchasing a new module you will be given the choice to either store or part exchange the old one (if present). When you select an installed module in the outfitting menu, the “Transfer Options” drop-down allows you to store it or you can swap it with either another installed module (“Swap”) or one presently stored at that station (“Transfer”).

All your stored modules can be reviewed via the outfitting menu, where it is also possible to select and store multiple non-essential modules from your current ship — essential modules include things like cargo racks that are in use, your power plant, and thrusters.

Remotely stored modules can also be transferred to your current station. Like ship transfers, this takes time and money, dependent on type and distance.

14. Death and insurance
Good news: there’s life after death — brace yourself: it’s just a game, you’re not actually Jesus. Following ship destruction, you’ll magically respawn at either a nearby starport or the last one you docked on.
You’ll also be presented with the “rebuy screen”, where you’ll be given the option to buy back your old ship plus upgrades for a fraction of the total cost (around 5%). If you can’t afford this or choose not to pay this, then it’s back to the free Sidewinder. The bad news is you lose all cargo, exploration data, bounty claims and combat bonds. Materials and any stored ships or modules will be safe.
Your current rebuy cost is displayed in the home tab of the systems panel. I can’t stress this enough: ALWAYS make sure you keep at least this amount in reserve. Ideally, two or three times this in case you have a run of bad luck. You’ll also still need to be in a position to purchase cargo, fuel, and munitions following respawn.
However, if you can’t afford the insurance fee, the game does offer a loan of up to 600,000cr (more if you increase any of your Pilot’s Federation ranks) to enable you to buy back your old ship. If you do take this option, 10% will be deducted from all credits you make until the loan is paid back.

15. Crime, punishment, and system security
It’s not very difficult to get on the wrong side of the law in Elite: Dangerous. You can receive a fine for simply loitering inside a starport, flying recklessly, or accidentally discharging your weapons within a no-fire zone. More serious crimes, such as assaulting or murdering clean ships, will result in a bounty being issued and you will become wanted.
You can also receive a “reckless weapons discharge” fine for friendly fire during dogfights, i.e. accidentally hitting a clean ship that’s not your current target. Repeated offences against the same target will result in you being given an assault bounty. This is something to be aware of when bounty hunting in busy locations.
15.1. Criminal status
Criminal status is subject to the jurisdiction, so you’ll only ever be wanted whenever you travel through space controlled by a faction that has issued a bounty against you — the word “wanted” will appear above your fuel gauge in the bottom right corner of your screen. There can be multiple jurisdictions in any one system. A wanted status is a green light for anyone to legally attack you including NPC bounty hunters, authority ships, and other players. However, you cannot be lawfully attacked for simply have a fine.
Current bounties and fines can be reviewed under the transactions tab, whereas those relevant to the current system will be displayed under “reputation” in the status tab. Be aware that random scans are performed on ships entering and leaving starports, so if you are caught with a criminal status you’ll be vaporised before you can say “bollocks” (jump to Pirating, smuggling, and silent running section).

All fines and bounties are attached to the ship you committed the offence in — the ship and all its modules become “hot” (“It weren’t me officer, it was the ship that done it! I’m telling ya, that thing is evil, pure evil!”). By switching to another ship, you leave behind all fines and bounties associated with it until you swap back again.
If your ship accrues five or more bounties issued by factions affiliated with the same superpower, a superpower bounty will be issued. This means that your ship will be hot in all systems aligned to that superpower. Also:
- hot modules can be stored, but cannot be transferred to a clean ship
- stored hot modules can be cleaned for a fee at any port
- hot ships can still be transferred, but at a greater cost and not to anywhere it would be wanted
- hot ships and modules can be sold at a greatly reduced value (25% of the normal sell value)
- unpaid fines never turn into bounties
- fines and bounties never expire

15.2. Notoriety
As well a bounty, players also receive a notoriety rating for killing other ships. This is a value between 0 and 10 that increases by 1 with each new murder, but decreases by 1 for every two hours of goody-two-shoes behaviour (active gameplay not real time). Notoriety is linked to the player and not the ship.
The higher your notoriety, the higher the value of the bounty on you will be — this is based on a fraction of your ship’s rebuy cost. It becomes more complicated if you kill another Commander (as opposed to an NPC). For each notoriety point, your bounty will increase by 10% of the difference of your respective rebuy costs. If the victim’s rebuy cost is lower than yours, then the increase will be zero.
Apparently, this convoluted system is to discourage Commanders with large ships attacking those with smaller ones. Not that it really acts as much of deterrent to dedicated player killers!

15.3. Power bounties
The bounty system is different for crimes perpetrated in a Powerplay context (jump to PowerPlay section). Murder or assault committed between Commanders pledged to separate powers will result in power bounties instead of normal ones. These can only be detected and claimed by Commanders pledged to the issuing power.
Authority ships will ignore power bounties. Power bounties do not affect your docking privileges. Power bounties are cleared when you get fragged by someone from an opposing power. They are also cleared when you leave or defect from a power.
15.4. Docking with a hot ship and paying off fines and bounties
When flying in a hot ship, you’ll have reduced privileges when docking at a port in a jurisdiction in which you’ve unpaid fines and bounties. You will still have access to security contacts, refuelling, the black market and active missions, but all other services will be unavailable, including repairs. If you only have fines, these can be paid off at the security contact to immediately restore full access.
However, bounties must be paid off at an Interstellar Factors Contact. This can only be done so if your notoriety is zero and in a jurisdiction where your ship is not wanted. Clearing all associated bounties removes the hot status from your current ship and all its fitted modules.

The Interstellar Factor Contact can only be found in low-security and anarchy systems (use the filter on the galaxy map to find). They can also be used to pay off fines and collect bounty claims or combat bonds that relate to any system or jurisdiction, for a 25% commission, of course.
15.5. Crime and death
If you’re flying a hot ship through a jurisdiction where you are wanted and get destroyed by someone (NPC or human) who has detected your criminal status, you will respawn at the issuing faction’s nearest Detention Centre. You will then need to pay off any bounties or fines relevant to that jurisdiction on top of your rebuy cost. If you have outstanding fines and bounties in other jurisdictions, these will remain active and your ship and modules will still be hot.

15.6. System security and the ATR
There are four levels of system security: high, medium, low, and lawless/anarchy. This relates to the amount of time it takes for the authorities to respond to a crime. So, if you get attacked in a high-security system, the cavalry will appear on the scene fairly quickly (10 seconds) but will take ages to show up in a low-security system (4 minutes). There is no rule of law in anarchy systems and therefore no police response at all.
As such, some systems are far safer to travel through than others, while those wanting to indulge their violent misanthropic fantasies will fare better in low-security and anarchy systems. By disabling “report crimes against me” (in the ship tab), the cops will not show up at all if you get attacked, which can be useful if you’re wanted or carrying illegal goods. However, they’ll still turn up if you start wasting clean ships. There’s also no police response at hazardous resource extraction sites or compromised navigation beacons, though any crimes you commit will still be recorded.
Commanders on a murder spree may find themselves having to deal with Advanced Tactical Response (ATR) ships. Like some kind of intergalactic SWAT team, these are bad-ass authority ships packing some serious firepower. These guys will show up if you commit enough crimes in a single jurisdiction; the trigger threshold is related to the system security level. They will continue to respond to any crimes you commit until you leave the system.
16. PvP, PvE, and being interdicted/attacked by other players
The Elite galaxy is a very big place and not everyone plays in Open, so outside of popular destinations and concentrated pockets of inhabited space, encounters with other Commanders tend to be relatively infrequent.
Other players will show up on your scanner as a hollow cube or triangle. If you do see someone, don’t panic — most will totally ignore you and leave you to go about your business in peace. Others may greet you or even initiate a little friendly chit-chat. However, you may occasionally encounter players who will attempt to interdict and/or attack you.
PvP (player vs. player) is a legitimate and fun part of the game, and there are several reasons why another Commander might wish to engage you, such as:
- You have an active bounty
- Your PowerPlay allegiance
- Piracy
- Various roleplaying reasons
- You’re fighting on the opposite side in a conflict zone
- They’re looking for a dogfight
As with all online games, they’re some players who are just out for cheap lolz and will specifically target new players and other vulnerable prey for easy kills. Unfortunately, the current crime and punishment implementation lacks teeth and provides little deterrent for wannabe murderers.
If you do get interdicted or attacked, you have three main options: fight back, comply with any demands they make, or leg it.
16.1. Fighting back
PvP combat is a whole different ball game to fighting NPCs. PvPers tend to fly around in dedicated combat-ships fitted for the sole purpose of fighting other Commanders. With the right weapons and Engineer modifications, they can potentially disable or destroy even the biggest and most heavily-shield ships very quickly. Succeeding at PvP not only requires the right ship and loadout, but also knowledge of more advanced flight manoeuvres, tactics, and whatever the current metagame is.
As a beginner, fighting back is probably best well avoided until you have more experience and knowledge of the game, especially if you don’t have a lot of cash to spare or the time to sink into Engineer modifications.
16.2. Complying with their demands (if any)
Sometimes players will make demands of you. Bounty hunters and pirates will typically order you to cut your engines and stow your weapons while they scan you for active bounties or tasty cargo. The latter may then demand some or all of what you’re carrying. Generally, if you’re a good boy or gal, they’ll let you leave in one piece. If you’re in a slow and cumbersome ship or they’re in a wing, this is probably going to be your best hope of not seeing the rebuy screen.
16.3. Running
Some players will frag you no matter what, and if you’re outnumbered or not properly equipped for a fight, then your only choice is to skedaddle promptly (i.e. flee)!
If you’re feeling confident, you could try to win the interdiction battle (jump to Supercruise, interdiction, and low and high waking). Alternatively, you can submit to the interdiction attempt, then keep boosting until you can high wake out of there. Don’t make it easy for them by flying in a straight line — keep changing direction and try to be unpredictable in your movements.
You can improve your survival chances by using chaff to break gimbal locks and heat sinks and ECM to break missile locks. Point Defence Turrets (PDTs), which don’t need to be deployed and automatically engage enemy missiles and limpets, can also buy you precious seconds. And don’t forget to put all your power distributor pips into your thrusters and shields.
In general, if you’re worried about being attacked, then make sure you have a high-wake destination pre-selected. If you do this through the Galaxy Map and use the “plot route” option (as opposed to merely selecting a system), you can switch back to targeting your high-wake destination at any time using the “target next system in route” key (you need to bind a key for this first in the control options!).
Of course, having a fast ship also helps! See Coriolis EDCD for a table of ship stats. If you have Horzions, then dirty drive tuning can make a huge difference to your maximum speed and boost capability.
16.4. Station rammers
Another thing to be aware of is station ramming. This is a lame player-killing tactic that abuses station collision rules. Its perpetrators fly disposable, unshielded ships (e.g. Sidewinders) that they have deliberately damaged in order to get the hull down to just a few percent. They hang around popular stations and will attempt to kamikaze into Commanders travelling above the speed limit (over 100m/s), resulting in the victim receiving a murder bounty and being instantly obliterated by the station’s defences.
Rammers may also use silent running to avoid appearing on your scanner. Fortunately, evading the trap is simple: always make sure you are travelling at less than 100m/s when in and around stations (i.e. within the no-fire zone). The HUD will warn you if you’re speeding.
16.5. Don’t be put off!
If you do get attacked/destroyed by another Commander for what seems like “no reason”, don’t immediately be put off from playing in Open. I play almost exclusively in Open and my experience of interacting with other players has largely been positive. That said, there are certain regions of space where you should definitely be more on guard, including:
- starting system regions (i.e. around LHS 3447 and Asellus Prime)
- active Community Goal systems
- recent or current story event locations, e.g. crash sites, alien discoveries, generation ships, etc
- systems being focussed on by PowerPlay campaigns
- popular destinations such as Engineer bases, the Sol System, Shinrarta Dezhra, etc.
These are the busiest player locations in the game and tend to be magnets for Commanders seeking out cheap kills, with Community Goals probably being the worst for this. You should be even more wary of travelling through these systems if you have an active bounty or are allied to a hostile PowerPlay faction. Also, trade ships are likely to attract more attention as they’re sought after by pirates and make easy prey for player killers. Oh, and don’t be fooled by a system being labelled as “high security”, this offers little protection from dedicated player killers.
If you’re genuinely worried about travelling through these systems, but still want to play in Open, then you might want to consider forming a wing (I still need to add a section on Wings to this guide!) — safety in numbers and all that. You can hook up with potential wing mates in-game by joining a Squadron. Outside of the game, you can find friends through the:
Also, check out The Git Guide to Trading in Open. This video tutorial has some great tips for surviving in Open that is of use to all playstyles, not just trading. It’s pretty funny too.
Alternatively, you could always head out to one of these locations in a cheaper or more expendable ship such as Sidewinder. Lastly, and this goes for playing in Solo as well, never, ever fly around in a ship you cannot afford to lose — always have enough money to cover your rebuy!!!
16.6. PvE-only groups
If a particular incident has put you off playing in Open or you just don’t fancy it, but you still yearn for a bit of human contact, then you might want to consider joining a PvE-only private group. These groups act as a halfway house between Open and Solo – you still have the possibility of encountering other Commanders, but PvP is strictly forbidden and players caught breaking the rules will be expelled. The largest and most famous of these is Mobius.
17. Squadrons
Squadrons, introduced in the Beyond 3.3 update, is an in-game system for communicating and coordinating with a group of like-minded players. It’s basically similar to the clan or guild systems that you find in many other online multiplayer games.
You can only be in one Squadron at a time. So, if you want to join a new Squadron, you’ll have to leave your current one. A Squadron can accommodate up to 500 members.
17.1. Finding a Squadron
To join a group, access the Squadron UI through the home tab in the systems panel, then click on “Browse Squadrons”. Then you can either manually browse through the newest Squadrons, use a keyword search, or set filters based on specific tags.
Squadron tags are numerous and varied and include:
- activities
- availability
- attitude
- time zone
- play style
- language
- game mode
- Powerplay allegiance
When you click on a Squadron, you’ll be presented with a “public statement” and a bunch of info, such as their tags, affiliations, number of members, and whether they are currently accepting applications. You can fill out a “request letter” before sending a join request, but this is optional. You’ll be notified by the comms panel if and when your request is approved. Ohhhhhh, the anticipation…

17.2. Creating a Squadron
If you’re the leader type or simply hate being bossed around by other people, then why not create your own Squadron? Note that you can only create a Squadron if you’re not currently a member of one. You also need to pay a 10m credits set-up fee (don’t ask me why!).
To create a Squadron, access the Squadron UI through the home tab in the systems panel, then start filling out the form in the left-hand panel.
Some notes about Squadron creation:
- you cannot change the Squadron name or four-letter ID after submitting the form (so watch out for typos!)
- you have to choose a superpower affiliation and this cannot be changed later
- powerplay (power) and faction affiliations are optional but cannot be changed once set; however, you can leave them blank and set at a later date
- if you wish to be allied to a specific faction, you need to be in a system where the faction is present when you create your Squadron; otherwise, you won’t be able to select them

Once you’ve created a Squadron, you’ll be presented with a new UI for managing that Squadron (accessed from the home panel). Under the “Squadron Management” tab, you can:
- view and manage members
- view details the power and/or faction your Squadron is allied to
- review applications
- set admin rights for individual members (manage ranks tab)
- set whether you’re accepting new members (settings tab)
- update your tags (settings tab)
- disband the Squadron (settings tab)
- set power and faction affiliations if you don’t have any yet (settings tab)
You can also view leaderboards for your own members as well as for competing against other Squadrons.

Bizarrely, if you want to create a Public Statement for your Squadron (and why wouldn’t you?), you have to do this through the comms panel. This is basically your Squadron’s mission statement and recruitment post.
To create a Public Statement :
- Head to the Squadrons tab of the comms panel.
- Select “New Post”.
- Set the category to “Public Statement”.
- Start typing your blurb, but keep it to a max of 300 characters (rather restrictive, don’t you think?).
- Submit.

This statement will then appear on your Squadron entry for other players to see when they’re looking for a group to join, so make it snappy! Also, Frontier are planning to eventually host info pages for all the Squadrons on the Elite: Dangerous Community Page.

17.3. Squadron communication
Whether you’re the leader or just a member, you can access info on your Squadron through the home tab of the system panel. If you’ve been given admin rights, you should also be able to exercise those through the Squadron interface.
However, all communication is done through the comms panel in your cockpit. From here you can view (and filter) the Squadron feed. You can also send messages to other members. Depending on your rank (admin level), you will have access to different channels. Exciting stuff.
18. Reputation, rank, factions, and civil wars
This is a little complicated, so I’ve tried to keep it simple (A Guide to Minor Factions and the Background Sim on the official forums goes into far more detail).
The are three major factions (superpowers) in Elite:
- the Federation
- the Empire (all hail the Empress!)
- the Alliance
You hold a rank and a reputation with both the Federation and Empire, though currently just a reputation with the Alliance. You can view your present standing with these superpowers under the status tab in the systems panel.
By increasing your reputation and rank with the Federation and Empire you will be rewarded with permits to restricted systems (e.g. Sol or Achenar) and allowed to purchase faction-specific ships such as the Imperial Clipper or Federal Drop Ship. You gain rank by taking on naval ascension opportunities that appear on mission boards.
There are also hundreds of minor factions, up to five in any one system. Many of these are aligned with one of the three superpowers, while others are independent. Whichever faction owns the largest starport is deemed the controlling faction for the system and their political leaning determines the government type. In some instances, this will be an anarchy government and the system will be lawless. Be aware that smaller starports may be owned by rival factions.
Information about the system’s factions and control of starports can be found in the system map, as well as in the system factions section of the status tab in the system panel. The target information panel of your HUD (bottom left) also displays info about the controlling faction and government type.

Your reputation with a faction is affected by all your interactions with them, such as by:
- selling exploration data and trading at their starports
- bringing pilots wanted by those factions to justice
- criminal behaviour in their jurisdictions
- failing or completing missions
As your reputation increases with a faction they will offer you more lucrative missions. By working for one faction it is possible to negatively affect your reputation with another, so it’s important to select missions carefully; if you develop too negative a reputation with a faction, they will become hostile towards you and their NPCs may attack on sight.
It’s worth noting that reputation with the superpowers decays over time and as a consequence with all aligned minor factions. This works in both directions, so hostile superpowers and minor factions will slowly forgive you. Also, reputation increases faster when working for minors factions aligned to superpowers with which you have a good standing.
By working for factions you help to increase their influence, which can, in turn, affect the economic/political state of the system.
There is a wide range of states that a system can be in, such as boom, bust, famine, outbreak, unrest, etc. Different states have different consequences for the system and can affect commodities markets, available missions, and security. They can also cause specific POIs to spawn.
If non-controlling factions become too influential, this may spark a war for control of a starport and potentially the entire system. These wars are determined at conflict zones that pop up around the system.


18.1. Pilot’s Federation
As a member of the Pilot’s Federation, you hold separate ranks with them for combat, trade, and explorer, which are independent of any faction. The Elite: Dangerous Wiki has a more detailed guide on Pilot Federation ranks.
The game uses these ranks as a guide for mission difficulty. Taking on a mission above your current rank can be risky but lucrative (you will be warned of this in the mission briefing). Improving any of these ranks also increases the maximum loan available to you upon ship destruction.
The CQC rank is solely from playing the CGC Championship game mode and has no bearing on the main game.
19. The Codex
The Codex, introduced in the Beyond 3.3 update, is an in-game repository of information. You can access it through the home tab of the systems panel.
The Codex is divided into three main sections:
- Commander. Includes a session log, detailed player statistics, and an archive of visited tourist beacons and collected narratives from the game’s stories.
- Discoveries. A record of all your exploration discoveries, broken down by galactic region and type. Reported = discovered by another Commander; confirmed = discovered by you. You can click on each discovery type for further info. This section also lists rumours of possible discoveries for each region.
- Knowledge Base. Outlines key aspects of Elite: Dangerous lore, including information and history about the main factions.
- Pilot’s Handbook. Explains the basics of some of the game’s main activities, such as mining, exploration, trading, and bounty hunting.
20. Unidentified Signal Sources (USSs)
Whenever you first enter a system, a set of USSs will spawn in supercruise. At these, you’ll encounter everything from shipwrecks and pirate ambushes to wedding parties and trade convoys. USSs are a good source of manufactured materials, but you will often also find abandoned and sometimes valuable commodities just floating around in the void. These can all be salvaged by using your cargo scoop to hoover them up or deploying cargo limpets to collect them (jump to mining section).
Cargo found at wreck sites is generally considered legal salvage and can be sold to the Search and Rescue Agent starport contact. Other items may be considered as “stolen” or illegal and will need to be sold on the black market (jump to Pirating, smuggling, and silent running section).
Your ship will automatically detect any nearby USSs (within a 1000Ls or so). To detect more distant signal sources, you need to either discover them using the FSS (jump to exploration and fuel scooping section) or by scanning the current system’s nav beacon. USSs are semi-permanent, lasting for up to 40 minutes. If you leave the system and return within the stated time frame, the same USS should still be there.
USSs come in multiple flavours and are automatically scanned when facing them with your ship. This will reveal both their identity and a threat level (0-5). Zero is usually safe, but watch out for the occasional pirate ambush.
- Encoded/Degraded Emissions are shipwrecks where you are likely to find cargo canisters and things like occupied escape pods, black boxes, data caches, etc, which can be sold to Search and Rescue contacts or on the black market; sometimes you will have to contend with rescue ships who may become hostile if you attempt to plunder the wreckage; if you have the Horizons expansion, you may also find materials and data beacons at these
- Weapons Fire Detected will usually contain pirates, bounty hunters and system authority ships battling it out; these are good for bounty hunting
- Combat aftermath sometimes spawn a scenario/mission or contain rarer manufactured materials
- High-grade emissions (Horizons expansion only) contain rarer manufactured materials
- Convoy Dispersal Patterns will contain a convoy of ships (obviously) and these can sometimes be hostile or wanted; these have the potential for bounty hunting but are probably best avoided early on; sometimes also trigger scenarios
- Ceremonial Comms will contain a convoy of a wedding, funeral, party ships; not much use really
- Trading Beacons will contain a trade ship; if you have want they want, it will be automatically transferred to their ship and you will be compensated with credits (usually well above the galactic average)
- Distress Calls usually trigger a scenario in which NPCs are in need of fuel/repairs or are under attack by pirates. For the former, you will require fuel or repair limpets. For the latter, you will potentially face a large number of well-armed pirates, which can be fun but challenging
- Non-human Signal Source are thargoid-related encounters typically found in and around the Pleiades Nebula (near Merope and Maia) or other systems that the thargoids have penetrated. Be warned, the thargoid ships may look pretty but they’re also very dangerous!

21. The endgame, career paths, and ways to make money
Let’s get down to brass tacks: there is no real endgame in Elite: Dangerous other than that you set for yourself. There is no central narrative, story missions are few and far between, and there are no long-term objectives set by the game. You are not some chiselled-jaw action hero on a quest to save humanity. In fact, in the grand scheme of the Elite universe, you’re pretty damn insignificant. Get over it.
Elite: Dangerous is all about creating your own journey and setting your own goals. Do you want to be a trader, bounty hunter, smuggler, psychopath, a professional assassin, courier, mercenary, miner, pirate, explorer or jack of all trades? It’s completely up to you — the Milky Way is your rather large oyster. The game is also steeped in lore and has a long and rich history, for those willing to go look for it.
21.1. A note on missions and scenarios
Missions come in a variety of forms and feed into all career paths. They’re also the best way to make money in the game early on — trading and combat are not so easy in a tiny, fragile Sidewinder.
Missions are primarily obtained from missions boards at starports. The type of missions available at a particular station will generally reflect the local economy, system state, and the political leaning of the issuing faction.
You can choose the reward you receive for missions you get from starport bulletin boards. Possible rewards include additional credits, materials (Horizons only), commodities, or a greater reputation increase. You will be shown the possible mission rewards before committing to the mission and get to choose your preferred payment upon completion (up to three options). You can also filter missions by reward options.

Occasionally, upon completing a mission you will receive an offer of a related job from the same faction on the mission board. These are known as chained missions and are marked by a chain-link icon.
All missions timers are in real time so never take on what you can’t complete (extensions are occasionally granted) and some carry a fine for completion failure. Also, note that any undelivered cargo will become classed as stolen upon mission failure and, therefore, can only be sold on the black market.
Read mission briefings very carefully. Some will require you to break the law (killing, piracy, illegal salvage, trespass) or may result in hostile ships being sent after you. Others may require you to meet a contact in space at a specified time to receive your instructions. Also, take note of the stated mission rank as this an indication of the relative difficulty. Taking on a mission above your current rank can be lucrative but also risky, i.e. you may be attacked/interdicted by very strong ships.
Mission objectives can change after accepting them, these are known as wrinkles. You may be given a new deadline, destination or bonus objective, or told to meet a contact for further details. You will be informed of these changes via the comms panel. Most are optional.
Mission targets can be found either by using a discovery scanner/FSS (jump to Exploration section) or by dropping out of supercruise at a nav beacon and targeting it for a passive scan. You will be informed of the details via your comms and transactions panels. This usually involves travelling to a named planetary body and waiting for a mission-related signal source to appear (see screenshot below). This can sometimes take a little while.
Also, note that mission-related signal sources will keep respawning until you complete your objective. For surface missions (Horizons expansion only), a search zone will appear on the planet once you get close enough (jump to Surface missions section).

21.1.1. Scenarios
Missions can also be given to you in space by NPCs, sometimes as an alternative proposal to an active mission. These proposals can be accepted or rejected through your comms panel.
A variation on this is the so-called “scenarios”, which may be offered to you at locations such as megaships, installations, settlements, distress calls, combat aftermaths, etc. These often revolve around attacking or defending a nearby objective, such as space installation, but others involve joining in with a salvage operation or playing the good Samaritan to help out a random dude with repairs or refuelling.
However, the financial rewards for scenarios are usually quite poor and taking them on is more about supporting a specific faction.

21.2. Trading
Trading can be very profitable if you can find some good routes, but it usually requires a little research — imperial slaves and precious metals are a good place to start once you have the necessary capital. Basically, you want to buy commodities in medium to high supply and transport them to where they are in demand, or low supply.
21.2.1. Using the galactic average
When viewing the commodities market at a port, the galactic average provides a rough guide to the type of return you can expect for a particular commodity. The galactic average is the average price of a commodity across all markets in the galaxy (the clue is in the name!).
On the buy screen, the last column displays the profit (or loss) you would make per tonne if you bought the commodity at the current port and then sold it at the galactic average price.
On the sell screen, the last column displays the profit (or loss) you would make per tonne if you bought the commodity at the galactic average and sold it at the current port.
21.2.2. Researching trade runs
You permanently acquire access to trade data from each system where you’ve docked at a port or scanned the nav beacon. This trade data can be used to help research profitable trade routes.
When you highlight or click on a specific commodity, it provides import and export prices from nearby systems for which you hold trade data.
To enter the galaxy map trade data overlay, either:
- select a specific item in the commodity market and then click “view commodity in galaxy map” or one of the listed systems
- click on the “compare” icon in the commodity market, then “search market” followed by “select on galaxy map”.
- go to the galaxy map and switch to the commodity filter
From here you can select a specific commodity from the left-hand panel, then view which systems are importing (blue diamonds) and exporting it (green triangles) within 40ly of your current location. A white diamond indicates that you have trade data for the system, but the selected commodity is not being traded.
Moving the cursor over a visited system will generate a pop-up that reveals prices and additional options. For example, you can filter trade data by landing pad size, planetary markets, and market range, which is the distance of ports from the main star.
Selecting a system and then clicking on the “compare in commodities market” icon will make its import and export prices available on the commodities market screen. When back on the commodities market screen, click on compare icon to switch between stations in the comparison system.
You can also view current trading trends for systems you have visited in the last 24 hours. This information can also be bought for nearby systems through the galaxy map for 100cr a pop, but only while docked. Trading trends can be filtered to only show data based on other Commanders (i.e. players).
See the screenshots below for a very simple example of how to research a trade run using coffee as an example.


The trick to trading is learning the imports and exports of different economy types. For instance, extraction systems produce minerals; these are needed by refinery systems, which in turn produce metals required in industrial and high-tech economies.
Trade prices and production are affected by supply and demand as well as government type, wealth and population size of the system, and the system’s current status, e.g. civil war, lockdown, boom, etc.
The EDDB is a great site for researching trade runs or finding systems that import or export specific commodities.
21.2.3. Outfitting a trade ship
When trading, cargo space is everything. However, vessels geared towards freightage — such as the Hauler and Lakon transporters — handle poorly and have limited combat capabilities, which makes you easy prey for pirates and nutjobs.
That said, NPC pirates are relatively easy to give the slip — simply submit to their interdiction, stick 4 pips to engines and keep boosting until you’re able to high wake out of there (jump to Supercruise and interdiction section).
Encounters with pirate Commanders are infrequent; however, they probably won’t be so inept (jump to pirating, smuggling and silent running section) and it might be in your best interests to give in to their demands.
Note that hatch breaker limpets, which are fired like a missile, penetrate shields and attach themselves to your cargo hatch, releasing some of your precious wares into the void. These limpets can be effectively countered with point defence turrets (PDTs) and activating ECM, which will remove any attached limpets from your hull. You do not need to deploy weapons for these systems to work; however, while PDTs are passive, ECM must be activated manually and has a 10-second cooldown.
Some players swap out shields for more cargo space; it’s a risky gambit — you’re only one accidental boost away from being space garbage and an even easier target for freebooters and psychos.
21.2.2. Rare commodities
There are also commodities in the game that are classed as “rare” and which behave differently from standard commodities. Each rare is unique to a single starport and cannot be purchased anywhere else in the galaxy. They can be sold at any starport, but the further you travel from the source the higher the return you will make.
However, this relationship is not linear and you will need travel in excess of 100LY from the source to make it worth the effort — the sweet spot seems to be around 125LY and the returns beyond this distance are diminishing. Also each rare has a maximum allocation and you cannot purchase more until you sell what you currently hold. Some rares are also considered illegal and must be sold on the black market.
The Elite: Dangerous Wiki has a list of rare goods. The Elite Rare Trader map shows their locations across the galaxy and allows route planning.
21.3. Couriering, procurement, and salvage
Become a space postie! Usually pretty straightforward: accept jobs from the missions boards, take cargo from A to B. Some missions do not require the use of any cargo space, e.g. messages, small packages, etc.
Be aware that you will sometimes be requested to transport cargo that is considered illegal at the intended destination, but this will be spelt out in the mission description. If this is the case, you will need to avoid been scanned by the authorities (jump to pirating, smuggling and silent running section). Also, some missions will result in hostile ships being sent after you. Again, you’ll be warned of this in the description.
As of the Beyond 3.2 update, depots appear on the missions board at both the source and destination starports for haulage mission. These allow you to take on large cargo delivery missions regardless of your hold size and complete them over the course of multiple trips. You simply collect as much as you can carry from the issuing station and drop it off at the destination station, then return to pick up more; rinse and repeat. The mission is complete once all the goods have been delivered.


A variation on haulage missions is procurement contracts, where you will be tasked with sourcing x tonnes of a particular commodity and delivering within a specified time frame — the EDDB commodity finder is a great tool for this. Sometimes the mission will specify these must be stolen and sometimes this will be from a specific target (jump to pirating, smuggling, and silent running section), so read the briefing carefully.
Salvage missions require you to recover items found at a specific signal source (jump to Making money early on and signal sources) or to head to a search zone on a planetary surface (jump to Surface missions section). Collection limpets are pretty useful for salvage missions that take place in space.
21.4. Bounty hunting
Kill criminal scum for bounty vouchers, which are then cashed in at starports in the relevant jurisdiction (see below). You no longer need to scan a wanted ship first before engaging. However, if you attack an unscanned ship and it turns out to be clean, you will receive an assault bounty.
The kill warrant scanner (KWS) can be used to scan a target for additional bounties linked to the current jurisdiction’s superpower allegiance. If the ship is clean but found to be wanted elsewhere, you will be granted a license to kill them. All detected bounties will be claimed on the ship’s destruction. As such, the KWS can significantly increase bounty hunting income.
Good hunting spots are nav beacons (NAVs), resource extraction sites (RES) and certain types of signal source. Compromised NAVs and hazardous RESs are the most dangerous with no security forces present, but also by far the most lucrative. You can find good hunting locations on Elite: Dangerous Utilities. Contracts for killing a specified number of pirates (massacre missions) in a named system are also available on mission boards.
Once you get a better ship/loadout (at least a well kitted-out Viper, Cobra, or Adder, but ideally a Vulture), you’ll be able to go after juicer but more challenging targets. In particular, convoys and distress calls often contain large pirate wings or you can interdict valuable targets in supercruise — claiming a bounty on a wanted Python, Federal Drop Ship, or Anaconda (etc) can net you anywhere up to 500,000cr.
Remember to exercise some trigger discipline when bounty hunting in busy areas. Repeated friendly fire accidents can result in fines and even bounties.
In general, bounty payments can only be collected at starports where the issuing faction is present. However, for a 25% commission, the Interstellar Factors Contact, found only in low-security systems, allows Commanders to pay off fines, claim bounties, and hand in combat bonds that relate to any system or jurisdiction. Remember, all bounty vouchers are lost if you die.

21.5. Assassin
Agent 47 wannabes can take on assassination contracts from the missions boards. Normally, the target is found at a mission-related signal source (jump to a note on missions section). You’ll need a decent ship, kitted out for combat. The bigger the reward and higher the recommended combat rank, the tougher the target. Some may also have wingmen to contend with. Bear in mind that if they have a clean criminal status, you will be committing murder unless in a lawless system.
In a similar vein, you can also take on contracts to kill x number of pirates/traders/authority vessels/etc in a certain system (massacre missions). The advantage of these is you can find your targets anywhere — nav beacons, resource extraction sites, flying around in supercruise, signal sources, etc.
21.6. Mercenary and conflict zones
Cry “Havoc!,” and let slip the dogs of war. Fly to a conflict zone (CZs) and choose a side to fight from the comms panel. System conflicts last for 7 days and the CZs that spawn come in three intensity flavours: low, medium, and high. You win the current battle by killing enemy ships and filling up the green bar at the top right of the screen. The eventual outcome of the war will resolve power struggles between the system’s factions, so you may want to choose your side wisely!
You’ll receive a combat bond for each kill worth 4,000cr–80,000cr, depending on ship type, that you can cash in at a relevant starport (see below); but like bounty claims, these are all lost if you die.
You only need to get the last shot on the ship to claim the kill. You can also find contracts that pay for a specified number of warzone kills in a stated system. Lists of systems with active conflict zones can be found in the Galnet news feed or found in the galaxy map by using the “war” state filter.
In general, combats bonds can only be redeemed at starports where the issuing faction is present. However, for a 25% commission the Interstellar Factors Contact, which only found in low-security systems, allows Commanders to pay off fines, claim bounties, and hand in combat bonds that relate to any system or jurisdiction.
Conflict zones are also a good place to farm some otherwise difficult-to-find materials.

21.7. Psychopath
I don’t think I really need to explain this. In the immortal words of the Talking Heads:
Psycho Killer
Qu’est-ce que c’est?
Fa fa fa fa fa fa fa fa fa far better
Run run run run run run run away…
21.8. Mining and collection drones
Hi ho, hi ho… and all that crap. Mining involves extracting minerals and metals from asteroids and then selling the processed ore on the commodities market or handing it in to fulfil mission contracts.
There’s now quite a lot of equipment that can be used for mining, including:
- Mining Laser. Basically a beam laser. Used for strip/laser mining ore and elemental materials.
- Abrasion blaster. Works like a shotgun. Used for breaking off surface deposits.
- Subsurface displacement missile. A dumb-fire missile that drills into subsurface deposits. Limited ammo.
- Seismic charge launcher. Launches a timed charge that sticks to fissures and can break open asteroids with cores (“motherlodes”). Limited ammo.
- Refinery. Needed to process the ore from mining fragments.
- Detailed surface scanner (DSS). Used to find mining hotspots in planetary rings.
- Pulse wave scanner. Scans asteroids within a certain radius. Used to detect asteroids with surface features, including motherlode/core asteroids.
- Prospector limpet controller. Like a dumb-fire missile launcher. Fires a drone that probes an asteroid for mineral content and surface features such as deposits and fissures. Requires a stock of limpets.
- Collection limpet controller. Launches drones to collect liberated fragments. Requires a stock of limpets.
The type of mining you want to do will determine which modules you need to install. Ammo and limpets for mining equipment can be synthesized if you have the necessary materials (Horizons only).
Note that you need to switch to analysis mode to use most of this equipment. The key binding for switching between analysis and combat mode is under “mode switches” in the control options.
In my own experience, there are two main approaches to mining: high-volume laser mining and motherlode hunting (core mining). I’ll discuss these mining strategies below as well as how to harvest surface and subsurface deposits, but first, let’s talk about where and what to mine.
21.8.1. Where to mine?
The best place to mine is in a planetary ring. You can mine at individual belt clusters, which are often found in close proximity to stars, but these usually comprise just a handful of rocks. In contrast, the supply of asteroids is virtually infinite at a planetary ring and many rings will contain one or more hotspots for specific, high-value minerals.
When looking for a suitable spot to mine, it’s important to check the planet’s information on the system map. If this info is not available, you’ll need to either:
- buy exploration data from a starport
- scan the system’s nav beacon
- “discover” the planet using the FSS
Clicking on the info panel for a specific planet will tell you about the quality rating of its mining reserves, which can be one of five ratings:
- Pristine — best
- Major
- Common
- Low
- Depleted — worst
Higher quality reserves offer better yields and improve the chances of finding higher-value minerals.
There are also four types of planetary ring: icy, rocky, metal-rich, and metallic. The ring-type determines which minerals can be found there.
The Elite: Dangerous Wiki has a list of mineral types and where they can be mined. Elite: Dangerous Utilities has a tool for locating pristine metallic rings.

Many planetary rings contain designated mining locations known as resource extraction sites (RESs). These are actually better suited to bounty hunting than they are for mining. NPC pirates hang around at RESs so you will need to be able to defend yourself or be ready to make a hasty retreat.
You’re far more likely to be attacked at a high-intensity RES and there will be no security forces to protect you at a hazardous RES.
The best option for mining is to use the DSS to discover hotspots for high-value metals/minerals. All you need to do is fire a single probe directly into the ring, this will then reveal any hotspots. These hotspots are permanent POIs and can then be targeted and flown to in supercruise.
When flying to a hotspot, it’s also best to avoid dropping out at the centre. The resources are persistent and the chances are that other Commanders will have been there mining. Instead, drop out at a random spot nearer the edge of the hotspot.

21.8.2. What to mine?
That’s a very good question and there’s no longer a simple answer, particularly as FDev have rebalanced mining a number of times over the years. OIn the past, the most profitable minerals were painite and platinum, then it became void opals which were eventually succeeded by low-temperature diamonds.
More recent changes mean that the buying price of specific minerals can vary considerably and is highly dependent on local market conditions, such as economy type, faction state and current demand.
The Elite: Dangerous Wiki lists the galactic average price for each mineral type, which gives you a good idea of their relative values.
Generally, you’ll want to concentrate on gathering minerals at the top end of the list, such as alexandrite, grandidierite, void opals, low-temperature diamonds, etc. Mining is very time consuming, so it’s rarely worth pursuing low-value minerals/metals, especially if you have little cargo space.
After filling your hold, you’ll want to maximise your profit by researching the best selling locations using either the in-game trading tools (jump to trading section) or external resources such as the EDDB commodity finder. Demand at individual starports can change rapidly, so don’t rely on data that’s more than a few hours old!
It’s also worth keeping an eye out for mining missions at starports, as these can make gathering specific minerals much more profitable than usual.
21.8.3. Laser mining
Laser mining is the simplest method of mining and requires the least equipment. You can get away with just a mining laser and refinery module, but I would strongly recommend also installing a DSS and prospector and collection limpet controllers.
This type of mining is well-suited to big ships with a lot of cargo space. Laser mining is also the only way to extract elemental materials from asteroids (Horzions only).
Simply get close to a roid (within 500m) and shoot it with your mining lasers until it stops puking ore fragments. Fragments liberated from the same asteroid will normally have a similar ore composition and can be analysed by targeting them.
These fragments need to be collected either manually using your cargo scoop or by using collection drones (see collection limpet section below). Collected fragments are processed by your refinery module.
Refinery modules house a number of bins (more expensive versions will have additional bins). As you scoop up fragments, minerals/metals will be automatically assigned to an empty bin; you can vent anything you are not interested in refining further. When a hopper reaches capacity (100%) it will generate 1T of that commodity, which will then transfer to your cargo hold and free up the bin (see screenshots below).
The refinery module is accessed through the inventory tab of the right-hand panel (see screenshot below).
Any metal/mineral added to your ignore list will be automatically discarded by the refinery, which saves having to vent them manually. You do this through the contacts tab of the left-hand panel. Just select a mining fragment and chose one or more metals/minerals to be ignored. Ignored minerals are remembered by the game for future sessions but can be removed from the list in exactly the same way.
Before mining a specific asteroid, it is worth firing a prospector probe at it. This not only tells you what ore the asteroid contains but also magically doubles the yield (see prospector section below).
Prospectors also highlight any fissures and surface and subsurface deposits. Harvesting these can significantly increase your yield but requires extra equipment.


21.8.4. Core mining
The other main approach to mining is hunting for and cracking open the so-called “motherlode” or core asteroids. This strategy is well-suited to faster, more agile ships but can still be done in larger ships (I manage well enough in my Imperial Cutter).
Core asteroids are relatively rare, so a faster ship facilitates scanning more rocks in a shorter space of time. The extra agility also comes in handy for visually checking roids for fissures and placing the seismic charges.
Core mining requires more equipment and skill than laser mining. At a minimum you need:
- refinery
- prospector
- seismic charges
- pulse wave scanner
However, for maximum efficiency and profit, you should install a DSS, ablation laser, and collection limpets. And you will want to fly out to a ring with pristine reserves and use the DSS to find hotspots for rare, highly valuable minerals such as void opals, low-temperature diamonds, alexandrite, grandidierite, etc.
Once at a nice hotspot, you need to scan the asteroids using the pulse wave scanner. Firing the scanner will highlight interesting roids in yellow for about 5 seconds; nearly all of these will have surface features, but only a tiny fraction will have fissures/cores.
The trick is to get good at picking out core asteroids from the crowd. Asteroids come in different shapes and sizes, but there is only one asteroid model in each type of ring that can be core mined.
In metallic and metal-rich rings, core asteroids are medium-sized and teardrop shaped. On the pulse wave scanner, they will glow an intense yellow that does not diminish on getting closer. Nebukatze posted some good pictures of a metallic megalode on Reddit. Also, see my screenshots below.


In icy rings, core asteroids are medium-small in size and sort of popcorn-shaped (to me they also look like squashed brains!). On the pulse wave scanner, they glow an intense yellow with patches of intense red. This colouring should not diminish on getting closer. Cmdr Jeff God of Biscuits posted some good pictures of an icy megalode on Reddit.


To confirm a motherlode without wasting a prospector limpet, you can fly close and visually look for the presence of fissures on the surface. Getting proficient at spotting core asteroids means you’ll waste fewer prospector limpets and make more credits per hour.
Once you think you’ve found a motherlode asteroid, you need to fire a prospector at it. This confirms if it can be core mined and adds fissures and other surface features to the HUD.
Now we need to crack it open to get to the juicy stuff in its core. We do this by firing seismic charges, which if aimed right will stick to the fissures.
After placing the first charge, a detonation yield display will appear in the info panel (top-left of the cockpit screen). You then have 120 seconds to place the rest of your charges on other fissures. You can only place one charge per fissure.
The idea is to place enough charges to reach the optimum yield, which is illustrated by the blue area of the detonation yield graph. Below this range, the asteroid will not crack open. Above this line will destroy many of the goodies inside.
There are three strengths of fissure: low, medium, and high. Targeting a fissure will tell you its strength. You can also set charges to three different yields, also: low, medium, and high. So:
- a high-yield charge on a low-strength fissure = greatest effect on the total detonation yield
- a low-yield charge on a high-strength fissure = least effect on the total detonation yield
I find that you can often reach the optimum yield by placing just two high-yield charges on two separate low-strength fissures. If you need a little topping up, then set a low-yield charge on a high-strength fissure.
The seismic charges work like a dumb-fire missile. The longer you hold the trigger before releasing, the higher the yield of the charge, as indicated in central targeting reticule by the number of bars that fill up. When aiming a charge, you need to take into account the rotation of the asteroid as well as the hardpoint placement of your launcher.

If you go over the optimum yield, don’t panic. Head to the contacts panel, make sure the relevant fissure is selected and then click on the “disarm” button. Also, once you’ve reached the optimum yield, you don’t have to wait the full 120 seconds for detonation. Select any fissure with a charge on it, then click the “detonate now” to blow the asteroid.

You might want to quickly retreat to a safe distance before detonation. In a well-shielded ship, the explosion is usually not an issue but it can trash your drones or SLF.
After the fireworks and a satisfying kaboom, the asteroid will break into several large chunks and spew out valuable minerals. Scoop or use collection drones to gather these up.
The mini-asteroids that result from the detonation will also spawn surface deposits that you can target through the HUD. For maximum profits, shoot these off using the ablation blaster. You need to get within 1km of the deposit to do this. Again, this is quicker and easier to do in a more agile ship.
I’ve also included a video demonstration of me finding and mining a void opal motherlode below:
A good motherlode asteroid will net you between 10 and 20T of a very high-value mineral, e.g. void opals. Nice!
21.8.5. Surface and subsurface mining
Asteroids that glow yellow with the pulse wave scanner will usually have some surface and/or subsurface deposits. Hitting one of these rocks with a prospector will display these features on your HUD.
You can harvest surface deposits by shooting them off with the ablation laser, which basically works like a shotgun. You need to be within 1km of the deposit for this to work.
For subsurface deposits, you require a subsurface displacement missile launcher. These work like dumb-fire missiles. When aiming these missiles, you need to take into account asteroid rotation as well as your hardpoint placement.
Press and hold the trigger (do not release). If the missile hits the deposit, you’ll get a “deploying drill” message in the targets panel (lower-left screen) followed by a visual representation of the missile drilling through the rock.
You need to release the trigger when the white horizontal bar is over a seam, which are represented as blue bars. If you fail to stop on a blue bar or reach the end of the graph, you get nothing.
Each subsurface deposit can be drilled multiple times to increase yield. After each successful attempt, you will need to target a new seam.

In general, focusing solely on surface or subsurface deposits is not an efficient mining strategy. But if you have the capacity to install the extra gear and don’t like leaving behind valuable minerals, exploiting surface/subsurface deposits can nicely supplement laser and core mining.
Tritium, which is the chemical that fuels hyperspace jumps in fleet carriers, can only be mined from surface and subsurface deposits on icy asteroids.
21.8.6. Using collection limpets
To improve efficiency, I strongly urge investment in a collection limpets — particularly as mining fragments will eventually dematerialise, so speed is of the essence. This requires a collection limpet controller to be installed (in an optional internal slot); the limpet drones are bought separately from the restock menu at starports and take up cargo space.
Collector limpets are fired like a weapon (you need to assign to a fire group) and have two modes:
- Targeted. If you target an ore fragment and launch a drone it will quickly collect that fragment, drop it your hold, and then immediately expire.
- Automatic. If you have no collection target selected the drone will slowly gather all the fragments (or cargo canisters) in range for a set period of time. At the end of this period, it will expire and you will need to launch another drone.
Investing in a better controller increases both the number of simultaneous drones you can launch and their range and life-span.
As mentioned above, metals and minerals that you do not wish to be processed can be added to your ignore list. Any collectable items (cargo, materials, etc) can also be added to this list. Items on the ignore list, or mining fragments composed entirely of ignored metals/minerals, will be left alone by your limpets.
21.8.7. Using prospectors
You can also buy prospector limpets to ascertain the content of nearby asteroids. Like the collection drones, these require a controller and a supply of limpets.
Simply fire a prospector at a nearby asteroid and target the drone. When it impacts the asteroid, the target panel will display information on the content of the asteroid and any surface features will appear on the HUD.
Prospectors are single-use, slow and have limited range. However, using one doubles the number of fragments you can laser mine from an asteroid and are also essential for harvesting asteroids with surface features, including motherlodes.
Investing in a better prospector controller increases the range and number of limpets you can have active at any one time. When you reach this limit, firing a new prospector limpet will cause the oldest active limpet to expire.
21.9. Exploration and fuel scooping
Exploration is a solitary life that involves discovering and mapping planetary bodies, then selling the data to a Universal Cartographics contact back at a starport.
Systems that can be mapped will have little or no information about them on the galaxy map. Perhaps a little counter-intuitively, you can also “discover” planetary bodies in many Bubble systems and in systems that other Commanders have already fully or partially mapped. However, the most rewarding exploration, both in terms of credits and personal satisfaction, comes from heading far out of inhabited space to map previously uncharted systems.
For many players, the aim is in finding Earth-like worlds (ELWs), interesting stars, and other high-value bodies, but there’s a lot of joy to be had travelling through nebulae and other visually-pleasing regions of the galaxy and just taking in the awesome vistas and the sense of scale.
A common exploration rite of passage is travelling the 25,000 LY to Sagittarius A, the black hole at the centre of the Milky Way (done that, got the t-shirt!), or the 65,000LY trip out to Beagle Point on the outer rim of the galaxy (I might give that a miss!). Of course, there are also hidden mysteries for ED’s community to unravel and ancient ruins to discover, which you can read more about in the Codex, through Galnet, and on the forums.
21.9.1. Getting started
All ships have a built-in discovery scanner, composition scanner, and full spectrum system (FSS), but if you want to map planetary surfaces then you’ll need to buy and install a detailed surface scanner (DSS). Purchasing a fuel scoop is also a must for anyone heading outside of the Bubble, otherwise, you’ll quickly run out of fuel and end up stranded!
To use any of the exploration scanners you need to assign them to a fire group and switch to analysis mode. You also need to set up multiple key bindings before using the FSS and DSS (right at the bottom of the control options).
I have listed my own key bindings for controlling the FSS below:
Click here to reveal FSS key binds
| FSS key binds: | |
| camera pitch increase | s |
| camera pitch decrease | w |
| camera yaw increase | D |
| camera yaw decrease | A |
| zoom in to target | up arrow |
| zoom out | down arrow |
| stepped zoom in | + mouse wheel |
| stepped zoom out | – mouse wheel |
| tuning right | . (>) |
| tuning left | , (<) |
| discovery scan | space |
| leave FSS | num enter |
| show help | F11 |
With the exception of the compositional scanner, all exploration processes are done in supercruise and cannot be carried out in normal flight.
21.9.2. Discovering planetary bodies
When you arrive in an unexplored system, it will seem empty at first but your ship will automatically start discovering and scanning any nearby astronomical bodies. To determine if there are any more bodies to be found, either:
- use the discovery scanner while in analysis mode — you simply need to switch to the relevant fire group and hold the fire button until the scan is completed
- switch to the FSS and hold the assigned key to perform an “energy pulse” (basically you’re just doing the discovery scan in a different interface)
Scanned bodies and other POIs will then need to be further analysed in the FSS before they are considered to be “explored”. If you enter a system that another Commander has already visited, any astronomical bodies that they discovered will appear in your ship’s HUD and system map but will be listed as “unexplored” (see screenshot below). These can also be scanned in the FSS.

21.9.3. Using the FSS
The FSS is essentially a telescope for locating and scanning unexplored planetary bodies, scenarios, mission targets, POIs, and USSs. Scanning a planet with the FSS will also inform you of the likely presence of any biological, geological, or xenological POIs.
After completing a discovery scan, the FSS will display the system’s orbital planes and inform you of how many unexplored bodies there are. Undiscovered planetary bodies are indicated as waves on the filtered spectral analyser (FSA), which looks like an old-fashioned radio tuner.
Different wavelengths represent different types of object. So, going from left to right, you have:
- transient signal sources — basically a USS
- concentrated signal sources — these are POIs and scenarios, which are special types of mission that you can choose to take on
- asteroid clusters
- metal-rich bodies
- high metal content worlds
- rocky bodies
- icy bodies
- rocky ice worlds
- Earth-like worlds
- ammonia worlds
- water worlds
- gas giants
In a nutshell, this is how to use the FSS (see screenshots below as well):
- Fly a little away from the main star, as this blocks your view and prevents you from scanning obscured objects.
- Trace the path of the orbital plane using the “telescope” reticule and look for flashing blue blobs, known as signal fields.
- Centre the reticule on the blob, then tune the FSA until a hollow white circle appears (solid line, not hashed). As you get closer to the correct wavelength, the patterns on the reticule will align symmetrically and become the same as those on the tuner bar below. If you are not directly over the blob, the aligned patterns will point to the blob.
- If the tuning is correct, the FSS will let you zoom into the signal field. If there are several bodies present in the field, you may need to zoom in one or more times to separate them out and scan each one.
- Once fully zoomed into the planet, a scan will take place and provide more information about it. You don’t need to wait for the scan to finish before zooming back out and moving on to the next body.
- The flashing blob will disappear when all the bodies within it have been discovered. Discovered planets are added to the system map and will also appear in the HUD and navigation tab.


While the majority of these signal fields will be very close to the orbital plane, you may occasionally have to go hunting for a field that is sneakily hiding somewhere above or below the plane. As you discover planetary bodies, their orbital paths will also be added to the display. If you’re only interested in finding certain bodies (e.g. ELWs), you can pre-tune them and then scan the plane. When close, patterns will appear in the reticule and point to the relevant blob.
You don’t need to scan the USSs and scenarios to reach 100% system mapped, but these will rarely be present if outside the Bubble. By the way, USS blue blobs always have a dashed circle in them, whereas planetary blue blobs are empty until you get the correct tuning.
Note that stars don’t appear on the tuner and are usually scanned automatically by your ship upon entering the system. In systems that contain a distant secondary star, you may need to fly closer to it for the scan to take place, or you can find and zoom to it in the FSS.
If you’re the first to scan a body, after selling the data you will be credited with the discovery on the system map. You’ll also get a 50% credit bonus.
21.9.4. Surface mapping
For extra credits and glory, you can also map the surface of planetary bodies. This will also reveal the locations of any biological, geological, or xenological POIs present on the planet’s surface, which in turn can be investigated using the compositional scanner.
For surface mapping you need a DSS installed and assigned to a fire group. The process consists of firing probes at different regions of the planet’s surface. Thankfully, you have an infinite supply of these probes and don’t have to buy or make them.
To map a planet’s surface:
- Target the planet, switch to analysis mode, and select the relevant fire group.
- Fly towards the planet. The HUD will let you know when you’re close enough to start the process.
- Once in range, reduce speed. Again, the HUD will let you know if you’re going too fast.
- Press fire to enter the surface mapping mode.
- Use the reticule to aim the probes and press fire to launch them.
- The probes scan a circular area; coverage is shown in light blue. You need to assign a key to view the rear side of the planet.
- Mapping is considered complete once you hit 90% surface coverage.
Matching or beating the probe efficiency target nets you a credits bonus. Some tips for aiming probes (also see screenshots below):
- The probes are affected by gravity, so do not travel in straight lines.
- Aim is relative to the central white dot. The further away from this you aim, the further away the probe will land from the white dot.
- You need to aim away from the planet to land probes on its rear side; gravity will take care of the rest.
- Aim too far away and the probe will miss the planet altogether, but the HUD will inform you of this with the word “miss”.
- Aiming at the hashed line will land the probe halfway between the centre of the front and the centre of the back of the planet (relative to your view).


This is what I usually do when mapping a surface:
- Fire one probe directly at the white dot.
- Fire one probe to the opposite side of the planet. I do this by moving my aim outwards horizontally until the word “miss” appears, then move back in slightly and fire a probe.
- Fire the remaining probes at the hashed line at different points along the planet’s circumference. I spread these out evenly to meet the efficiency target.
- So if the efficiency target is 6 probes: I fire one to each “pole”, then the remaining four at the hashed line at roughly equal distances around the circumference of the planet.
If you’re the first to map the surface, after selling the data you will be credited with the discovery on the system map along with a 50% credit bonus.
21.9.5. Using the compositional scanner
If you’re really keen and have Horizons, you can also head down to the planetary surface to scan any biological, geological, or xenological features you discovered from surface mapping. These can include things like geysers, fumaroles, barnacles, thargoid and guardian stuff, and other interesting or even mysterious phenomena.
Scanning these locations earns you extra credits and you get a Codex entry for your efforts. For some daft reason, you cash in these “Codex vouchers” at an authority contact rather than Universal Cartographics.
These surface features appear in your HUD and navigation panel once close enough to the planet. Simply target one and fly down to it like you would with any other planetary location. You usually make eye contact once within 1 or 2 km.
To scan a surface feature:
- Switch to analysis mode and have the computational scanner set to a fire group.
- You can scan once within 700m, but it’s easier if you get a bit closer.
- Aim the scanner’s reticule at any of the objects and fire to scan. The reticule will glow when you have a target.
- If you’re on the dark side of the planet, enabling your ship’s night vision is very helpful for finding surface objects!

21.9.6. Fuel scooping
If you’re planning to head outside the Bubble you will need to install a fuel scoop (optional internal slot). As the name suggests, these are used to replenish your fuel reserves by skimming the corona of stars. Bigger and more expensive versions scoop at a faster rate — always buy the best one you can afford/fit as it will save you a lot of time, especially in ships with larger fuel capacities.
Bear in mind that you can only scoop at KGB FOAM class stars — these can be filtered on the galaxy map and a handy icon will display the last scoopable star on your current plotted route. Scooping is not difficult, but if you get it wrong your ship will overheat. You’re safe up to 100% on the heat gauge, but after that, your modules will take damage. Heat sinks are your friend!
Approach the corona slowly (e.g. around 25% throttle) until the scoop engages. Personally, I keep going until I reach around 60-70% of my possible scoop rate, keeping the heat level between 60 and 70%. Then I drop the throttle to zero and sit there until my tank is full.
If you start getting too hot, don’t panic, fly away from the star and begin the procedure again. Be careful when scooping at binaries and trinaries, as your ship is likely to get much hotter than normal.
If you get too close to a star, you will drop out of supercruise. Don’t panic! Point your ship away from the star, wait for the FSD cooldown to finish, then low wake out of there (i.e. head into supercruise, not a hyperspace jump). You will need to target the escape vector. Depending on your configuration and the type of star, your ship may get very hot, so now would be a good time to use some of those heat sinks.

21.9.7. General exploration tips and info:
- You need to find a starport more than 20LY from a system to sell the data for it.
- Earth-like worlds, water worlds, and terraform candidates generate the best income. Metallic planets can also be worth discovering, but rocks and ice worlds are generally low income and asteroid clusters are literally worthless.
- The Elite: Dangerous Wiki entry on exploration has an up-to-date guide to exploration data payouts (based on the formulae from MattG’s forum post). They also have a useful dashboard hologram reference.
- If you’re the first to discover or surface map a body, you will receive 50% extra money and be credited with the discovery or mapping on the system map, but only after selling the data.
- To consistently find systems that other Commanders haven’t explored, you may need to fly far from the Bubble (e.g. at least 2500LY); also, try avoiding direct routes to nebulae and other popular destinations or try travelling further above or below the galactic plane
- You get a bonus for discovering all of the bodies in a system.
- Discoveries will appear in your Codex.
- The Diamondback and ASP explorer variants are relatively affordable and well suited to exploration due to their large jump ranges and fuel tanks. I travelled to Sagittarius A in just a DBX; I love that ship!
- For very long or risky trips out into the void, the AFMU can repair modules and repair limpets can restore the hull.
- Before heading out, it may be worth stocking up synthesis materials (Horizons only), such as those needed for longer jumps and replenishing heat sinks, limpets, and the AFMU.
- Remember that, if you do ever run out of fuel and get stranded, the Fuel Rats are always willing to help out no matter where you are stranded.
- There are many systems within the Bubble, both inhabited and uninhabited, where you can scan “unexplored” bodies for easy money and rank progression.
- Did you know that there are a handful of remote starports located well outside of the Bubble, e.g. in and around Colonia. These can make good stop-off points for repairs and selling data and can be found using the galaxy map filters.
- Anyone keen on finding ELWs should check out Marx’s guide to finding Earth-like worlds over on the Elite: Dangerous forums
- Elite Dangerous Utilities has tools for finding interesting/special star systems, eg black holes, neutrons stars, etc.1
21.10. Pirating, smuggling and silent running
Excellent, a perfect excuse to listen to Alestorm while playing Elite! Pirating involves installing a manifest scanner (for scanning cargo holds) and relieving evil capitalist traders of their precious cargo -— yaaaaaarrrrrr! At present you can’t make demands to NPCs and destroying a ship usually yields zero cargo (other than materials for Engineer upgrades; jump to Horizons section), which leaves three ways to approach this:
- Find/interdict a human player and use the comms system to demand they drop some cargo. Good luck with this as most folks are extremely unreceptive to being pirated. The Elite: Dangerous forums are awash with anti-pirating sentiment (with many equating it to griefing) and some players will combat log (i.e. kill their game process to escape combat; an exploit that is supposedly being looked into by Frontier). Of course, this does beg the question: why play in Open then?
- Using a hatch breaker limpet mine (see below).
- Targeting the cargo hatch through the subsystems panel (or using the hotkey). If you damage the hatch enough, cargo will start being vomited out into space. The trick is not to destroy the ship in the process, which can be a problem against smaller vessels like the Hauler or Cobra. Low-damage gimballed weapons (e.g. pulse/burst lasers) work well for this purpose.
Obviously, some will try to flee while others may counter-attack so you might consider disabling their drives before attempting one of the above. Be aware that if you take too long the local space rozzers may show up and try to ruin your day. Note that jettisoned cargo will eventually dematerialise, so don’t mess around when collecting your precious booty. You may want to consider using collector drones for speed and convenience (jump to mining section).
Like bounty hunting, nav beacons and RESs are good places to pirate. Alternatively, you can pull fat transporters out of supercruise using an interdiction module (jump to Supercruise and interdiction section). Ideally, you want to research trade routes using the galaxy map to find juicy hauls. However, you can’t use the manifest scanner while in supercruise, so you may need to interdict several targets before you find a ship with something worth stealing.
You can also take on missions that require you to acquire stolen commodities, sometimes from a specific target.
21.10.1. Hatch breakers
These are basically homing missiles that you fire at your prey. If successful, they latch onto the cargo hatch of the target and try to break it open. First, you need to install a hatch breaker limpet controller (optional internal slot); the limpets are purchased separately from the restock menu at starports.
They’re much better than they used to be, especially as they now penetrate/ignore shields. However, each limpet only yields a small fraction of the target’s cargo and it’s pot luck what cargo it liberates. Also, the goodies get strewn over a large area. The limpets also slow and can be outrun, and can be destroyed by point defence turrets and ECM (once attached to the hull). Also, carrying limpets takes up precious cargo space on your ship. Better controller modules increase the change of success and allow you to fire more limpets simultaneously
21.10.2. Smuggling stolen goods and prohibited items
Any loot you acquire as a pirate and many items found at signal sources will be classed as stolen or illegal. These goods need to be sold to a black market contact — not all stations have one, but anarchy systems are usually a safe bet.
You can use the “has facilities” filter on the EDDB station finder to find nearby systems with a black market. Black markets are also listed on the starport facilities info on the system map.
Outside of anarchy regions, you will need to avoid authority scans when entering a starport if you don’t want to be landed with a hefty fine. The same goes for goods considered illegal at that starport (visit the system map for a list of prohibited items). Your HUD will display an “Illicit Cargo” warning above the fuel gauge if you are carrying anything that could get you into trouble in that particular system.
However, being caught with stolen goods is not the end of the world — you will not be fired upon and you will only be fined. The fine will be proportional to the quantity and value of the goods, which will not be confiscated and sometimes (especially for specific smuggling missions) you are still able to turn a profit.
The best tactic to avoid being caught is to enter the starport at speed so that there isn’t enough time to complete the scan before you’re inside. Remember, crashing into another ship while “speeding” can land you a fine or even a murder bounty. Watch for patrolling authority ships and oncoming traffic, then time your entry accordingly.
Curiously, you very rarely get scanned at outposts so these can be a convenient refuge for outlaws, though they tend to provide fewer services than starports — some don’t even offer repairs or munitions resupply (available facilities are listed on the system map).
Also, if you’re carrying illegal wares, you may want to consider turning off the “report crimes against me” option in the ship tab. Otherwise, if you get attacked outside of an anarchy system, the cops will eventually show up and you might get scanned.
21.10.3. Silent running
“Silent running” is a useful tactic for evading scans when entering ports. With silent running enabled, you become unresolved on the scanners of other ships/starports, meaning they can’t lock onto you to perform a scan, unless very close. The downside is that your shields go offline (so don’t crash) and the ship vents are closed off so the cockpit gradually heats up. If it gets too hot, equipment will begin to take damage and malfunction — you’re fine up to 100% on the temperature gauge.
There are two ways to deal with this. Firstly, you can turn off non-essential ship modules (e.g. shield boosters, FSD, cargo hatch, etc) in the systems panel to reduce total heat output, which will give you more time before overheating. Secondly, you can deploy a heat sink (of which you can carry a very limited number and require the launcher to be installed in a utility slot). These instantly draw all the heat from the ship, reducing the temperature to 0%, but only last a few seconds. Also, the colder your ship, the harder you become to detect; at 0% you become virtually invisible to all but the closest of ships.

21.11. Taxi service and tour operator
Become a glorified taxi service! Don’t worry, someday a real rain will come and wash all this scum off the shipping lanes.
Passenger missions are similar to couriering, but the cargo talks back and starts to get sulky when you get shot at or have a slight mental breakdown and decide to set the controls for the heart of the sun. These missions are taken on from the passenger lounge and will only be available to you if you have the capacity and meet the minimum accommodation requirement of the client.
21.11.1. Installing cabins and accommodating your passengers
First, you’ll need to install some cabins in an optional internal slot. These come in four accommodation classes: economy, business, first, and luxury. Though, only the Beluga and Orca, which are dedicated passenger liners (and rather plush looking), can install luxury cabins.
The capacity of each cabin varies according to accommodation type and module size. So, for instance, a class 6 first-class cabin has a capacity for 12 passengers, whereas class 6 economy can hold 32. Obviously, some potential clients have standards and will refuse to travel in cattle class, or even business or first for that matter. However, it is always possible to give the scum, err, I mean less discerning clients, a free upgrade.
When accepting a mission, you must then choose which cabin to place the party. Note that named passengers (crown symbol in the missions list) will not share cabins with other parties. Snooty beggars! Remaining cabin capacity can be reviewed via the inventory tab.


21.11.2. Passenger traits
Before taking on a job, it is important to properly read the brief and learn the passenger’s traits. Some passengers will not react well to danger or illegal activity, others will not appreciate delays or being scanned by authority vessels.
Prima donna types are likely to make sudden and whimsical demands, such as stopping off at a conflict zone or wanting you to find them some wine or coffee. Shadier characters might be pursued by hostile forces or be wanted in some systems. Be warned, security forces will open fire if you’re caught harbouring a criminal (jump to pirating, smuggling and silent running section).
If a passenger becomes too dissatisfied, they may demand you dock at the nearest starport, where they will promptly disembark, while less stable types may suddenly abandon ship using the escape pods; either way, you don’t get paid and will lose reputation with the associated faction. You also fail the mission upon ship destruction, though apparently, your passengers do survive (unlike NPC crew!). You can review passenger traits and their current level of satisfaction at any time via the transactions tab.


21.11.3. Passenger mission types
Passenger missions come in three basic varieties:
1. Ferrying from A to B. Simply transport the passengers to the required destination within a set amount of time.
2. Tourism. Take passengers to a sequence of visitor beacons in a number of systems then return home. Visitor beacons usually appear as POIs in the navigations tab, otherwise will appear when you approach a specified planetary body. These behave similarly to nav beacons.
Simply drop out of supercruise at a tourist beacon, then target the beacon. It will be scanned automatically, and you will receive a short history of the site via the comms panel, which will be added to your Codex.
Once the passengers are satisfied, you will be informed of your next destination. These missions can be quite time-consuming and may involve travelling hundreds of light years, so a fuel scoop is advisable.
3. Long distance round trips. These involve taking clients out to distance systems to scan for data, then returning home. The pay is high but can involve travelling thousands or even tens of thousands of light years. As such, they are best suited to experienced explorers with properly outfitted ships. A fuel scoop is a must (jump to exploration section).

21.12. Wing missions
Wing missions can be found on the mission boards at starports. They are indicated by a blue circle in the bottom left of the listing summary. Although these are intended for people playing as a group, they can still be taken on by solo Commanders.
Essentially, they are just scaled-up versions of standard missions and include assassination, massacre, haulage, and procurement scenarios. When working in a wing, the rewards will be duplicated rather than shared. However, they may not always be worth the extra time, effort, or risk when playing alone.

For the haulage scenarios, depots will be created on the missions board at both the source and destination starports. All players in the wing should be able to see and use these depots, and they allow you to make multiple trips to complete the mission. You simply collect as much as you can carry from the issuing station and drop it off at the destination station, then return to pick up more; rinse and repeat. The mission is complete once all the goods have been delivered.


21.13 Community Goals
Community Goals are global, story-driven missions created on a semi-frequent basis by Frontier. They normally last for several days or more and anyone can take part — it doesn’t matter whether you play in Open, Private Group, or Solo. Missions range from bringing specified commodities or exploration data to particular stations to fighting in named conflict zones or collecting bounties in certain jurisdictions. When available, Community Goals will appear under the missions bulletin board at all stations. Details of active events can also be found under the Community Goal Discussions sticky on the official forums or through the Galnet News service.
Depending on the mission type and commodities involved, Community Goals can be quite profitable and include bonus rewards based on your total contribution relative to other Commanders (e.g. top 75%, top 50%, top 25%, etc.) as well as the overall progress of the community. Some missions also include global rewards if certain community targets are met. These include things like new starports being constructed or influencing the direction of particular background storylines.
To participate, you first need to enrol. To do so, select the mission from the starport service board, scroll down to the end and click on the sign-up button. The Community Goal will then appear under your transactions tab, where you can track both global and personal progress. Don’t worry, there are no penalties if you change your mind and end up not participating in the objective. When a Community Goal expires, you should head to the specified station to collect your bonus reward.
BE WARNED THOUGH: if you play in Open, Community Goal sites are among the busiest locations in the game and tend to be a magnet for Commanders with nefarious designs — being interdicted and attacked by others players is a very strong possibility.


22. PowerPlay
PowerPlay (PP) allows you to pledge your allegiance to one of 11 galactic personalities/Powers and support them in their quest for territorial expansion.
By visiting the PP interface, either through the home tab (system panel) or galaxy map, you can see:
- what each of these Powers stands for
- which Superpower they’re aligned to — Empire, Federation, Alliance, or independent
- what effects they have on the systems they control
- their current status
- what you can do to support them
You can support your Power by completing missions that assist:
- preparation — preparing neutral inhabited systems for an expansion attempt
- expansion — attempting to take control of prepared systems
- control — fortifying control systems (i.e. those already owned by the faction)
- opposing rival expansion attempts
- undermining rival fortification efforts
Missions and terminology for each of these processes vary from faction to faction (see the PP interface for specific details), but essentially boil down to:
- transporting “Power commodities” between certain systems
- pirating or killing specific ship types in relevant systems, either interdicting them supercruise (usually an illegal activity) or in special designated conflict zones; then handing in cargo or kill confirmations to “Power contacts” at starports in control systems


22.1. Rating, rewards, and PP cycles
All PP actions are rewarded with “merits” and a very small amount of credits (100cr per merit). If you gain enough merits your rating with the Power will increase. A higher rating will improve your weekly rewards/salary, as well as increase your Power commodity quota and unlock access to faction-specific gear — e.g. Prismatic shields for Aisling Duval, Retribution beam lasers for Edmund Mahon, etc.
Each PP cycle lasts a week, at the end of which all preparation, expansion, and control actions are resolved and your new rating is determined and salary paid. At the end of each cycle, you will lose half of your merits, plus any unclaimed vouchers or undelivered Power commodities. Cycles normal finish 7am GMT on Thursdays, you should receive a warning the day before.
Note that if you’re looking to make money, then PP is not the place. You will need to grind extremely hard to achieve a rating with lucrative rewards and your time would be far better-spent bounty hunting, trading, etc. PowerPlay is about roleplaying, PvP, and supporting a Power you believe in.

22.2. Power commodities and quotas
As mentioned above, the name of the these varies according to the Power and their function. Power commodities are collected from and delivered to “Power contacts” at relevant starports and limited by a collection quota. This starts off at 10 per 30 minutes but increases with your rating to a maximum of 50. If you have money to burn, you can fast-track your next allocation for 100,000cr. This can be done as many times as you want or can afford.

22.3. Leaving a power
You can choose to leave a Power at any time, but you will lose all of your merits and will not be able to pledge to another Power for 12 hours. If you choose to defect, you will transfer half of your merits over to the new Power but will be hunted down by the old Power’s agents for a period of time (dependent on your rating).
22.4. Dangers
It’s important to realise that by pledging allegiance to a Power you will be considered “hostile” when travelling through systems controlled by a rival Power not aligned to the same Superpower as your own Power — e.g. Hudson (Federation) versus Lavigny-Duval (Empire). You will be warned of this by your HUD as well as before jumping
This means that NPCs/Commanders aligned to that Power can legally attack you in those systems, whereas you cannot legally attack them or fight back. This is not the same as being wanted and you will be left alone by the police and will be able to dock/trade freely. More generally, you may also be harassed by NPCs when carrying out PowerPlay-related activities.
22.5. The metagame, command capital, and consolidation voting
In order for your chosen Power to succeed and grow, they need to manage their command capital (CC) wisely. CC is essentially a meta-currency gained from control systems and used to maintain their upkeep and fund expansion attempts. Successfully fortifying a system temporarily reduces its upkeep cost, whereas successfully undermining a revival’s system increases theirs (fortifying/undermining beyond 100% is a waste of time).
An overall CC deficit can result in the loss of control systems (most expensive first) if a positive balance sheet is not restored within one cycle. This process is known as turmoil.

At the end of each PP cycle, up to nine systems that have reached the preparation threshold will be listed as potential expansion candidates, ordered according to the number of “preparation points” they attained during the week. From rating 2 and above (if you’ve been pledged for more than four weeks) you will be given a vote on what the Power’s priority should be next PP cycle, to either:
- consolidate — invest CC in system defence
- preparation — to invest CC in preparing candidates for an expansion attempt
Voting for consolidation raises the “consolidation line”. Only systems that end up above this line will become expansion candidates for the next cycle. The crucial factor to be considered in all this is how much a specific expansion attempt will cost and what its income and upkeep would be if controlled.

Therefore it’s important for you and others who support your Power to focus their efforts accordingly, such as which systems to fortify and which to prepare for expansion. You can find faction-specific discussions on current objectives, priorities, and strategies over on the official forums PowerPlay area.
22.6. More detailed PP guides
My guide here is a simple introduction to PP that glosses over many of its more complicated aspects. If you want to learn more, then this unofficial PowerPlay manual provides a detailed but slightly out-of-date guide on the mechanics. There’s also a helpful PowerPlay Manual For Dummies and list of other PowerPlay guides both hosted on the official forums. The Aisling Angels PowerPlay guide is a particularly useful, up-to-date, and easy-to-follow introduction.
23. Elite Dangerous: Horizons and Beyond expansions
Horizons, released in December 2015, was the 2016/17 expansion (or “season 2”) for Elite: Dangerous. It brought new features that significantly expanded the base game, most notably:
- the ability to land on planets and explore their surfaces
- persistent characters known as Engineers, who can upgrade ship modules
- materials and crafting (“synthesis”)
- ship-launched fighters (SLFs)
- multi-crew co-op play
- Holo-Me avatar creator (or Commander creation)
In 2018, Horizons was followed up by the Beyond expansion (“season 3”). Beyond was free a season of updates that further expanded, tweaked and polished both the base game and Horizons content.
Horizons used to be a paid-for expansion. However, on 27 October 2020, Frontier made Horizons available to all current and future players for free, which was a nice gesture. This also puts everyone in the same position for the upcoming Odyssey update, which is a premium expansion that will arrive in early 2021.
Horizons does increase the system requirements for playing Elite: Dangerous, so for the time being the vanilla game is still available to run from the game launcher. However, if your PC meets the minimum system requirements, there’s little reason not to play the Horizons version.
A useful Horizons quick start guide can be found on the Elite: Dangerous community site.
23.1. Planetary flight and landing
At present only planets without an atmosphere (i.e. rocks/moons) can be landed on. If landing is possible, the planet will have a blue ship icon next to it the navigation tab of the target panel and a blue halo around it in the system map.
The system map and navigation tab will also list any outposts (small buildings icon) and planetary ports (skyscraper icon) present on the surface. Planetary ports can be docked at and behave in a similar way to starports, whereas outposts/settlements are points of interest (POIs) that can be explored and raided, and are the targets of certain missions.
To explore the surface of a planet you will need to purchase a surface reconnaissance vehicle (SRV), jump to SRV basics section for more details.

Whether you intend to land directly on the surface or dock at a planetary port, the initial steps are the same. First, you need to target and approach the planet (or port/POI) in supercruise. I still use the “6-second rule” for this (jump to Supercruise and interdiction section) and never go above 75% throttle once over the planet.
As you get close (around 2Mm), your HUD will change to display your altitude and speed of descent. At an altitude of 600km, you will enter a special form of supercruise known as orbital cruise and your HUD will now also display a pitch ladder (see annotated screenshot below).
At an altitude of around 25km, your ship will drop from orbital cruise into normal flight. If your ship’s pitch is between -60 degrees and +5 degrees when this happens, you will enter glide mode and cruise at speed of 2500m/s until near to the surface. To abort this and enter normal flight immediately, simply raise the pitch to above 5 degrees.
Note that while in normal flight above a planetary surface, your ship will have reduced manoeuvrability at slow speeds, as more thrust power is diverted into vertical thrusters in order to maintain your current altitude.

23.1.1. Landing at a planetary port
Docking at a planetary port is very similar to docking at an orbital outpost. However, you now have gravity to contend with and the stronger the gravity, the more careful (i.e. slower) you should be with your approach.
Anything under 1G should be fairly straightforward. The trick is to drop out of orbital cruise between 50 and 80km from the planetary port and glide in the rest of the way. If you drop out too early, you’ll end up too far away, and if you drop out too late you will overshoot or smash into the ground. Once within 7.5km, request docking then head over to your pad and land normally. See video below for a basic demonstration of docking at planetary port.
23.1.2. Landing on a planetary surface
Similar to above but when you drop out of orbital cruise:
- head to where you want to land — ideally somewhere relatively flat
- reduce your altitude to less than 1km
- disengage forward thrusters.
When you deploy your landing gear, the scanner will display a surface relief map with a representation of your ship above it (see screenshot below). The projection disc will turn blue when above suitable terrain.
Align the pitch ladder with the alignment bar using pitch and roll (it will turn blue when okay) and ascend slowly to the surface using your vertical thrusters.
And remember, the higher the gravity, the slower and more careful you need to proceed. See video below for a basic demonstration of surface landing.

23.1.3. Taking off again
Sooner or later you’ll want to head back into the endless void. Simply use your vertical thrusters to leave the surface, point the ship upwards and then engage forward thrusters. Once you’re a few km above the surface you will no longer be mass locked, and should be able to engage your FSD to either enter supercruise or perform a hyperspace jump (if your destination is not obstructed by the planet surface).
23.1.4. Finding points of interest (POIs) from the air
A variety of POIs can be found on the surface of planets, including small outposts, mining facilities, crash sites, and stashes that can all be scavenged or pillaged for cargo. Curiously, nearly everything you encounter on the surface is considered “legal salvage”. Like signal sources in space, planetary POIs are randomly generated and not persistent.
When flying above 1.5km the general location will appear on your scanner as large blue circles, it helps if you zoom out your scanner. If you fly low enough, larger POIs can actually be seen from the air — turning your lights or night vision on helps with this.
Alternatively, you can touch down and search for them with the SRV (jump to Finding materials and POIs using the SRV wave scanner section). Be warned that some POIs are protected by turrets and mobile sentries that will turn hostile if you get too close — you will see a warning on your HUD first. Entering some outposts may also count as trespass and land you a fine or bounty. Again, you will be warned first.

23.2. SRV basics
23.2.1. Purchasing and deploying an SRV
To explore the surface you need a surface reconnaissance vehicle (SRV), which is essentially a moon buggy with guns and shields. And who doesn’t want a moon buggy with guns and shields?
SRVs are purchased through the outfitting menu at ports, but first, you need to install a planetary vehicle hanger in a module slot. More expensive versions can house multiple SRVs. Once you’ve done this, click on one of the vehicle bay slots to purchase an SRV (see screenshot below).

SRVs can only be deployed once you’re securely touched down on a planet’s surface. You can also do this when docked at a planetary port, if you fancy a drive around town. The SRV is deployed from the role panel, which is found underneath your scanner by using UI focus + down or you can bind a hotkey (under “mode switches”).

23.2.2. Controlling an SRV
First, you will probably need to configure your controls — you’ll find the SRV options under the “driving” tabs in the control options. I use a keyboard and mouse setup and have copied in my bindings below as a guide (any controls not stated are set to default); obviously, you will want to set these to your own taste.
Click here to reveal key binds
| Driving: | |
| drive assist | mouse 5 [toggle] |
| srv pitch mouse y-axis roll | pitch |
| steering left button | A |
| steering right button | D |
| roll left button | Q |
| roll right button | E |
| vertical thrusters | left ctrl |
| fire SRV weapon | mouse 1 |
| operate datalink scanner | G |
| handbrake | space |
| headlights | L |
| toggle SRV turret | mouse 4 |
| Driving targeting: | |
| select target ahead | T |
| Driving turret controls: | |
| turret mouse x-axis | yaw |
| turret mouse y-axis | pitch inverted |
| Driving throttle: | |
| SRV throttle increments | continuous |
| accelerate button | W |
| decelerate button | S |
Controlling an SRV is very similar to driving a car. However, you also have vertical thrusters that allow you to perform jumps and to slow your descent if you go over an edge. While airborne you can control both pitch and roll, useful for making sure you land on your wheels. Note that thrusters drain your engine capacitor.
Be warned, the SRV is pretty fragile and will take hull damage, regardless of shield condition, from falls and collisions. Hitting a rock at speed, especially on a low gravity planet, can send you flying up into the air. The SRV is also prone to power sliding, particularly on icy terrain.
Drive assist allows you to maintain a constant speed of your choice and is actually pretty useful (think cruise control); simply set the throttle while engaged. Night vision (the key binding is under miscellaneous) also works in the SRV and is pretty damn handy when it gets dark.
The SRV’s cockpit looks and operates almost identically to your ship’s cockpit during orbital cruise, right down to having the same three-way power distributor.
The SRV is equipped with duel gimballed plasma repeaters, which have a limited supply of ammo. These can be fired from the normal cockpit view or from the turret camera, which sits on top of the SRV. You can still drive the SRV while in turret mode.
To scoop up materials and cargo, deploy your cargo scoop, target the item, and simply drive over it. The SRV can only carry 2T of cargo, though the materials limit is the same as in your ship (jump to Synthesis and materials section). The datalink scanner is for scanning data points and terminals that are found at outposts and POIs (jump to Using the SRV datalink scanner section).
Your SRV is magically repaired upon rejoining your ship; however, it will only be refuelled and rearmed when you dock at a port. Fortunately, you can repair, refuel, and rearm your SRV from the materials you collect on your travels (jump to Synthesis and materials section).
If your SRV is destroyed, you will be given the option to rejoin your ship in orbit on the death/insurance screen at no cost, though you will need to head to a starport in order to purchase a new SRV.
23.2.3. Rejoining your ship
When you get too far away from your ship (more than 2km I think) it will magically take off and enter orbit — i.e. despawns, so is 100% safe. This may also happen if you quit the game. You can also dismiss your ship manually from the SRV menu in the role panel.
So to rejoin, you may need to recall your ship from orbit using the SRV menu in the role panel. Your ship will touch down on the nearest piece of suitable terrain.
To board your ship:
- Drive under the illuminated bay.
- When in position the “board ship” indicator will light up — it doesn’t matter whether the SRV is facing the front or the back of the ship
- Bring up the SRV menu from the role panel and select board ship.
- Instead of boarding, you can also choose to just transfer across your cargo.


23.3. Synthesis, materials, and materials traders
Horizons introduced a looting and crafting mechanic that revolves around collecting materials, which come in four flavours:
- elements
- manufactured materials
- data materials
- guardian materials
Materials take up no cargo space, how many you can carry depends on grade:
- grade 1 (most common) – 300 each
- grade 2 – 250 each
- grade 3 – 200 each
- grade 4 – 150 each
- grade 5 (rarest) – 100 each
They are retained when your ship or SRV is destroyed — unlike bounties, combat bonds, and exploration data. You can review collected materials in the inventory panel. Elements and manufactured materials are grouped together under “materials”, data materials are under “data”. They can be filtered.

Materials are sometimes also awarded for completing missions, can found at signal sources and planetary POIs (including geological features), and can be obtained through megaship interactions. See below for a description of the main ways to obtain each type:
23.3.1. Elemental materials
Elemental materials are mainly found on planetary surfaces (jump to Using the SRV datalink scanner section) and are required for both synthesis and Engineer upgrades.
However, a number of elements can also be obtained as a byproduct while strip mining asteroids (jump to mining and collection drones section). These include:
- arsenic
- boron
- cadmium
- carbon
- iron
- lead
- nickel
- phosphorus
- rhenium
- sulphur
- zirconium
In fact, lead, boron, and rhenium, can only be obtained from asteroids.
From planets, elements are harvested from the outcrops and meteorites scattered across the surface (jump to Finding materials and POIs using the SRV wave scanner section). They can also be harvested from the crystals and other targetable fragments at geological features such as geyser and fumaroles.
To harvest an element from a planetary surface:
- Target the outcrop, meteorite, crystalline fragment, etc
- Shoot it
- Target the liberated material
- Drive over it with your cargo hatch deployed
You can use the system map to determine the available elements and their relative abundance on a specific planet (see screenshot below). If this data is not available, you’ll need to either by exploration or scan the planet using the FSS.

23.3.2. Manufactured materials
Manufactured materials are ingredients for Engineer upgrades. These are found at signal sources and planetary POIs; ships also drop them upon destruction. Which materials spawn is dependent on ship type and system state. For instance, pharmaceutical isolators only tend to spawn at signal sources in “outbreak” systems, whereas polymer capacitors only tend to be dropped by military and authority ships — in fact, a good but risky place to obtain these is at conflict zones.
The INARA components database is a good place to find out where specfic manufactured materials tend to spawn. If you’re struggling to find a specific material, it’s also worth searching the forums as there is plenty of useful info on there.
Missions rewards are also a good source of manufactured materials.
23.3.3. Data materials
Data materials are ingredients for Engineer upgrades and can be acquired in several ways.
- scanning ships — this is performed automatically when you target a ship and have visual on your HUD, and works in both supercruise and normal flight; it does not require any special modules.
- scanning the data points you find at planetary outposts and crash sites
- scanning private data beacons you find at degraded/encoded emission signal sources
- wake echoes are obtained by using a wake scanner (works the same as manifest or kill warrant scanner) to analyse the high energy wakes that are left behind by ships entering hyperspace; a good place to do this is just outside of starports or, even better, at the distribution centres found in high-population systems in a famine state (use the filter in the galaxy map to find these)
23.3.4. Guardian materials
Guardian blueprints and materials are special materials required by the Technology Broker for unlocking Guardian weapons and modules. In Elite: Dangerous lore, the Guardians were an ancient alien race and their ruins can be found throughout the galaxy. These materials can be obtained from exploring and interacting with ruin sites. A list of known Guardian ruin sites can be found on the Canonn Research Group website. You can also use Canonn’s interactive galaxy map to locate sites.
TheOriginalB has posted some walkthroughs on the official forums on how to obtain the bits and bobs needed to unlock Guardian tech:
- Walkthrough: Guardian Module Blueprints
- Walkthrough: Guardian Vessel Blueprints
- Walkthrough: Guardian Weapon Blueprints
23.3.5. Synthesis
Synthesis is a crafting system that allows you to do things like:
- restock ship munitions, including chaff, heat sinks, and the AFMU
- restock limpets
- top up your life support if your canopy gets blown
- boost FSD range for a single jump
- refuel, rearm, and repair your SRV
Common materials are used for basic versions, but rarer materials are required for “standard” and “premium” versions that provide certain bonuses such as increased damage for a single reload.

23.3.6. Materials traders
Materials traders can be found at some starports under the contacts menu. Once discovered, their locations can be revealed on the galaxy map using the services filter (within 40ly of your current position). Materials traders come in three varieties:
- raw — trade in elemental materials
- manufactured — trade in manufactured materials
- encoded — trade in data materials
To trade, click the material you want, followed by the material you’re selling. Then choose the amount you wish to trade. The trade ratio depends on the rarity of the substances you’re exchanging. As you’d expect, rare materials are worth far more than common materials.
A list of known materials traders is available through the INARA “nearest” tool and can be filtered by proximity to a specified system.

23.4. Finding materials and POIs using the SRV wave scanner
Your SRV is equipped with a wave scanner that can be used to find both outcrops/meteorites and POIs. It’s a little bit daunting at first, but once you know what to look out for it’s actually quite easy.
You’re looking for single bands or bands of two or three parallel lines. At range they will appear as indeterminate blobs, slowly resolving into distinct bands that decrease in size as you get closer. Also, the closer you get to an object, the more frequently the scanner will beep. Bands that appear in the bottom half of the scanner tend to be outcrops/meteorites and those in the upper half tend to be POIs (see screenshots below).
Different meteorite and POI types have slightly different banding patterns and sounds. The Elite: Dangerous Wiki has visual references guides for meteorites and outcrops and planetary POIs.
As mentioned earlier, some POIs are guarded by turrets and mobile sentries that will open fire if you trespass or get too close — you will receive a warning first. Curiously, any cargo found on the surface is usually considered “legal salvage”.


23.5. Using the SRV datalink scanner
Data points and terminals can be found at some outposts and crash sites. Terminals are scanned to fulfil certain missions, whereas data points can be scanned to generate intel packages, as well as data materials. These packages will be of relevance to one of the three Superpowers (check the transactions tab) and can be sold at a local security office in one of their ports. Scanning certain terminals can also be used to override security systems.
To scan a data point or terminal, simply target it and hold the assigned key until the process is complete (it will take a few seconds) — the scanner works in both normal and turret view.
If there is more than one data point at a site, you will need to scan all of them within a given time frame to generate the intel package. If the timer expires you will need to start again. Data points can be attempted in any order and you receive a time extension for each one you scan. Note that scanning private data points is illegal — this info is displayed in turret view (see screenshot below).


23.6. Surface missions
With Horizons comes surface-specific missions. These are listed separately on missions boards and normally include a planetary horizon icon to the right of the description (see screenshot below). Some surface missions will send you to undiscovered planets, so you will need to either scan a nav beacon or use the FSS to find your objective.

The variety of missions is very similar to that of space missions with a few notable exceptions, which I have listed below:
23.6.1. Salvage missions
These involve finding and delivering specific items found on planetary surfaces. Like other missions, using the FSS or scanning a nav beacon reveals which planet to head out to. Once close enough, a search zone will spawn. As you head towards it, it will move several times, until the exact site is located. Land there, deploy your SRV, and scoop up the cargo. Some sites will be protected by skimmers.

23.6.2. Cut the power missions
These involve heading to a named/persistent outpost then locating and destroying a specific power generator. Generators can sometimes be tricky to find as they don’t appear on your scanner until quite close. Also, there are often several generators in an outpost and you need to destroy the correct one to complete the mission.
These missions normally involve breaking the law (trespass and assault) and most outposts are defended by both turrets and mobile sentries (skimmers); these can be taken out by either your SRV or ship. High-security outposts will also scramble fighters to protect themselves.
Sometimes access will be barred by a security forcefield; these can be disabled by either destroying the relevant power generator or using your datalink scanner on the associated terminal. The navigations tab provides an indication of the size and security level of persistent outposts.


23.6.3. Data missions
Similar to the cut the power missions, but instead you need to use your datalink scanner on a specific terminal.
23.6.4. Destroy skimmers
Pretty simple, destroy a specified number of skimmers (i.e. mobile sentry drones). The mission will name a specific planetary outpost, some of which will be heavily defended by numerous turrets and NPC ships as well as the skimmers themselves.
Normally it will be a crime to attack any of these. So, the trick to completing these missions with a minimum of risk is not going directly to the stated base, but landing near it (within 10-50km). Search for POIs in the area, either with your ship or SRV wave scanner. Any skimmers found at these will belong to the mission target faction and most will be wanted, meaning you can destroy them without receiving a bounty. You can actually make a lot of money doing these missions.
23.7. Engineers
Engineers are persistent characters who are capable of modifying your ship’s weapons and modules. There are at least 24, each with their own backstory and speciality, such as kinetic weapons or exploration equipment.
Engineers reside in remote planetary bases scattered across the galaxy and access to them is by invitation only. To acquire an invite, you must first learn about them and then meet their basic criteria — this sometimes includes being on cordial terms with a named minor faction. At first, only a handful will be known to you; contact with others is established by working with known Engineers.
Once you gain access you will then need to complete a specific task in order to start working with them, such as:
- providing them with a specified quantity of a rare or difficult-to-find commodity, e.g. meta-alloys or Soontill relics
- handing over a specified value of bounties vouchers or combat bonds
You access info about the different Engineers through the home tab of the systems panel.

Inara’s Engineers page lists:
- currently known Engineers
- their specialities and blueprints
- possible modification outcomes
- how to receive an invite and unlock their services
A list of Engineers resources and guides can be found on the official forums.
23.7.1. Reviewing possible modifications and finding ingredients
To start the modification process for a specfic module, you need to dock at Engineer who offers upgrades for that module type.
Engineer modifications are rated by grade, with grade 5 offering the largest effects. Clicking on a grade will show you the outcomes and the materials required to craft that particular modification. All modifications result in both positive (blue circles) and negative (red circles) outcomes.
The modification preview shows you both the current value and the maximum possible value for each attribute that will be changed. The circumference of the circle shows how close you are to maxing out that attribute for their current grade.
For each modification you wish to craft, you must first acquire the necessary ingredients. These include a wide variety of materials (jump to Synthesis and materials section), with higher-grade modifications requiring rarer items.
Be warned, finding and collecting these can be very time-consuming/grindy! However, you can find some information on how to find these by hovering your cursor over the ingredient name on the Engineers screen.Better still, check out INARA‘s component list; hovering over the location also provides useful tooltips.
23.7.2. The modification process
For each and every module, you start at grade 1 and must sequentially work your way through each grade. The first modification for each grade locks in the negative outcomes, which will then remain static for the rest of that grade. Each time you press the “generate modification” button, you spend the required materials and each attribute will increase or decrease in a predictable manner.
Repeated modification will gradually move you towards the maximum possible values for that grade and will eventually unlock the next grade. The higher your reputation with the Engineer, the faster this will occur. Reputation improves as you craft modifications. A particular Engineer may not go up to grade 5 for all their available modifications.

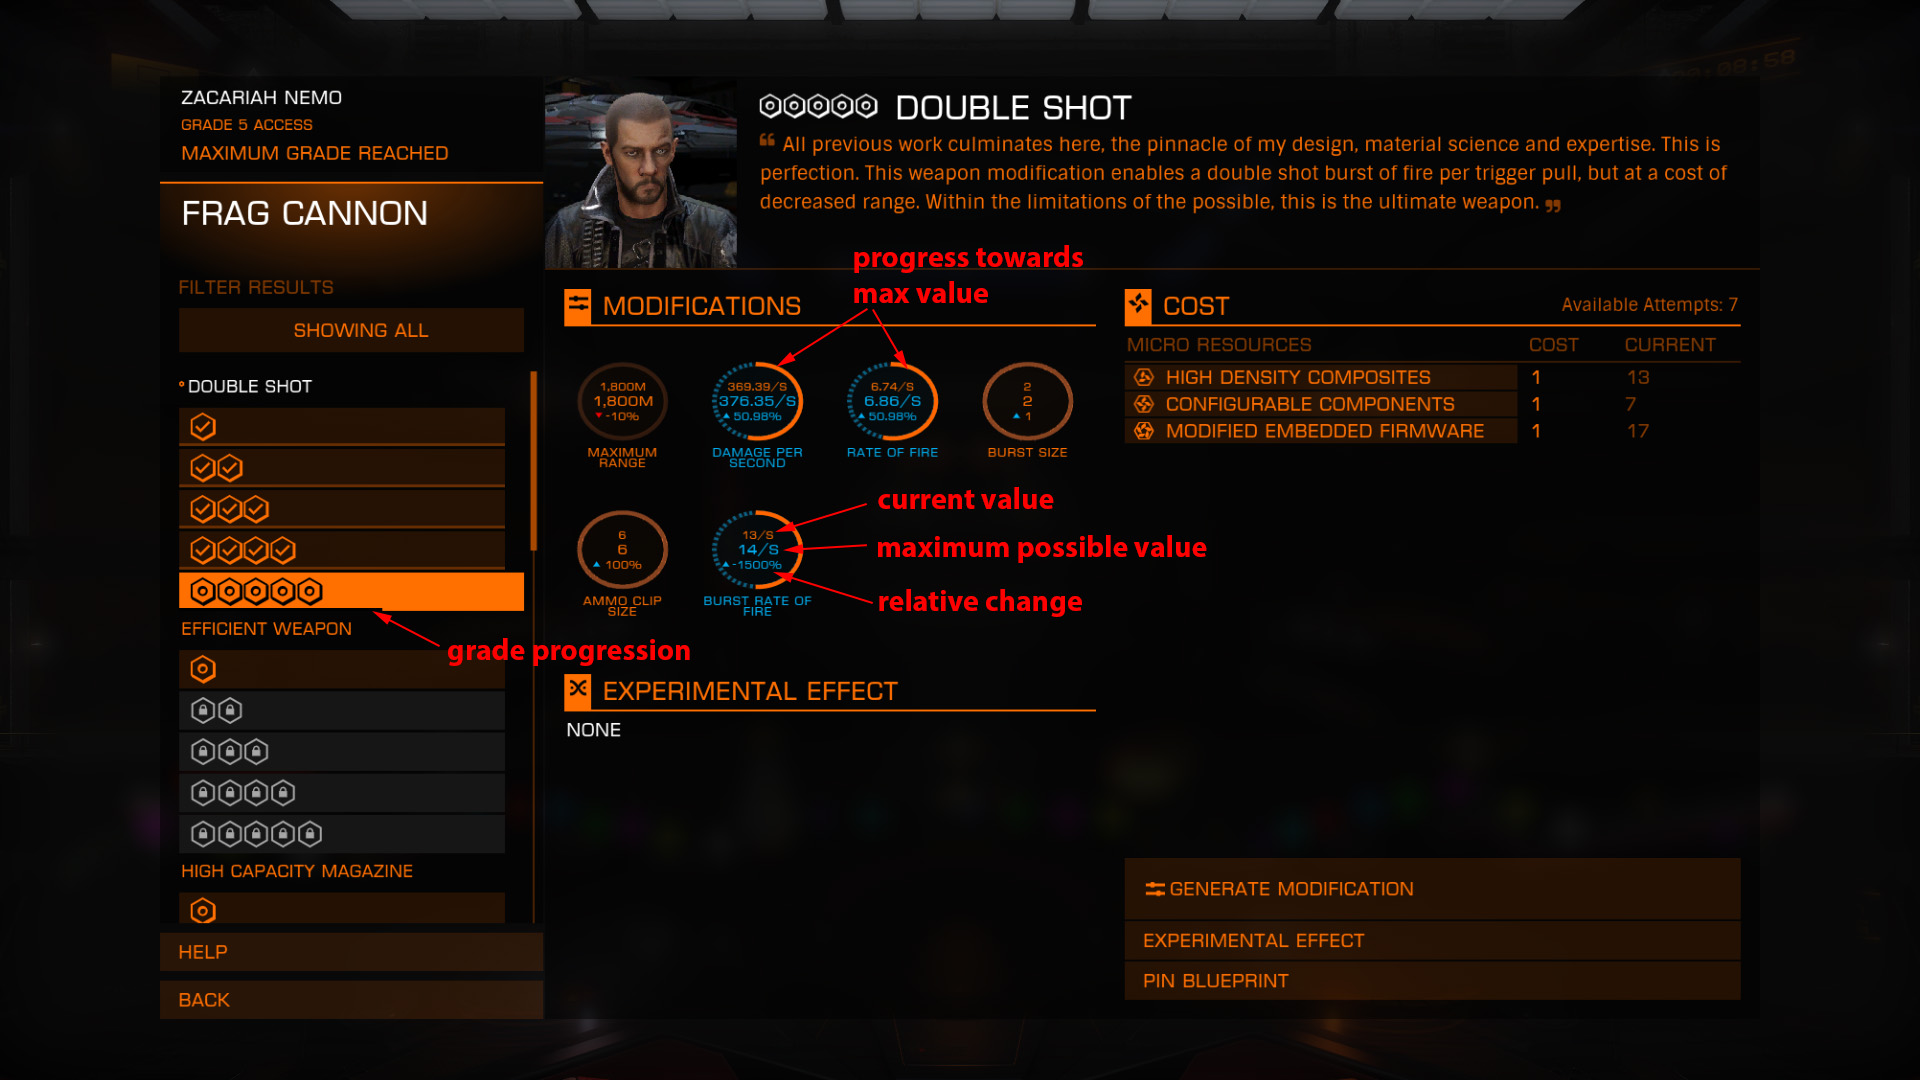
23.7.3. Experimental effects
For each modification, you can also purchase an experimental effect. These include things like decreased weight, increased integrity, reduced power draw, or special ammo effects, amongst other things. See the INARA page for a full list of these.
You can view the available experimental effects by clicking on the “experimental effect” button in the bottom right. Like modifications, these also must be bought using materials. However, the modifier values of experimental effects are fixed and don’t change between grades — so it doesn’t matter if you purchase an experimental effect at grade 1 or grade 5. They can be removed and changed at any time.

23.7.4. Pinning blueprints and remote engineering
You can also pin blueprints, but only one per Engineer and this can only be done when at their base. If you want to change the blueprint, you have to head back to their base. You can view your current pinned blueprints from the Engineers page that’s accessed from the home tab
Pinned blueprints allow you to craft these modifications from the “remote workshop” option available at all starports. However, when remote engineering, you are unable to purchase experimental effects and gain no reputation with any of the Engineers. Caveats aside, it’s still a useful feature and I use it a lot.
23.8. Ship-launched fighters and NPC crew
The following ships can install hangars that allow you to store and deploy ship-launched fighters (SLFs):
- Imperial Cutter
- Federal Corvette
- Anaconda
- Federal Gunship
- Federal Crusader
- Beluga
- Type-9 Heavy
- Keelback
- Krait Mk II
- Type-10 Defender
Fighter hangars are installed like any other ship module and come in two classes:
- 5D hangar = capacity for one SLF
- 6D hangar = capacity for two SLFs
Like SRVs, clicking on the available fighter bay slots in the outfitting menu allows you to purchase SLFs. These come in multiple flavours, each with their own strengths and weakness:
- F63 Condor — Federal
- GU-97 — Imperial
- Taipan — Independent
- XG7 Trident — Guardian
- XG8 Javelin — Guardian
- XG9 Lance — Guardian
Availability of these types is system dependent and the Guardian SLFs need to be unlocked first through a Technology Broker. Each individual model also comes in several varieties, according to weapon loadout. The Elite: Dangerous Wiki has a guide on each of the SLF types.


Although the 6D hanger has the capacity for two SLFs, only a single fighter can be deployed at any one time — the exception being during multi-crew sessions.
In addition to the fighter currently occupying the bay, each individual slot is able to produce an additional seven fighters (via 3D printing or some malarkey). So, if a fighter is lost, that bay will automatically start constructing a replacement. However, this takes a few minutes. Therefore, by having a second slot, you are able to immediately launch another fighter if the other one is vaporised.
Lost fighters and the components to construct new ones can be replenished at starports via the restocking menu.
23.8.1. NPC crew
For the sake of clarity, it is worth pointing out here that SLFs are flown remotely by “telepresence”. Apparently, the body in the cockpit doesn’t belong to anyone! So when a fighter is destroyed, no one dies. Controversial, I know, but let’s not get into a discussion about that here!
To make the most of your SLF, you need to hire some crew. You can launch a fighter without an active crew member, but you’ll only be able to order it to either follow you or hold position, and it will not partake in combat. The same applies to the mothership when you take control of the fighter.
NPC pilots are hired at starports via the Crew Lounge. You can hire up to three, but can only set one active crew member.
In addition to an initial one-off hiring cost, each crew member you take on board, regardless of whether they are active or not, will take a set percentage of all profits. Like you, NPC pilots hold a combat rank with the Pilot’s Federation, which will improve through active duty (i.e. dogfighting). This not only determines their ability but also their salary demands.
Lower ranking pilots are cheaper to hire and will take a smaller share of your profits. But as they rank up, they will demand a bigger cut. Crucially, a pilot “trained” from scratch will be less of a financial burden than one hired at a higher rank. For instance, a pilot hired at expert level will take a 12% share of your income. Whereas a harmless-ranked pilot will start at a 4% cut, increasing to 7% when they eventually reach the rank of expert.
Note that you can only set active crew at the Crew Lounge in ports. And when you switch to a non-SLF ship and then back, you will need to set the active crew member again.

If the mothership goes does down, you will be given the option to recover an active NPC pilot. The cost of doing so increases with their combat rank, so an Elite crew member will set you back 2.25 million credits, for example. Still, it’s better than training up a new pilot from scratch.

23.8.2. Launching fighters and issuing orders
Fighters are deployed and orders are issued through the role panel, i.e. the panel below the sensors area (UI focus + down, or you can set a specific key). When you first launch a fighter, you need to choose which one to deploy (if you have two bays) and who’s going to fly it, you or your NPC pilot.
Once deployed, you can switch between controlling the fighter and the mothership at any time. If you have an active crew member they will take over the controls of the other vessel (if you trust them!).
The fighter is flown like any other ship in the game and has a near identical cockpit interface and layout. Note that the fighter will be lost if it veers more than 30km away from the mothership. It’s also lost if it doesn’t return to the ship before engaging your FSD. However, it doesn’t need to be docked before exiting the game.
A variety of orders can be issued either to your fighter or the mothership, depending on which one you are presently in control of. These include things like:
- defend — will only attack targets that attack you or the SLF
- engage at will — will attack any hostile in range
- hold position — will stay in current position
- maintain formation — will follow ship without engaging targets
- attack target — will specifically engage your current target and will continue to do so even if you switch to a new target
Most of these can be assigned their own hotkeys (under “fighter orders”). Regardless of whether or not you are flying the fighter, the docking sequence must be initiated before it can return to the ship (role panel or hotkey). To dock manually, simply fly to the end of the blue holographic tunnel on the underside of the mothership.
The ship you’re not directly controlling will appear on your scanner as a green contact and an icon on the HUD will indicate current distance and direction. It’s shield/hull status and current orders are displayed on the right side of the dashboard, just above the status of the ship you’re flying.
By the way, if you’re determined to improve your combat rank quickly, you might want to think twice before launching that SLF. NPC pilots take 50% of the progression points for each kill they’re involved in, as Frontier confirmed on Reddit.


23.9. The Commander creator (Holo-Me)
Known in the game (rather cringingly) as “Holo-Me”, the Commander creator allows you to completely customise the appearance of your avatar. It can be accessed either from the starport services menu (top right) or from the home tab of the systems panel.
It’s pretty straight forward to use, but if you’re feeling lazy you can use one of the 50 presets or you can randomise each of the available features. You change your avatar at any time and as many times as you like, so knock yourself out. You may need to assign keys in the controls menu in order to rotate and quickly undo changes. Also, note that tattoos and some of the flight suits need to be purchased for real money from the Frontier store.

23.10. Multi-crew
Multicrew allows up to three players to team up together on the same vessel, with the owner flying (Helm) and the others operating the turrets/scanners (Gunner) or ship-launched fighters (Fighter Con). Crucially, unlike with the wings mechanic, it uses a matchmaking system and players can hook up instantly regardless of where they are in the galaxy.
Crew members are simply beamed in as holograms (“telepresence”) with their own ships safely despawning. When the session ends, the crew members are returned to their respective ships in their original locations.
Before joining a crew, you may need to configure a set of keys/buttons in the control options (under “multi-crew”)
23.10.1. Joining/creating a multi-crew session
You must be in the Open game mode first in order to participate in multi-crew. Only ships with at least two seats in the cockpit/bridge can be used for multi-crew, so no Sidewinders! The multi-crew interface can be found in the second tab of the comms panel.
To create a session on your own ship, you can either:
- invite specific friends — simply click on the friend you want to invite, but obviously they need to be online and currently in Open play
- open your ship up to complete strangers via a matchmaking system — click the “find crew” option
Before joining a multi-crew session, each player must select a planned activity from a predefined list, e.g. bounty hunting, piracy, mining, etc. These come with their own rulesets, which you should read carefully. Breaking these rules could see you automatically kicked from the session, e.g. shooting at ships with a clean status. Not only does this system allow for players intentions to be matched with each other, but also helps prevent griefing/trolling.
When first joining another Commander’s ship, you must select a role from those available. This is done through the role panel, i.e. the panel below the sensors area (UI focus + down, or set a hotkey for “role panel”). By returning to the mothership’s interior view and heading to the role switch panel, it is possible to change role (if available).
Once in a session, the comms panel can be used to:
- leave or close a session
- activate/deactivate voice chat
- mute other crew members
- send text messages and friends requests
- block players from future sessions
The history tab also handily keeps track of who you’ve recently played with. If you’re accidentally disconnected (unfortunately, this happens a bit too frequently), you will be given the choice to rejoin the session (if still active) when you load back into the game.


23.10.2. Helm
If you own the ship, you will always take the Helm — it is not possible to swap seats with the other crew members. The Helm pilots the ship and controls all ship functions and fixed/gimballed weapons. Control of turreted weapons and ship-launched fighters is lost when those systems are taken over by another player. While in multi-crew mode, is not possible to hand control of the vessel over to an NPC — meaning you yourself can’t fly one of the ship-launched fighters.
The Helm can kick crew members or end the session at any time. They can also use the ship tab during a multi-crew session to disable the fighter con or limit the gunner to just weapons and scanners, which is pretty useful for gunners who seem intent on spamming all your shield cell banks and heat sinks.

23.10.3. Gunner
The Gunner controls all turreted weapons, as well as sharing control of scanners (e.g. manifest, kill warrant, etc ) and utilities (chaff, heat sinks, etc) with the Helm. You start off in first-person view, where you can’t do much other than look around the cockpit, set your pip (see below), and customise your fire groups in the systems panel — just like in your own ship, but with an extra two fire buttons to assign. However, by switching to the outside third-person view (see screenshot), you’re able to fire/use the weapons, scanners, and utilities available to you.
Controls are very much the same as it would be in your own ship, though you may need to set some keys first in the controls menu under the multi-crew section. For instance, you need a key to switch between the inside and outside views.

23.10.4. Fighter Console
Like the Gunner, the Fighter Con starts off in the mothership’s cockpit. From here you can either launch a fighter or switch to one that’s already deployed. You can swap between the fighter and the mothership at any time.
Flying a fighter is almost identical to flying any other small ship (jump to Ship-launched fighters and NPC crew section). It’s possible for the Helm to send you orders, including a request for you to dock the fighter. Remember that active fighters are lost during jumps and that they cannot stray more than 30km from the mothership.
The fighter’s multi-crew interface works in a very similar fashion to that presented when you team up with wingmen. At the top of the screen, you can see the status (hull and shields, where relevant) and current targets of your crewmates. You can set up hot keys (under “targeting” in the controls menu) that allow you to quickly select your crewmates or their targets.

23.10.5. Bonus power distribution pips
Each crew member is given a pip that they can assign to any category (sys/eng/wep) in the mothership’s power distributor. This is done in the same way as you would do in your own ship. For the Fighter Con, this can only be done when using the mothership interior view, but the Gunner can also assign their pip while in the third-person view. Note that no category can exceed a total of four pips.

23.10.6. Possible crew combinations
Depending on the configuration of the ship (i.e. availability of weapons, NPCs, and fighter bays), the following combinations are possible:
- helm + one gunner + one human-controlled fighter
- helm + one gunner + one human-controlled fighter + one NPC-controlled fighter
- helm + two human-controlled fighters
23.10.7. Risks and rewards
As it’s their ship, the Helm takes all the risk. On the event of ship destruction, crew members are returned safely to their own ship (without penalty) and the owner is left looking at a rebuy screen. The good news is that the insurance cost is reduced by over half for a fully-crewed ship.
In terms of rewards, bounty claims and combat bonds are duplicated for each crew member. However, whereas the Helm always gets 100% of the value, what crew members receive is dependent on how their combat rank compares to the Helm. Essentially, the higher your rank, the more you’ll get (up to 80% of the reward value according to Frontier). Currently, crew members also receive a 10% dividend from trading profits but nothing from mission payouts. Faction reputation is unaffected for the Gunner and Fighter Con.
At the end of a multi-crew session (either by disconnection or exiting), you’ll be presented with a report. Here you can choose to accept or decline the financial rewards. By accepting the payouts, you also take on any fines incurred during the session. Any bounties are converted into active fines.

23.11. Technology Brokers
Technology Brokers can be found at some starports under the contacts menu. As with Materials Traders, once discovered, their locations can be revealed on the galaxy map using the services filter (but only within 40ly of your current position).
These guys deal in blueprints for high-tech weapons and modules that can’t be found anywhere else. This includes some alien (i.e. Guardian) technology.
These blueprints can only be bought using materials and commodities. Once unlocked, the modules can be purchased and fitted to your ship at an outfitting yard.
A list of known Technology Brokers is available through the INARA “nearest” tool and can be filtered by proximity to a specified system. INARA also has recipes lists for unlocking all the known Technology Broker wares.
TheOriginalB has posted some walkthroughs on the official forums on how to obtain the bits and bobs needed to unlock Guardian tech:
- Walkthrough: Guardian Module Blueprints
- Walkthrough: Guardian Vessel Blueprints
- Walkthrough: Guardian Weapon Blueprints

24. ARX and the in-game store
In the September 2019 update, Frontier introduced an in-game store and a virtual currency known as ARX to Elite: Dangerous.
ARX can only be used to buy cosmetics items including ship skins, bobbleheads, and Holo-Me customisations from the in-game store. Thankfully, ARX cannot be used to purchase anything that directly affects gameplay, such as credits and materials.
Players can purchase ARX bundles using real money from the Frontier Store.
You can also earn ARX by simply playing the game but this is capped at a mere 400 ARX per week. Note that the ARX awarded during your current gameplay session may not show up until you exit the game to the main menu.
On Playstation 4 and Xbox One, ARX completely replace the Frontier Points system for buying in-game extras. PC players are no longer able to directly purchase cosmetic items from the Frontier store.
I have no idea what ARX stands for but in a feeble attempt to appease lore obsessives, Frontier describe it as an “alternative currency created and regulated by the Bank of Zaonce.”
25. Fleet carriers

Drake-Class Carriers, or more simply fleet carriers, are player-owned assets that act as a mobile base of operations and effectively behave like mini, portable starports.
Carriers have a jump range of up to 500LY and owners can use them to store and transport their fleet. You can also choose to install facilities and services similar to those found at standard starports, such as commodity markets, black markets, outfitters and redemption offices. They have a cargo capacity of up to 25,000 tonnes that owners can use for personal storage.
Fleet carriers are persistent structures, which means that other Commanders can see and interact with them regardless of game mode or whether the owner is even currently logged in to Elite: Dangerous.
However, these megaships are indestructible and have similar defences to space stations, so don’t even think of trying to take one down!
25.1 Docking at a fleet carrier

Fleet carriers appear on the system map and clicking on one will provide additional information, including available services, docking access and details about the proprietor. If present in your current system, they will also appear in the navigation panel.
The owner can specify rules on who is allowed to dock at their carrier. They can also choose which facilities to install and set an additional tariff on available services (up to 100%), which means restocking and shopping at a fleet carrier may potentially come at a premium.
Owners can also specify any commodities they wish to buy or sell from their carrier as well as a trading price, which can be 5-1000% of the galactic average.

Docking at a fleet carrier is very similar to the procedure for orbital outposts, i.e. you land on an external pad. Don’t forget to request permission first! The carrier will be subject to local laws and system authority vessels may be patrolling it, so don’t get up to anything you wouldn’t risk doing at a standard starport!
Be warned: if you park your ship on a carrier, you may find yourself in a different part of the galaxy when you log back in! Fleet carriers have a hyperspace range of up to 500LY and can potentially jump every 20 minutes!
If logged in, you will receive a warning when the carrier is about to jump and will have a maximum of 15 minutes to vacate. Otherwise, you’ll be going along for the ride.
25.2 Buying a fleet carrier

Fleet carriers are a serious financial investment and generally intended as “endgame content”, so not really aimed at greenhorns.
A barebones carrier will set you back 5 billion credits and additional facilities can cost up to 250 million each to install. Then there’s the weekly upkeep, which starts at 5 million and scales upwards according to your facilities configuration.
A fully outfitted fleet carrier has an initial setup cost of 6.15 billion credits and a weekly maintence of 26.7 million. That’s a fair chunk of change! Check out this handy fleet carrier calculator for more details on specific costs.
Failure to pay the maintence will eventually result in involuntary decommissioning of your extravagant toy. I believe that this occurs when your upkeep debt exceeds 250 million credits, which is equivalent to defaulting for 10 weeks on a fully outfitted carrier. However, you will be refunded the full cost of the carrier minus the upaid debt upon decommissioning.
Another expense to consider is tritium, which is what fleet carriers use to fuel their hyperspace jumps. The amount of tritium required per jump varies considerably according to distance and carrier mass. For example, a barebones carrier with no cargo will need 68 tonnes of tritium to jump 500LY. Fleet carriers can store up to 1,000 tonnes of tritium.
You can either purchase tritium from starports in refinery economies (the galatic average at the time of writing is 51,572 Cr) or mine it from deposits on icy asteroids. The former is expensive and the latter can be very time consuming.
If you have the dosh to slosh, then you can only purchase a Drake-Class Carrier from a limited number of stations with a Brewer Corporation Carriers contact.
However, I feel that fleet carrier ownership is beyond the scope of a beginner’s guide, so I won’t be going into any more detail. Besides, if you can afford a fleet carrier, then what are you doing here!!!
If you do want to learn more about fleet carriers, then I recommend reading the Elite: Dangerous wiki entry for Drake-Class Carriers.

Great guide and made an interesting read thanks for your hard work 🙂
LikeLiked by 1 person
Thanks!
LikeLike
Thank you for writing this. I am new to the game and found it very informative. But it makes me wonder, where did you learn all this? The game manual and training missions don’t come even close.
LikeLiked by 1 person
Thanks, glad you found it useful. Well, I have been playing since summer 2014, when it was in beta. Plus I learned a lot from reading forums etc, and I’m a veteran of the original games back from the 1980s/90s.
I’m hoping to do an update soon that includes the recent planetary landings expansion
LikeLike
This is where I found my start
LikeLiked by 3 people
Yeah Frontier was a great game, used to pull sick days at school so I could sit home and play it!
LikeLiked by 1 person
I hear they nerferd the Solo play option but I cant find it really documented anywhere.
Do you have any information on this? Really enjoyed your write up and Im sure I’ll be using it often 🙂
LikeLike
Not sure what you mean by nerfed? Solo is exactly the same game as Open and Private Group. All three game modes take place in the same shared and persistent universe. However, in solo you will never be instanced with other human players.
LikeLike
Thanks for the info, by Nerf I meant I read that solo mode had been dropped and would now just place you in a universe with other players same as open mode.
LikeLike
No, there’s no truth to that. I don’t FD would ever get rid of solo mode, they’d anger far too much of their player base – a lot of people still haven’t forgiven them for there being no true offline mode.
LikeLike
Hello I am a newbie with EB and its been very frustrating The question I have is when you set up you key binding which one do u use to do this u have KB Custom empty and 1 more
LikeLike
I would just edit the one it defaults to, it will switch to custom once you start changing things anyway. Also, if you go to: C:\Users\USERNAME\AppData\Local\Frontier Developments\Elite Dangerous\Options\Bindings\ you’ll find a file called custom. If you duplicate it and rename, it will show up in the control options with the new name.
LikeLike
This is strange the file Users\USERNAME\AppData\Local\Frontier Developments\Elite Dangerous\Options\Bindings, or C:\Users\USERNAME\AppData\Local\Frontier Developments\Elite Dangerous\Options\Bindings doesnt show up while doing a search on my HD?? and thxs Ill try it.
LikeLike
Just checking, but you have substituted the USERNAME part? Anyway, it should be there. That’s were all the ED settings are stored.
LikeLike
Hi, thanks a bunch this is super helpful.
I’m a complete noob (like 3 hours) and I’m trying to pick up a collector limpet controller like you recommended. I tried both the dock I spawned at, and the nearest starport, and neither of them have it under Optional Internal:
http://imgur.com/a/CrFQH (There’s one more item below, it’s surface scanners I think). It’s not under Prospecting Limpets. Am I doing something wrong?
Thanks!
LikeLiked by 1 person
Hi. No, you’re not doing anything wrong. You find them under “collection limpets”. However, module stock varies considerably between starports, so sometimes you can’t find what you’re looking for, especially in low population systems. When module shopping, the best places are high population systems with a high-tech economy.
LikeLike
This is a great write up and very appreciated! I do have one issue and only one…..why did you not include smuggling as a career path? I made 100 million bucks doing that over a month or two of casual play, from Robigo to wherever, but there is quite a few systems that have great smuggling missions available. I also however found out the hard way what happens when you have no extra money to pay for that nice ship that got shot down by 7 cops after a measly lil (large) burst laser hit one…..I now fly a viper again…=(
Thanks again though, you did a great job!
LikeLike
After a simple re read, just to make sure i wasn’t missing it, I notice you did cover smuggling to a degree. Fair enough, fair enough. My apologies.
LikeLike
Thanks. You’re right, you can make serious money from smuggling and I have done so myself in the past. I do cover smuggling as part of piracy and it’s also mentioned in passing in a few other sections, but maybe in a future update I’ll give it more of a dedicated section.
LikeLike
Excellent guide Stevie, good work, bravo! A question about docking. Usually I direct the front of the ship toward the pad’s number, but in some spaceports it’s the opposite. Is there a way while docking, except try & error, to understand where to point at? Thanks a lot
LikeLike
Thanks. Personally, I’ve not noticed this varying between starports. Generally, you want the whole ship perpendicular to the pad, which often means pointing the nose higher than you think. I find that how much leeway you get depends on the ship, with bigger ships being less forgiving of angle. Also, you need to be mindful of where the cockpit sits in relation to the rest of the ship when determining where to “aim”.
LikeLiked by 1 person
Really helpful guide. Thanks!
LikeLiked by 1 person
You’re welcome, thanks!
LikeLike
Thanks for this great guide, haven’t played elite since frontiers, was a tad rusty.
<o
LikeLiked by 1 person
Thanks! Yeah I loved Frontier: Elite II.
LikeLike
Amazing effort, Thanks so much.
Very, very useful.
LikeLiked by 1 person
Thanks!
LikeLike
I haven’t read single a drop of this but it appears, at least at first glance, to be a well thought out resource for ED. Perhaps evening a living document if we’re lucky. Thanks Steve, may the gods forever be in your favor.
LikeLiked by 1 person
Thanks! I hope you still think the same after reading some of it!
LikeLike
Hey steviegill,
As a returning player from before horizons launched, your guide is amazing and i hope you keep it up to date. Trying to pick everything back up and figure out all the new things is harder than i expected. You managed to boil down all the new systems into manageable chunks and i really appreciate that.
I currently dont trust myself to fly my a rated conda atm. Ill probably go out and set up a cobra or an asp for doing missions to learn more about the horizons expansion.
Stay safe commander, o7
CMDR ForgottenAmnesia
LikeLike
Thanks! Yeah, it’s probably a good idea to use a cheaper ship for a while, as a lot’s changed since then. Besides, there’s a lot of fun to be had in flying around in the smaller, more agile vessels. Good luck and fly safe…
LikeLike
Masterfully done sir! I have been playing (solo, PS4) for about a week now and your guide has been invaluable. I lament not having ever played the predecessors, however, I was a Wing Commander fan back in the day. I just purchased ED for the PC (via Steam) as well and discovered that you can’t play the same commander. Initially I was dismayed, however, I quickly got over that when I realized that I could just play my evil altar ego commander when I play on the PC in open.
Thanks again for your stellar work!
LikeLiked by 1 person
Thanks, appreciated! Yeah, I used to love the Wing Commander games as well. I also really liked Freelancer. But for me, none of those games quite scratched that Elite itch.
That’s a shame you can’t carry your Commander over. But I imagine ED is better to suited to PC than PS4, just for all the key binding possibilities!
I’ll have to update the guide again soon, with all the new changes coming to Engineers and Crime and Punishment.
LikeLike
Well done! You don’t happen to have a PDF version of it, do you? Turning pages on a tablet suits long documents a bit better than scrolling a very long bar.
LikeLike
Thanks. Unfortunately, I don’t have a PDF version of the guide. You could try using a tool/plugin to print the webpage to a PDF file, though I imagine the result won’t be perfect.
But yeah, it is getting very long. When I first started the guide, I didn’t intend for it to be so lengthy and comprehensive. But I just kept adding to it and adding to it. I enjoy doing it, plus I’ve been encouraged by all the positive feedback I’ve received. At some point, I may have to start splitting the guide into separate pages!
LikeLike
Extremely informative. Well done indeed. Will be coming back to this resource a lot from now on.
LikeLiked by 1 person
Thanks! Glad it’s useful.
LikeLike
Dude. Can’t thank you enough for this guide. Covers all the questions I have been trying to find an answer for for some time now. Muchas gracias!
LikeLiked by 1 person
You’re welcome! Fly safe o7
LikeLike
Super useful guide, well written and organised with helpful links all over the place. It’s a gem. Thanks so much.
LikeLike
Thanks!
LikeLiked by 1 person
Echoing the thanks already expressed by others. I bought Elite Dangerous years ago in a Steam sale but then life got in the way. Finally committed to take the plunge two months ago, bought a HOTAS, and was able to start playing last week (instead of reading about how to play, because I initially started it up and was immediately intimidated). I would be absolutely lost and clueless without experienced players like you sharing your knowledge, advice, and expertise in such a succinct, focused, and easy to follow write-up. A hearty 1,000,000 thank you’s for your time, willingness to share, and lighting the possible paths for us Elite Dangerous virgins.
LikeLiked by 2 people
Cool, thanks!!!
LikeLiked by 1 person
Great guide mate….helped me immensely…..one thing you might wanna put (stumped me as a beginner) is that when landing on a pad you need to be facing the correct direction ie ship facing forwards on the land scanner readout…..the amount of times i couldn’t land on a pad because i was 180 degrees out was pretty frustrating in the beginning.
LikeLiked by 2 people
Haha, yeah, I forgot about that! After a while, you start to take these things for granted. I’ll add something in.
LikeLiked by 1 person
Ahhhh good old Freelancer! I played that game a lot back in the day! Then it was EVE Online forever and a day and now I’m trying this out.
Just finished going through your ED guide and I’ve got to say it’s amazing. So much invaluable information that the game doesn’t even attempt to teach you during the training mission.
I’m sure I’ll be referencing this guide for awhile as I tackle the learning curve. Thanks again and keep up the good work!
LikeLiked by 2 people
Thanks! Yeah, I also really enjoyed Freelancer back in the day.
LikeLiked by 1 person
Great work! I did find one very minor error. Under the image “Passenger cabins 2” there is written “Parties can be upgraded but downgraded.” Perhaps you meant “Parties can be upgraded but ~~not~~ downgraded.” For all the new and the clueless like myself, thanks for the time and effort you put into this. It should be required reading for all pilots.
LikeLike
Haha yeah, that’s obviously a typo and I’m sure there are plenty more! Anyway, I’ve corrected it now. Thanks for pointing it out.
LikeLike
Just wanted to drop a line, I started in June 2018, and before I bought the game, I read about 50% of this whole post. When I started I instantly rebound keybindings, and away I went, everything just made sense. This is a wonderful tool for players, and I still go back to it. I even taught my friend a thing or two from this, and he has been playing for 3 years.
LikeLiked by 1 person
Thanks!
LikeLike
I love this guide, thank you so much!
LikeLiked by 1 person
Thanks!
LikeLike
Btw, any suggestion on how to bind the new controls from the 3.3 update?
LikeLike
You mean for the FSS?
Well, personally I use F12 to switch between combat and analysis mode, enter (numerical keypad) to open up the FSS, and space to do the discover scan.
To control the telescope I use WASD and the arrow keys for zooming and tuning. That way I can easily use both hands on the keyboard. Initially, I set it up to an Xbox pad to control the FSS, but actually prefer doing it all on keyboard.
For the detailed surface scanner I use the mouse for aiming and firing.
LikeLike
fantastic guide, help me a lot!
LikeLiked by 1 person
Thanks!
LikeLiked by 1 person
Great guide, much more “user friendly” than the official manual. I have only been playing a few weeks as I bought this to go with my new Vive (mind blowing btw and takes me right back to the eighties playing Elite on the CBM64!!!), and this document has explained so many little problems that I just couldn’t figure out. All your hard work is very much appreciated. Thanks again 👍
LikeLiked by 1 person
Thanks! It must be awesome to play ED in VR.
LikeLike
Nicely written and well balanced guide, many thanks for posting it! I have just started Elite Dangerous and found this guide useful over the past few weeks getting up to speed. Like the Chaos Engine aviator too, recognised him straight away 🙂
LikeLiked by 1 person
Thanks. Yeah, it’s the Mercenary, my favorite character from The Chaos Engine
LikeLike
I’d like to Thank you very much for all the obvious time and effort you put into compiling this great guide. There are many great ED guides out there but (IMO) this is the best of the best !! It’s up to date, the writing is great, complex ideas broken down into simplistic easy to understand terms and the graphics provided support the text very well. Once again Thank You
LikeLiked by 2 people
Thanks!!!
LikeLike
Many thanks for this incredible guide. It’s a huge help!
LikeLiked by 2 people
Thanks! I’m glad it’s useful!
LikeLike
Not sure how to comment on stuff here, but I figured I’d mention a typo in 4. paragraph 2, first word should be Dromi, not Dormi. For future reference, please let me know if there’s a better method of mentioning stuff like this, like if you’d prefer private messages rather than posts here. Although I’m at the very beginning of my learning curve on ED, I tend to be a very thorough student, and if I notice more typos (or have any other suggestions that I think might help future students), I want to be sure what the appropriate forum might be for that sort of thing.
Total noob here, I really appreciate the effort you’ve obviously made to familiarize those of us who are essentially babies in diapers crawling around wide-eyed.
LikeLiked by 2 people
Good spot and thanks for letting me know. I’m sure there are more typos that have slipped through – I’m always finding them when I add stuff or revise sections. I used to proofread and sub-edit professionally but I’m hopeless when it comes to my own writing!
Anyway, welcome to Elite: Dangerous! If you do notice anything else, you can email me at cakeisaliegaming@gmail.com.
LikeLiked by 1 person
This tomb of work on Elite Dangerous is unreal. I can ONLY imagine the number of hours and the amount of work put into this is CRAZY SICK (in a GREAT WAY!!). I’m not sure why this great work isn’t sold to Frontier or Prima Game publishers or any book publishing company to be published into a hard cover strategy guide for ED. I would DEFINITELY buy one and I can only imagine so would many other ED players would. With every new edition you put out, I cut and paste the entire guide into a word document, resize the images, print it out and place it into a nice loose leaf binder for use while playing or just studying. Awesome Job. A Huge Fan, Thank You so much.
LikeLiked by 2 people
Thanks, that’s very kind and I’m glad you find it so useful!
LikeLike
Great guide, thank you! I really struggled with the Elite universe when this first launched, but as a returnee now learning the ropes from scratch, there is a load of useful info here that is helping smooth my journey in.
LikeLiked by 1 person
Thanks, I’m glad the guide is useful. The game has changed a lot since it first launched!
LikeLike
Great guide spoiled by ads for Scams.
LikeLike
Unfortunately, because I’m using a free WordPress.com account, I have no control over the display of ads on my site. It’s worth pointing out that I make no money from these ads or from my gaming blog in general (I don’t even monetize my YouTube channel). If the adverts are inappropriate or obvious scams, you could try reporting them to WordPress.com.
Personally, I don’t see the ads because I always use an ad blocker (uBlock Origin) 😉
LikeLike
Very good! Thanks for your work.
LikeLiked by 1 person
You’re welcome!
LikeLike
Thank you for this guide, it shed some light on ED, which was very confusing at first – and still is. But your hard work is helping a lot to get a hang of it and I appreciate your effort very much, especially since you obviously keep it up-to-date.
I am kind of a “digital dinosaur”, my first Elite was the C64 version (on cassette) in 1984 and I sank endless amounts of time into it. 2 years later I assembled my first PC (8086 XT clone) and was very disappointed of the poor PC version (which came on a “wobbly” 5.25″ diskette), especially the horrible CGA graphics. I was quite unhappy to be stuck with it because I had to sell my C64 to afford the components for the PC. Therefore I was happy when Elite II: Frontier was released and once again enjoyed it for countless hours. I have played many “space sims” since then, including my favorites like the “Wing Commander” and “Privateer” series, “Freespace” Part 1 and 2, and of course the great “Freelancer”, which still is one of my all-time-favorites. I was hoping that ED copied the Freelancer style of mouse steering, which I liked a lot, but unfortunately that wasn’t the case. So I switched to the XBOX 360 gamepad/controller, which works good for me. I’m not going to sink a significant amount of money into a HOTAS system for casual gaming, because I don’t have enough gaming time to utilize it. Besides, I’m still furious about the disappearance of the gameport, which left me with about 10 excellent (and expensive) joysticks – including the famous Microsoft Sidewinder Force Feedback – rendered totally useless. Nowadays it has become quite normal to bury standards just to force the customers to buy new equipment and trash perfectly working hardware for no good reasons. But I’m doing my best to boycott such business behavior.
Anyway, I’m still new to ED and if it didn’t have the solo mode to avoid all those toxic bullies out there, I wouldn’t have bothered with it. There’s enough hatred in the real world, I don’t need more, when I want to relax while gaming. Currently I’m basically just traveling around in the starter systems under “puppy protection”, running easy missions and marveling at the sheer size of the ED universe.
I would love an option to be able to design my own textures (a.k.a. paint jobs) for my ships, but I guess FD won’t let that monetization monopoly slip out of their hands.
One thing I’m missing in your guide is some help to decide, when is the right time (or the right amount of savings) to buy the first ship after the free sidewinder and which ships make the most sense as an upgrade to the sidewinder. Some practical help regarding outfitting the ship would also be grand. But I still haven’t discovered all resources about ED on the WWW, so I guess I might find that elsewhere.
So thanks again and please keep up your great work.
Best regards
CMDR doubleyoukay
LikeLiked by 1 person
Thanks. My first experience of Elite was on a BBC Micro at school and then we had for it our ZX Spectrum at home. I was a bit too young for it then, but got properly addicted to Frontier: Elite 2 on the Amiga.
Anyway, deciding what ship to get next depends on what you want to do and your credit balance!
If you want to get into exploration, then I’d recommend the Diamondback Explorer (one of my favourite ships in the game!). If you want to get into bounty hunting, then maybe aim for a Vulture. For trading, a type-6. For passenger missions, a Dolphin.
A good, early-game all-rounder is the Cobra MkIII (another of my favourites). A good mid-game all-rounder to aim for is the Python (which is a great ship).
If you want to get more into exploration or combat, then I would strongly recommend getting Horizons (if you don’t have it already), as you’ll want to engineer your FSD, weapons, shields, thrusters, etc.
Fly safe 07
LikeLiked by 1 person
Words won’t do justice to your on-going, all these years, ‘expediti0n’ of keeping such a guide, up to date. I’m coming from the flight sim genre, having a 20+ years of experience in flying the B737 and after having mastered literally all of its systems and operations, I suppose this game is my next step forward.
It’d be a lie to say that I actually understand how ED works. I have two kids running all over the place, all day, especially now with the covid lockdown. I can only ‘study’ ED late at night but then I find myself so exhausted that my progress is minimal.
This guide is a masterpiece, mainly due to the unprecedented load of information gathered from various sources and personal experience, over your playing years.
Last but not least, I’d like to stress that this guide, most probably, will be also my motive not to abandon the game.
T-h-a-n-k you!!
LikeLiked by 1 person
Thanks!
LikeLike
Started a few weeks ago with E:D – your guide resolves lots of mysteries and questions. Bookmarked and used frequently 🙂
Thanks for your work!
LikeLiked by 1 person
Thanks, I’m just happy that people find it useful!
LikeLike
Great work! …and I put the PDF version on my Kindle 😎
LikeLiked by 1 person
Thanks!
LikeLike
Holy crap. After scouring youtube videos that weren’t helpful I on using the scanners, I think I might have found a good place to figure them out. Going to look at this guide later today.
LikeLiked by 1 person
what are wings? I noticed you mentioned adding an explanation for them and I would enjoy that because I don’t know what they are.
LikeLike
Yeah, I still need to add something on that – when I find the time!!! I’ve only just gotten round to adding a section on fleet carriers, which I’m still working on!
In a nutshell, a wing is a way for up to four players to form a temporary group that travels and fights together. While in the wing, you share profits and mission rewards. It works in similar to manner multicrew, but everyone is in their own ship.
LikeLiked by 1 person
This guide is a massive help, I just started the game with a buddy a week ago and this has helped us out so much. I much appreciate your hard work!!
LikeLiked by 2 people
Thanks!
LikeLike
The best guide I stumbled upon. And when I saw that blue Caffeinated Pixels banner with words “Amiga”, “retrogaming” and “indie” my heart started to melt down like 060 at 66 MHz! Thank you very much for this guide, it helped me discover a lot of useful things about this new Elite, things that weren’t present in C64 version or in Frontier on Amiga.
P.S. Is that Another World background on your Caff. Pixels banner? It looks familiar from somewhere but my memory is not what it used to be… 🙂
LikeLiked by 1 person
Thanks! Yeah, the Amiga was a big part of my teenage years, and that is Another World in my banner – so good spot! It’s the background from when you first arrive on the alien planet after getting out of the water. I love that game!
LikeLiked by 1 person
Thanks so much for this! I’ve only just started playing, and this guide has been absolutely invaluable as I get started. It must have taken you so long to write this, I really appreciate the time you put in to it!
LikeLiked by 1 person
Thanks, I’m just happy that people find it useful. Writing it has been an incremental process over a period of nearly six years. Boy, how time flies!!!
LikeLike
Really appreciate it! There’s so much to do in Elite, and so little is explained in the game, I’d be lost without this guide. Thanks again 🙂
LikeLiked by 1 person
hi,
thanks for such an awesome player guide… i haven’t played Elite since I was sneaking into my kid’s room at night to play the original on our Commodore 64! And boy how joysticks have changed since my red stick with the one button on top.
I just started ED last week, and now feel like I am in a Cobra Mk3 when driving down the highway (good thing no lasers installed on my Honda Ridgeline!)
LikeLiked by 1 person
Cool. I guess you’re the same person who replied to my thread in the forum. I would definitely recommend fitting your Honda with a couple of beam lasers for cutting through traffic 😀
LikeLike