

Last revised: 21 September 2020
Guide contents
- Short introduction
- Long introduction
- Before you start
- Building the system
- Changing the Workbench (RTG) display mode
- Setting up a shared directory with Windows
- Creating Amiga filesystem icons
- Changing wallpaper and tidying up the desktop
- Installing and running WHDLoad games
- Creating a WHDLoad games list with iGame
- Updating WHDLoad .slave files
- Game resolution and scaling and filtering options
- Sound settings
- Choosing an input method
- What if the game I want to play isn’t available as WHDLoad?
- Mounting Amiga CDs
- Can I use WinUAE’s save states?
- Troubleshooting and additional tweaks and settings
- Once you’re up and running
- Useful WinUAE keyboard shortcuts
- Useful resources
1. Short introduction
This is a detailed, step-by-step guide to building a persistent Commodore Amiga environment in WinUAE. I’ll show you how to install Workbench 3.1 on a virtual A1200 hard drive and how to easily run classic Amiga games using WHDLoad and iGame.
The guide also includes general tips and info for using Workbench, WinUAE, WHDLoad and iGame, and I provide links to a bunch of useful Amiga resources.
2. Introduction
These days, there are multiple ways to emulate and play classic Amiga games on your PC. The simplest method is to acquire the ADFs (Amiga disk file) of your favourite titles and run them through either FS-UAE or WinUAE using one of their configuration presets or through Cloanto’s Amiga Forever interface. In fact, FS-UAE connects to a handy online database that recognises your games and configures itself accordingly to provide decent compatibility for each one.
However, my preferred method is using WinUAE (the most fully-featured and configurable Amiga emulator available) to run games from a virtual hard drive through an emulated Amiga Workbench environment. Essentially this is a heavily-upgraded A1200 running Workbench 3.1 with a disk image containing the system drive (for booting/running the OS) and a “Work” drive that appears in Windows as a fully accessible and modifiable folder that allows me to effortlessly copy pre-installed WHDLoad versions of games over to my emulated Amiga.
The advantage of my current system is that it’s lightning fast, runs smoothly in fullscreen at my desktop resolution, outputs to 5.1 surround sound (which sounds great), and I can easily tweak WinUAE settings, when required, to improve compatibility with certain games/software. Once I boot my system I can quickly switch between the pre-installed games without ever leaving the Amiga environment or having to faff around with ADFs.
It’s also a doddle to capture screenshots and record gameplay footage using my preferred tools — MSI afterburner for screenshots and Nvidia Shadowplay for video capture. Plus WHDLoad game variants often come with essential compatibility fixes and quality-of-life tweaks (e.g. CD32 pad support) as well as options that allow you to skip intros/cutscenes, choose levels or enable all manner of cheats/trainers.
And of course, I get a nice, warm sense of nostalgia running my own virtual Amiga with a Workbench environment customised to my own tastes, a bit like in the old days when I used to own an A1200 with a 400Mb hard drive, Blizzard 1230 IV CPU expansion, 32Mb fast ram, and SCSI CD-ROM drive (why the hell did I sell it, why, oh why!!!)
Anyway, if you’re interested in running a similar emulation set-up, I’ve put together what I hope is an easy-to-follow guide for those who want to be able to play Amiga WHDLoad games without too much fuss or technical knowledge. This guide may also be useful to people just looking for some general tips and tricks for WinUAE, Workbench 3.1, WHDLoad and iGame.
You may also want to read my General Overview to Emulating the Commodore Amiga or my guide to emulating Amiga CD32 games.
Oh yeah, feel free to ask questions, leave feedback or point out mistakes or omissions in the comments below.
3. Before you start
Before starting you will need to acquire both an Amiga 1200 ROM and some Workbench 3.0 or 3.1 ADFs, both of which are still copyrighted materials. You cannot emulate Amiga software or hardware without a kickstart ROM (regardless of method) and you cannot build a classic OS without the relevant Workbench disks.
The easiest way to obtain these legally is to purchase the plus (or premium) edition of Amiga Forever from Cloanto. This comes with all the Amiga kickstart ROMs and original Workbench ADFs, as well as some games and a selection of pre-installed Amiga systems/configurations that run through Cloanto’s own interface (which, to be quite honest, is a bit pants and hugely lacking in configuration/compatibility options),
Alternatively, you can rip the ROM from a real A1200 (e.g. using TransROM) and the ADFs from real Workbench disks (see the Lemon Amiga ADF creation guide), if you still happen to own these and have a floppy drive on your PC or a null modem cable.
4. Building the system
Fortunately, a nice chap called Bloodwych has done all the hard work so we don’t have to. Similar to Jaybee’s Amiga in a Box (AIAB), Bloodwych has put together a comprehensive and elegant-looking Workbench 3.0/3.1 environment, which features everything needed to bring the GUI up to date and make for a much more user-friendly experience than the original Workbench. This include Scalos Desktop, MagicMenu, Magic User Interface (MUI) and New Icons — most of which I used to run on my real A1200 back in the day.
Importantly, it includes Picasso96, an RTG (ReTargetable Graphics) that interfaces with uaegfx (a virtual Amiga gfx card) to provide support for 16/32-bit colour and modern desktop resolutions (e.g. 1920×1080, 1920×1200, etc) while running Workbench. As an added bonus, there’s also a tonne of other software, much of which you’ll probably never need, and a small selection of classic Amiga game tunes.
1. Install the latest version of WinUAE. Note that when I originally wrote this guide I was using version 3.0.0, but it’s usually worth updating to the latest version.
2. Download Bloodwych’s P96 ClassicWB and extract the files.
3. Move Bloodwych’s config file (“ClassicWB_P96.UAE”) into the WinUAE configurations folder, for me this in “C:\Users\Public\Documents\Amiga Files\WinUAE\Configurations\”. Check the “Paths” tab in WinUAE to find where yours is located. You can place “System.hdf”, which is the hard drive file, anywhere you want.

4. Run WinUAE, go to the “configurations” tab, select Bloodwych’s config file (“ClassicWB_P96”) and click on the “Load” button.

5. Select a ROM from the “ROM” tab. If I remember correctly, if you already have Amiga Forever installed, WinUAE will automatically detect the available kickstart ROMs that come with the package. Otherwise, you will need to direct it to where you have them stored in the “paths” tab (on my PC this is: C:\Users\Public\Documents\Amiga Files\Shared\rom). If you only have the Workbench 3.0 ADF, you will need to select “KS ROM 3.0 (A1200)”, otherwise select “KS ROM 3.1 (A1200)”

6. In the “CD & Hard drives” tab, click on “Add Hardfile”, then the ellipsis (three dots) next to “Path:” and direct it to where you stored “System.hdf”. Type DH0 (that’s a zero) in the box labelled “Device:”. Then go back into the “Configurations” tab and save the changes.

7. Click on “Start” to boot the system and follow the instructions. When asked for the Workbench disk, hit F12, go to the “Floppy drives” tab and click on the three dots next to the “Eject” button for “DF0:” and direct it your ADF. If you have Amiga Forever installed, this will be somewhere like: “C:\Users\Public\Documents\Amiga Files\Shared\adf\”.

If using a Workbench 3.1 ADF, you will be asked if you wish to upgrade to Workbench 3.1. I suggest doing this (just type “y” and press enter), but you will need to provide it with the rest of the Workbench ADFs when prompted. At the end, you will be instructed to remove the Workbench disk and to reboot (hit F12, eject the ADF and press “reset”).

If successful you should end up with something looking like this, displayed in an 800×600 window (to go fullscreen press CTRL + F12):

5. Changing the Workbench (RTG) display mode
I like to run my Amiga Workbench desktop in fullscreen at my monitor’s native resolution, but you can set it to your own taste/requirements. By the way, this is the RTG resolution, which is not the same resolution that your games will run in – for more on that head to the game resolution and scaling section.
To change the Workbench screen mode, double-click on the “Run” icon on the Amiga desktop and then click “Screen” from the button menu that appears; alternatively, open “System” drive, go into to the “Prefs” folder and double-click on “ScreenMode”.
Note that you need to click “Save” to make the screen mode permanent, “Use” will only apply it for the current session. Also, if you used the button menu to get to the display preferences, you will need to close this (and any other windows) before it can change the display (you will be prompted).

If you don’t see your desired resolution or colour depth available in the list, you will probably need to allocate more video memory to the RTG. This is done in the “Expansions” tab of the WinUAE interface (press F12 to return) by moving the VRAM slider. I’ve set mine to 256MB, which is a little bit overkill, but what the hell! Remember to save your changes by going into the “Configurations” tab. You will need to reset the Amiga for this change to take effect.

If successful you should end up with something like this (we’ll sort out the slightly unsightly tiled wallpaper later):

If you want to start in fullscreen by default (rather than windowed mode), you need to go into the “Display” tab and set the “RTG” dropdown to “Fullscreen” and then save the configuration. If running at your desktop resolution, you can also choose to the have the display scaled when you switch back to windowed mode. To enable this, go back into the “Expansions” tab and check “Always scale in windowed mode”. Then go back to the “Display” tab and set a desired window resolution in the “Windowed:” box.

6. Setting up a shared directory with Windows
Although you can browse the internet through your Amiga environment (e.g. using AWeb) and download games/software straight onto your system drive, it’s useful to create a shared directory. This provides a simple method for transferring files between Windows and Amiga, and the same directory can be used for multiple Amiga configurations.
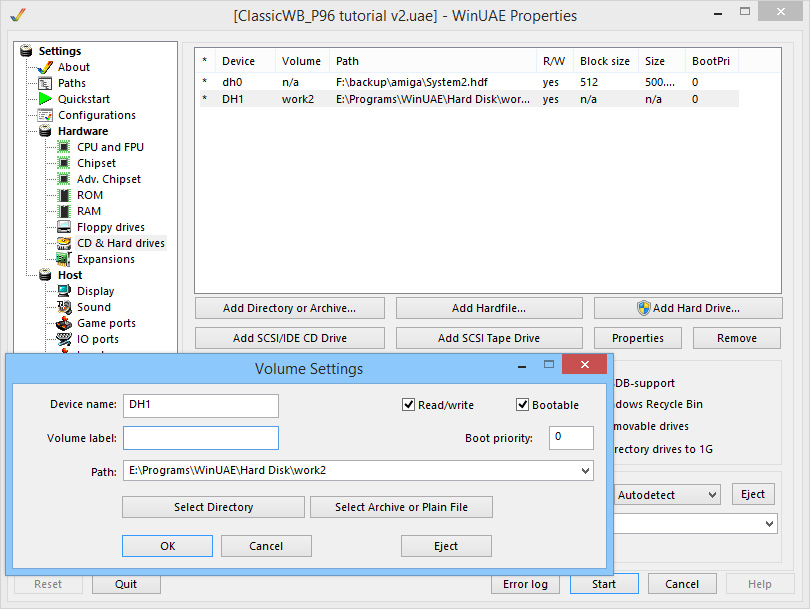
To set this up, first create a new folder anywhere you like in Windows and give it a name. Then in the “CD and hard drives” tab of WinUAE click on “Add Directory or Archive”, direct it to this folder and then label it “DH1” in the “Device:” field. The “Volume label:” field is what the drive will be called on your Amiga; if you leave this blank, WinUAE will automatically name it for you. Save the configuration and reset your Amiga, you should now see this folder mounted as a drive on your Amiga desktop.
If you want to create folders for this drive, it’s best to do it on the Amiga side. On the Amiga, folders are called drawers. To create a new drawer simply right click in the desired drive or directory and select New>Drawer; you will be prompted to give it a name.
Drawers created on the Windows side will not have an associated .info file, so they’ll not have an icon and you will only be to see them if you right click inside the window and select View>All Files.

7. Creating Amiga filesystem icons
If you want to give a drawer an icon (or any file for that matter), right-click in the window and select Icons>Filetypes. This should bring up two new windows. One window should display a range of icon styles, simply drag the desired icon to the “Source” box of the other window. Now drag the iconless drawer to the “Destination” box. This drawer should now have an associated .info file and you will be able to see it by default.
To improve icon support I also suggest that you install PeterK’s icon replacement library, which provides support for PNG icons, otherwise many of the games you download will have nondescript dots as icons. To do this open “Drawers” (next to “Run”), then navigate to “MyFiles\Install\Icons” and run “Install_Icons_Support”. Type “y” when prompted. The system will reboot twice during the installation process.
8. Changing wallpaper and tidying up the desktop & windows
Obviously, this step is not crucial. Ideally, your wallpaper needs to be the same size as your Amiga desktop as OS won’t resize the background so you may need to resize in an image editor. To support large image files, you may need to “RAM” tab of WinUAE and increase the amount “Z3 Fast:” RAM (e.g. to 256MB).

The image will need to be a JPEG, PNG or GIFF (or IFF the default Amiga image format). Simply drop the image into your shared directory and then copy over to “System:Prefs\Patterns\”. Then double-click on “Run” to bring up the button menu and select Settings>Scalos>Pattern. Highlight the current pattern in the list and click the icon to the right of the text box below, you should then be able to find your image in the subsequent list.

To tidy up your desktop, simply drag icons into position, right click and select Snapshot>All. You can do the same for the contents of drawers. Be aware that if you have drawers or files with no associated .info, this will not save properly.

9. Installing and running games
Fortunately, unlike the ROMs which are still under copyright, the vast majority of Amiga games can be legally obtained for free on the internet as abandonware. As a bonus, most are available in a pre-installed WHDLoad format, which means that you can simply copy them onto your Amiga’s hard drive and run from there without extra steps.
To able to run these you first need to install the WHDLoad user package. Bloodwych’s build already comes with this installed (v17.1), but it’s worth updating to the latest version, especially as the programme is now freeware (it used to be shareware). Download WHDLoad_usr.lha, extract (e.g. using 7-zip in Windows or on your Amiga by double-clicking and choosing an extraction path) and copy to your shared directory. Run the installer using the default options.
In order to work, WHDLoad games also require access to the Amiga Kickstart ROMs. However, a different naming system to the ROMs used in WinUAE must be used (as outlined on the WHDLoad website). Conveniently, the correctly named files can be found in Amiga Forever’s 3.x system drive. On my PC these are located in C:\Users\Public\Documents\Amiga Files\Shared\dir\System\Devs\kickstarts.
Once you’ve located these, they need to be copied across to System:Devs/Kickstarts/ on your virtual Amiga via the shared directory. Be sure to copy across all files, including the rom.key file; however, the relocation (.RTB) files should already be in the Kickstarts drawer so you can ignore that part.

Now it’s time to grab a game. Let’s head over to WHDownLoad to download a pre-installed version of Alien Breed II AGA, one of my favourites. Extract it and copy across to your shared folder. To run the game, simply double click on the game icon! Follow the same procedure for installing other games.
9.1. WHDLoad game repositories
The easiest way to download pre-installed WHDload games is from the WHDownLoad website.
However, they can also be downloaded from the English Amiga Board’s ftp site, who often have more up-to-date versions than on WHDownLoad. Specifically, you want to navigate to Retroplay WHDLoad Packs/Commodore_Amiga_-_WHDLoad_-_Games.
The EAB also have a search tool if you’re not able to find a specific game on their ftp. And if you want to download every WHDLoad game (~3000 titles!) then you might want to consider using Turran’s WHDLoad Pack Downloader.
9.2. Changing the QuitKey
All WHDload games have a QuitKey, which exits the game and returns you to Workbench. For games that save data to the drive (eg save games and high scores), it’s important to use this key for exiting the game (instead of just reseting the Amiga or exiting WinUAE). Otherwise, you may lose your saves. Believe me, I learned this the hardway playing SWOS!
The default key is often F10 or Print Screen. However, you can change this to anything you want! To reassign the default key, we need to edit the WHDLoad.prefs file located in the S directory on the System drive, so System:S/WHDLoad.prefs. Double clicking on this file should open it in a text editor.
We’re looking for a line that says ;QuitKey=$5a. First, we need to uncomment it by removing the semi-colon (;). Then we need to change the hex code after the dollar sign ($) with a RAWKEY code value from the WHDLoad docs. I like to use DEL as my quit key, so I’ve set mine to QuitKey=$46. Ideally, you want to choose a key that isn’t used by many games. Remember to save the changes to WHDLoad.prefs file before exiting the text editor.

We can also set the QuitKey for individual games to override the global/default QuitKey. This can be useful if the default QuitKey is used in that game, like in those flight simulators that use nearly every key on the keyboard!
To set the QuitKey for a specific game, head to the game’s directory then:
- right click on the game icon and select Info
- click Tooltypes
- click Add New
- type QuitKey=${hex code} but without the curly braces
- hit Save
Again, I’m going to use DEL as my quit key, so I’m going type QuitKey=$46. In the screenshot below, I lazily used all caps but the variable name doesn’t seem to be case sensitive!

10. Creating a WHDLoad games list with iGame
If you end up installing tonnes of games (and why wouldn’t you!!!), you might want to checkout iGame. iGame is an MUI frontend for launching and managing WHDLoad games. Useful features include being able to quickly search your games catalogue, filtering by genre and creating a list of favourites.

The best bit is, if you’ve been following this guide, it should already be installed on your system — you just need to point it in the direction of your games directory.
That said, there’s a newer version (2.0-beta5) of iGame over on GitHub that adds in an improved GUI and mouse wheel, cursor key and joypad scrolling. To install it, just copy the files to the iGame directory (you may want to keep your own gameslist and genres files).
iGame can be found in the Programs directory of your System drive, ie System:Programs/iGame, where you’ll also find a detailed manual. Or it can be quickly launched from the shortcuts tab of the Workbench/Scalos dropdown menu — right-click at the very top of the screen).

Setting iGame up is fairly straight-forward:
- With the iGame window selected, right-click at the top of the screen then head to Settings>Game Repositories
- In the new window, click the directories icon (left of the Add button)
- Navigate to your games directory (e.g. Work:games/) – if need be, you can add multiple directories.
- Then, once again with iGame window selected, right-click at the top of the screen and select Actions>Scan Repositories. This should start populating your list and may take a while depending on your emulation settings and the size of your catalogue. You will need to rescan each time you add or remove games.

Typing in the box at the top of the iGame GUI will filter your catalogue in real-time, you can also choose from a variety of preset filters from the list in the bottom right of the window.
To edit the properties of a game, select it from the list then either:
- right-click and head to Game Properties>Game in the drop-down menu
- or use the RAmiga + P shortcut (RAmiga is usually the right Win key on Windows keyboards)
Here, you can edit the game’s name, add it your favourites, assign it to a genre/category or hide it from the main list (to see hidden games, right-click and select Actions>Show/Hide hidden entries from the drop-down). You also edit the game’s tooltypes from here, but I don’t recommend it as it tends to mess up the icon in the game’s directory.

Another neat feature is that iGame can also display a screenshot of your choice when you highlight a game. To do this you need an IFF format image named igame.iff present in the game’s directory.
There are a couple of pre-formatted screenshot collections over on Aminet to get you started. I use the hstwb_igame_eab_games.lha screenshot pack as it seems to cover most games and the folder names (mostly) match up with those from the Retroplay WHDLoad collection from the EAB.
You can also update the genres list using a text editor such as JanoEditor, which you can access through Run>Utils>Text Editor. The genres text file can be found in the System:Programs/iGame directory.

11. Updating WHDLoad .slave files
Occasionally when you launch a WHDLoad game, it will tell you that a newer slave is available. It seems that WHDLoad connects to the internet and checks your slave version against the WHDLoad database. You might be surprised at how often these slaves get updated!
While not essential, updating the slave can improve compatibility and performance, fix bugs and provide additional pre-game options (cheats, intro skip, controller hacks & other tweaks, etc). Plus it gets rid of that annoying “newer slave available” message!
There are two main options for updating the slave:
- Downloading the new .slave file from WHDLoad. This method will work for most but not all updates.
- Downloading a new game installation (ie the entire game folder) from either WHDownLoad or the Retroplay collection on the EAB ftp. You’ll have to use this method if the update requires multiple files to be updated.
11.1 Dowloading the slave from WHDLoad
Head to the WHDLoad installers page and download the relevant lha package from the games section. These packages are meant for installing Amiga games from the original floppies onto a hard drive, but you don’t need to go through that process again.
Simply open the archive and copy the .slave file (it will be called something like GameName.slave) over to the game directory on your Amiga hard drive. You will need to replace existing .slave file.
The new .slave file needs to have exactly the same name as the game’s .info file. So for AlienBreed2AGA.info, the matching .slave file should be AlienBreed2AGA.slave.
It’s probably worth keeping the original .slave file in case there’s a problem with the new one. If you’re using iGame, renamed old slave files may appear in your games list as an additional entry (usually suffixed with “alt”) when you scan for new games. So, it’s best to keep the old slave files in a directory that’s not scanned by iGame.
11.2 Downloading a new installation
If you try the first method and it throws an error when you launch the game, then you probably need to update the entire installation!
This method involves downloading a new pre-installed game folder from either WHDownLoad or the Retroplay Collection on the EAB ftp site.
As you’ll be replacing the existing installation, it’s crucial to back up any game save data or high scores before preceding. How this data is stored will vary from game to game, so you’ll need to check the readme file in the game directory or on the WHDLoad website for info on this.
12. Game resolution and scaling and filtering options
Choosing a display resolution and scaling method when emulating classic Amiga games can be something of a divisive, not to mention complicated, issue.
Some people will want to stick as closely as possible to the Amiga’s original pixel aspect ratio (PAR) or a 4:3 display aspect ratio (DAR), while others (like me!) may want to stretch the output to fit their monitor’s full display area without any black bars.
The latter is something that is frowned upon by the aspect ratio police but, at the end of the day, it’s about choosing a resolution, scaling method, and filter that suits your own tastes or needs. And, as I’ll touch on below, choosing the “correct” aspect ratio for an emulated display is not that straightforward.
In this section, I’ll try to explain some of the display and scaling options available in WinUAE.
12.1. WinUAE display controls
When running Amiga software in WinUAE, the display output is affected by the:
- WinUAE display output. This can either be in a window (e.g. 800×600) or using the full screen of your monitor (e.g. 1920×1080). We control this through the display tab of the WinUAE GUI.
- RTG output. This only applies if you’re using a virtual graphics card to run Workbench at a modern resolution (e.g. 1920×1080). The RTG resolution is set through the Workbench screen preferences.
- Native output. The native resolution is the Amiga screen mode (e.g. lowres, hires, super-hires) and is controlled through the display tab of the WinUAE GUI.
- Filter options. The WinUAE filter tab includes a number of options for scaling and applying filters to the emulated Amiga’s native output, such as stretching the output to fill a widescreen monitor, aspect ratio correction, and applying scanlines or a bilinear filter.
With this system we’ve built in this guide, WinUAE will switch to the native screen mode when you launch a WHDLoad game. It then switches back to the RTG mode when you press the WHDLoad quit key, which returns you to the Amiga Workbench desktop.
This means that the resolution you set in Workbench can be different from the one that your games use, which is set within the display tab of the WinUAE GUI.

12.2. Resolution of classic Amiga games and analogue displays
Most classic Amiga games run in the Amiga’s lowres screen mode, which is:
- PAL: 320×256@50Hz (5:4 aspect) with an overscan area of up to 376×288
- NTSC: 320×200@60Hz (8:5/16:10 aspect) with an overscan area of up to 376×242
These games were designed to be displayed on CRT monitors and TVs with a 4:3 DAR. However, CRT screens are analogue devices and don’t use pixels, they display horizontal lines (scanlines) that are generated sequentially from left to right starting from the top of the screen.
So, PAL 4:3 screens display up to 576 visible lines with a horizontal resolution equivalent of up to 720 pixels. This gives a maximum possible screen display resolution of 720×576 pixels (576i) but this can vary between devices and the visible area is typically cropped to around 704×576 pixels.
For an NTSC 4:3 screen, the maximum possible screen display resolution is 720×480 pixels (480i) and the visible area is typically cropped to around 704×480 pixels.
So, in the Amiga’s lowres screen mode, the pixel size is effectively doubled and the PAR may be stretched or shrunk a little in order to fill the visible display area of a PAL or NTSC 4:3 monitor.
However, not all classic games use the full display area of the Amiga, so you can end up with black bars. For example, a lot of PAL games actually only use 320×200 pixels, which often leaves a big black bar at the bottom of the screen (e.g. Lemmings).
In contrast, a number of games intentionally exploit the overscan region (e.g. The Settlers) and the picture may extend beyond the visible display area of the screen.
To complicate matters further, no two analogues screens were quite the same. They tend to vary slightly in their total possible display area, which is why overscan areas existed.
These differences can sometimes result in unintended borders or some amount of picture cropping. This is why many analogue screens had horizontal and vertical adjustments controls that allow the user to stretch or shrink the picture to better fill the screen.
So, my point is that Amiga games can differ significantly in picture size. And because of the differences between the Amiga PAR and a 4:3 DAR as well as the natural variations in analogue screens, everyone experienced those games a bit differently back in the day and your pixels probably weren’t exactly square!
This all means that scaling an emulated Amiga display on a modern digital monitor is not always simple and often comes down to personal preference.
I’ve included some references on Amiga display characteristics in the Useful resources section if you want to read more on this.
12.3. WinUAE output options
By default, WinUAE in native mode outputs to hires mode using double lines, producing an Amiga screen resolution of either 640×512 (PAL) or 640×400 (NTSC). Obviously, this is tiny compared to what modern display hardware can output and significantly different in aspect ratio.
This leaves you three main display options:
- Windowed mode. Run the game in a window and then size it as desired. Windows sizes of 720×568 or 720×576 are often recommended to maintain an accurate Amiga PAR.
- Fullscreen reduced resolution. Set WinUAE to a much lower fullscreen resolution, e.g. 800×600 (4:3) or 1280×1024 (5:4), etc. This will change the display resolution of your monitor while running WinUAE.
- Fullscreen native resolution. Scale the game display area using the WinUAE filter options to better fit your monitor’s native resolution (e.g. 1920×1080).
You can set the fullscreen resolution and window size in the display tab of the WinUAE GUI.
To switch between window and fullscreen mode, either press CTRL + F12 or set the native output to either windowed or fullscreen in the GUI. If you want to manually resize the window, you’ll need to check the “window resize” option.
By the way, if you’re running in fullscreen and still want to be able to see WinUAE’s on-screen display, then head to the “miscellaneous” tab and check “RTG on-screen display” and/or “Native on-screen display”.
If you don’t have an adaptive sync monitor and you experience jerky movement or scrolling in games, then you may need to enable vertical sync in the display tab.
For PAL games you will need to set the refresh rate to either 50Hz or 100Hz, for NTSC either 60 or 120Hz (whichever your monitor supports). For the double refresh frequencies, you may want to check “black frame insertion” in the miscellaneous tab to reduce motion blur.
12.4. Fullscreen scaling options
Personally, I like to run classic Amiga games in fullscreen with WinUAE outputting to the native resolution of my 16:9 aspect monitor (i.e. 1920×1080). However, without any scaling, this will result in a tiny display area with black bars on all sides.

For the following discussion, I’m assuming a 1920×1080 monitor but this also applies to other widescreen formats.
If you want to scale the Amiga display area to better fill your screen, you can either:
- Preserve the PAR. This method scales the horizontal and vertical resolutions by the same multiplier to better fit your monitor’s vertical resolution and will significantly reduce or eliminate horizontal black bars. However, there will still be sizeable black vertical bars on the left and right.
- Distort the PAR to fill the entire screen. This scales the display area to completely fit your screen, which usually removes all black bars. However, this stretches the aspect horizontally and produces rectangular pixels that are short and fat.
- Use 4:3 aspect ratio correction. This scales the display area to completely fit the vertical resolution of your screen with a 4:3 aspect ratio. This will distort the PAR slightly and there will still be black vertical bars on the left and right.
To change the scaling method, you need to head over to the filter tab of the WinUAE GUI. Be sure to have the top-right dropdown set to native when playing with these options. Also, you can save and load custom filter/scaling presets at the bottom of the tab.

12.5. Scaling to fill the entire screen
If you want the picture to fill the whole screen, then head over to the filter tab and set the scaling method to either default, automatic scaling, or automatic resize.
Default scaling attempts to preserve intentional black bars or borders. Automatic scaling and automatic resize attempt to crop out all black bars so that the picture completely fills the screen.
A good example to illustrate this is the PAL version of Lemmings, which only uses 320×200 pixels so has a large black bar at the bottom of the screen. Default scaling will maintain this black bar but automatic scaling and automatic resize will crop out this black bar, stretching the picture even further.


I’m not actually sure what the difference is between automatic scaling and automatic resize but they sometimes produce different results so it can be worth switching between them.
If these methods don’t give you the result you’re after, then you may need to fine-tune the scaling using the horizontal and vertical size sliders. You can also adjust the placement of the picture using the horizontal and vertical position sliders.
Alternatively, set the scaling method to either “no scaling” or “automatic center” and use the sliders to manually stretch the picture to fill your screen. You can save your scaling settings as a custom preset at the very bottom of the tab.
12.6. Scaling while preserving the PAR
If you’re keen to preserve the Amiga’s lowres PAR, then things get a little more complicated.
The simplest and most accurate method is to use integer scaling. Integer scaling uses whole number multipliers (e.g. x2, x3, x4) to the upscale the image, which generally produces the sharpest image and squarest pixels. In contrast, scaling with fractions (e.g. x1.5, x2.5, x3.5) may produce less sharp images with pixels that are more off-square.
A good way to do this is to set the scaling method to “automatic center” and then use the dropdowns to set the vertical and horizontal multipliers.
On a 1920×1080 display:
- a multiplier of x2 is usually a good place to start; it will significantly reduce unintentional horizontal black bars but may not eliminate them entirely
- a multiplier of 3 is usually too big for the vertical resolution and will result cropping at the top or bottom of the picture
- a multiplier of x2.5 may work well for some games but not others; because it’s a fraction, not an integer, scaling quality may be less optimum

There’s also the “auto integer scaling” option, but for some games (e.g. Flashback) this can produce weird results with stretched PARs.
If you want the picture to completely fill the vertical resolution while preserving the PAR, then there are several other non-integer approaches to scaling:
12.6.1. Manual scaling using the sliders
It is also possible to set the scaling multiplier using the sliders, which allows for much finer scale adjustments. Simply adjust the vertical scale slider (second from top) until the picture fills the vertical resolution, then set the horizontal scale slider (first from top) to exactly the same value. Note that you can control these sliders more precisely using the cursor keys.
If you’re not using the “automatic center” option, then you may want to:
- adjust the screen placement using the horizontal and vertical position sliders, which are situated directly below the scale sliders
- set the scaling method to “no scaling” as this produces the most reliable results
12.6.2. Automatic scaling with aspect ratio correction
Alternatively, you can get WinUAE to do all the heavy lifting. I find that the following combination of settings maintains the PAR well for many games:
- setting the scaling method to “automatic scaling”
- setting the aspect ratio correction to “automatic” (or the aspect ratio of your monitor)
- checking “keep autoscale aspect”
If this produces undesirable results for some games, you may need to set the scaling or positioning manually using the sliders.

12.7. Scaling with 4:3 aspect correction
Back in the day, the Amiga PAR was often stretched or shrunk slightly to fill a 4:3 DAR screen.
I find that setting the scaling method to “automatic scaling” and the aspect ratio correction to “automatic” (or the aspect ratio of your monitor) usually does a decent job of producing a 4:3 aspect. You can quickly apply this combination by loading the “D3D autoscale” preset.
Again, you may need to adjust the scaling or positioning manually for some games. Don’t forget to save any manual settings as a custom preset!

12.8. Filter options
At the very top-left of the filter tab is a dropdown with a number of filter options. Most of these apply a blurring effect while also scaling the image by a preset integer (e.g. x2, x3, x4).
Personally, I don’t find these very useful and I think the blurring looks horrible but your mileage may vary.
Those who want to better simulate the look of a CRT display may find the PAL filter helpful. If you choose the PAL filter, you can additionally tweak brightness, contrast, saturation, gamma, blurriness, and noise by using the dropdown and slider in the “extra settings” box.
The extra settings box also allows you to apply and adjust other post-processing effects such as scanlines and bilinear filtering. Setting “scanline opacity” to something between 15 and 100 can produce a nice CRT scanlines effect.

12.9. My own scaling settings
When playing classic Amiga games, I usually set WinUAE to automatic scaling and disable the filter and aspect ratio correction options. This will normally fill my entire screen (without any black bars) and will be correctly centered.
It works well for most games and, in my humble opinion, looks good (check out my Amiga videos or some of the screenshots taken in one of my retrospective pieces).
The aspect ratio police will no doubt take umbrage with my heathen ways but as I’ve touched on above, choosing the “correct” aspect ratio for an emulated Amiga display is not actually that straightforward! In fact, games coded in 320×200 have an 8:5 aspect, which upscales without stretching to fit a modern 16:10 display, such as 1920×1200.
Anyway, back in the mid-90s, I used to sometimes run my Amiga 1200 on a 32inch 16:9 PAL television with the image stretched to fill the full screen 😀
So, don’t be afraid to experiment with the various filter and scaling options to get the look you want. And remember to save your settings as customs presets!
13. Sound settings
There is also a range of sound settings (in the “Sound” tab) that can be tweaked as desired. If you’re feeling particularly nostalgic you can emulate the floppy drive sound, which will click loudly at regular intervals until you insert a disk, but this becomes extremely annoying after say five seconds (just like it did in the old days!). These are the settings I normally use:
- Channel mode: 5.1 Channels (or cloned stereo)
- Frequency: 48000
- Sound Buffer Size: 6
- Interpolation: Anti
- Audio filter: Always off
- Stereo separation: 70%

14. Choosing an input method
WinUAE is compatible with a range of controllers including the Xbox 360 pad (my personal preference) and these can be selected in the “Game ports” tab.
For increased functionality, you can try setting the drop-down menu below the controller to “CD32 pad”. In some games, this will allow you to use additional joystick buttons and is obviously important if you’re actually playing a CD32 game! Some up-to-date WHDLoad game versions also add support for a CD32 pad (e.g. Pinball Dreams).
If you don’t have a controller, you will need to select a suitable keyboard layout (such as arrow keys or numeric keypad) for games that require a joystick. It’s also possible to completely remap joystick/pad and keyboard controls to your own preferences in the “Game ports” and “Input” tabs respectively.
For two player games, you will need to either change “Port 1:” (your mouse by default) to a second controller or a preferred keyboard layout once in the game. This is equivalent to disconnecting the mouse and plugging in a second joystick on a real Amiga.
Note that some games also have their own options for choosing or customising keyboard controls for additional players.

15. What if the game I want to play isn’t available as WHDLoad?
Very occasionally you can find the WHDLoad game installer for a specific game but not a pre-installed version.
For this, you will need to acquire the ADFs (jump to the resources section below). However, the installers usually prefer uncracked versions of the disks.
To install, run the executable, choose a suitable destination on your virtual harddrive, and provide the required ADFs through the “Floppy drives” tab when prompted.
If you can only find ADFs for the game you want to play, you can still use your configuration to boot from these. Just insert the ADFs into the virtual drives through the “Floppy drives” tab.
You can set-up up to four disk drives to reduce disk swapping. If you’re having compatibility issues (usually with really old A500 games), then you can use WinUAE’s “Quickstart” function to effortlessly set-up a standard A500.
16. Mounting Amiga CDs
There are some Amiga games that come on non-bootable CDs, such as Genetic Species and Simon the Sorcerer II. These games were intended to run through the Workbench OS on an Amiga with a CD-ROM drive and they will not work (natively) on the Amiga CD32 console. Some folks may also wish to explore the contents of Amiga-specific CDs, such as the Aminet disks.
Fortunately, it’s very easy to mount both physical CDs and disk image files through WinUAE, and no installation is required on the Amiga side.
Simply head to the CD & Hard drives tab of the GUI and check “CDFS automount CD/DVD drives”. In the Miscellaneous tab, make sure that “SCSI and CD/DVD access:” is set to the default value of “SCSI Emulation”.
If the disk mode is set to “Autodetect”, then WinUAE will automatically mount physical CDs that are present in your optical drive. If this doesn’t happen, then you will need select the correct drive letter from the disk-mode dropdown.
For CD images, click on “Select image file” and then direct WinUAE to the .cue file, or alternatively the .img or .bin file.

If successful, you should see the disk appear on the Workbench desktop. This can sometimes take a few seconds. If it seems to be taking a while, try right-clicking on the desktop then select redraw>update.

17. Can I use WinUAE’s save states?
Technically, WinUAE’s save states function is not supposed to work with hard drive configurations. However, I’ve found that it does work with a surprising number of WHDLoad games (but not all). Pressing the game’s quitkey will usually cause the emulation to crash, but trying out save states will not harm your Amiga system (still, it’s always worth backing everything up!).
To create a save state head to the “Miscellaneous” tab, press the “Save State” button (or press SHIFT + END + F5) and then give your save a name. You load save states from the same location (or with END +F5). Before loading, ensure that you’ve first loaded the correct configuration into WinUAE first. Sometimes it also helps if you run the game first before loading the save state.
18. Troubleshooting and additional tweaks and settings
Remember that emulation is rarely perfect or flawless (though WinUAE does a very good job of emulating the Amiga) and from time to you may experience brief glitches with the speed, sound, and graphics of a particular game. Or even crashes, freezes or the dreaded “Guru Meditation”, which is the Amiga’s rough equivalent of a BSOD. If you are having issues, here are a few things you can try.
General game issues
With general issues, such as the game running too fast or simply not working properly, the best thing to try first is enabling “Cycle-exact (Full)” in the “Chipset” tab.
Doing this will automatically:
- enable “cycle-exact (DMA/memory access)” in the “Chipset” tab
- disable “JIT” (Just-in-time) in the “CPU and FPU” tab
- switch CPU Emulation Speed in the CPU and FPU tab from “Fastest possible” to “Approximate A500/A1200 or cycle-exact”
This will slow down the emulation resulting in longer Workbench load times but can significantly increase the compatibility of certain games.
You can also play around with the above settings individually (including the “Cycle-exact CPU Emulation Speed”) to see what effects they have on the game or program you’re trying to run.
It may also be worth simplifying your memory configuration. Bloodwych’s original WinUAE configuration well exceeds the needs of most users and games. I find my system runs perfectly well with just 8MB of Chip RAM and 32MB of Z3 Fast. In fact, I could probably get away with less Chip RAM. Some older A500 games may benefit from adding 512Kb of Slow RAM.
Graphical issues
If you’re experiencing graphical corruption, head into the “Chipset” tab and check “Wait for blitter”. This will fix most graphical issues.
Sound issues
If you’re having audio issues, it may be worth disabling “Interpolation”. For choppy or distorted sound, try increasing the “Sound buffer size”. If you’re getting audio lag/delay, try reducing the buffer.
You may also experience choppy or distorted sound in RTG mode if the refresh rate differs from the Amiga’s display output. Generally, it’s best to set the RTG refresh rate to “chipset”.
19. Once you’re up and running
Now that you’ve set-up your virtual Amiga, why not celebrate by launching Eagleplayer and listening to some classic Amiga tunes. Oh yeah, and don’t forget to back everything up 🙂
20. Useful WinUAE keyboard shortcuts
Some handy keyboard shortcuts:
- F12 – brings up the WinUAE interface
- CTRL + F12 – toggle fullscreen and windowed mode
- Middle mouse button – returns you to the Windows desktop with WinUAE still running in the background
- CTRL + F11 – quit the emulation
- SHIFT + F12 – opens WinUAE’s debugger
- PRTSC – copies WinUAE’s current screen to the clipboard
- END + PrintScreen – save screenshot file (to a location specified in the “Paths” tab
- END + F5 – brings up the load state window
- SHIFT + END + F5 – brings up the save state window
- PAUSE – pauses the emulation
- PAUSE + END – activates warp mode (i.e. speeds up the emulation), press again to return to normal mode
- END + F1, F2, F3 or F4 – change floppy disk (ADF) in the corresponding drive
- SHIFT+END+ F1, F2, F3 or F4 – ejects floppy disk (ADF) in corresponding drive
It’s also worth noting that in WinUAE, the left and right Amigas keys are mapped to the left and right WIN keys on your keyboard. So if you want to do a soft reset, you can press CTRL + LWIN + RWIN. Also, the Amiga’s HELP key is mapped to PAGE DOWN. These keys can be remapped in the “Input” tab.
21. Useful resources
Other guides by me:
For finding games:
- WHDownLoad – a repository of pre-installed WHDLoad games
- Turran’s WHDLoad Pack Downloader — this is a tool for downloading pre-installed WHDLoad games from the English Amiga Board’s FTP site. These often have more up-to-date slave files than the games available on the WHDownLoad.
- WHDLoad – official WHDLoad site, which also contains a repository of game installers (note that these are not pre-installed like above and you need the ADFs to install the game to your hard drive)
- Vintage Is The New Old (formerly Commodore is Awesome) – general retrogaming resource with a heavy focus on all things Commodore; includes some downloadable Amiga games
- Amiga TOSEC – a free downloadable 37GB (yes 37GB!!!) archive containing multiple sources of nearly every Amiga game, demo, programme and cover disk ever made (excludes Workbench disks and Kickstart ROMs)
- EmuParadise – huge catalogue of classic games, including downloadable Amiga ADFs and CD32 disk images
- Planet Emulation – a French site hosting a large number of Amiga games
General:
- Lemon Amiga – general Amiga resource, includes a database of games and links to where you can download
- Hall of Light – Amiga game database
- English Amiga Board – English-language Amiga forums
- Amiga.org – Amiga portal, news site and forums
- aminet – Amiga software repository
Understanding Amiga display characteristics/modes:
- Amiga screen modes – a useful guide by the Amiga Graphics Archive
- Display Sizes, Offsets, and Clipping – an informative Retroplatform discussion on Amiga overscan and how CRT TVs work
- Effect of Display Overscan on the Viewing Area – from the AmigaOS 3.5 developer docs
- Correct Amiga Aspect Ratio – an article on configuring CRT displays for Amigas

Thank you for the guide, it is really helpfull. I have a problem concerning the improved icon support. When I open drawers and navigate to “MyFiles\Install\”, I don’t have the “icons” and therefore I cannot run “Install_Icons_Support”. Any idea why is that?
LikeLike
No idea, to be honest. The MyFiles/Install folder should look like this: http://i.imgur.com/FmKJqq7.jpg. Anyway, I’ve uploaded the icons folder to: http://s000.tinyupload.com/index.php?file_id=11283877055179665641. Extract and copy to your shared drive, then copy over to MyFiles and run from there. Hope that sorts out your problem.
LikeLike
Hi there, thanx for the comment.
I did copy over to my files and did the installation, but I got an error message which i didn’t catch up and then i couldn’t boot to my amiga anymore…
Fortunately I had backed up the configuration and I just copied to my winuae amiga files and i saved it :))
Anyway, i’ll give it a try again some point later.
I have another question if you don’t mind. I want to open the games I load from WHDload, with the igame. This WB has already installed the igame. So, as I understand, I copy the games to the System, into the drawer “games”, and then I run igames and go to ‘actions’ -> scan repositories. Am I correct?
LikeLike
Well, good luck. For the igames, I believe that is correct, but I run all my WHDload games directly from my shared directory where I store them – this makes it easier to transfer my games between different configurations.
LikeLike
Oh I just saw that system hdf is only 500MB. So I will do the same with you.
LikeLike
Well as I said in my reply, it all looks fine to me (both in Workbench and in game). If you examine my screenshots closely you will notice that the Workbench fonts are very clear, sharp and readable and I have not noticed any distortion. Personally I leave the filters turned off (I don’t like how they look), except for “automatic scaling”
But once again, this is a matter of personal preference.
LikeLike
Unfortunatelly IT IS NOT A MATTER OF PERSONAL PREFERENCE, but a matter of assumption everybody else has the same configuration like ME (because of lack of knowledge)
What ypu write above is an universal for everybody instruction, but you assumed something which is not true for other PC configurations.
Default Winuae resolution is 720×568, but the overscan area is much lower as the resolution suggest. As i told you before it is 8 lower res pixels on left, top and right but not bottom, while on real Amiga the overscan displayable area is much larger. If you set this resolution to any other IT WILL NOT change the amount of overscan area winuae will display, and in some games you wont see for example the bottom of the screen (all pixels on lines 257-313)
Take a look how the screen looks on INTEL HD display which is pretty common graphics card, but does not smooth resized area.
http://screenshotcomparison.com/comparison/139244
You do have probably NVIDIA or ATI card which smooths the screen, so you do not see the artefacts I see.
You also do not need to use filters, coz you have hardware filter, but i have to.
Even if your graphics card does have internal smooth resizer the mathematical precision says in order to maximise quality you have to use round multiplication. Good luck arguing with math.
I hope everything is clear now.
LikeLike
Thanks for explaining further, but it would be virtually impossible to write a guide that covers all hardware configurations/permutations and of course this is based on my own experience on my own hardware. However, this is only meant to be a simple “guide” for the average user (there is much I don’t cover, hence the links to other resources and I do not profess to be an expert). Plus the average PC user (especially anyone into gaming) will usually have either an Nvidia or AMD/ATI based graphics solution (for the record I have an Nvidia gtx 780). However, I also run WinUAE on my laptop with an IntelHD/Nvidia combo (which uses the Intel graphics solution for 2d applications to reduce power consumption), and I still do not have the issues you document.
It’s also worth pointing out that my guide uses the p96 version of Bloodwych’s preinstalled Workbench system (http://classicwb.abime.net/index.htm), which runs at 800×600 by default.
Do you know for a fact these differences are down to hardware smoothing?
Also, might I add, that I find your tone unnecessarily aggressive.
LikeLike
Reblogged this on rayduece and commented:
Great Article!
LikeLiked by 1 person
Thank you!
LikeLike
Ive been using amigas since 1993 Stevie, and then on to PC, I have learnt much! But there is still much to learn! I found your article very helpful, thank you, and the other guy who was arguing with you? What an ungrateful cock!
LikeLiked by 1 person
Thanks. I’m still very much learning myself, figuring the effects of different options and configurations within WinUAE. Not sure what that other guys problem was, all part of the joys of the internet!
LikeLike
Yeah true!
LikeLike
any opinion on fs-uae ?
thanks for a great article
LikeLiked by 1 person
Thanks. fs-uae is easier to use, especially for beginners, but I prefer WinUAE because it has a lot more configuration options. That said, I haven’t used fs-uae in ages.
LikeLike
Great guide mate. 🙂 Good work!
LikeLike
VERY cool and looks beautiful. I’ve had all kinds of problems trying to run this in Windows 10. I love the look, but am such a novice. At the end of finally getting almost everything to work it talks about the Picasso RTG libraries not being able to load. Used to LOVE the look of Amiga in a Box way back in the day too. Anyway, thanks for the blog post. 🙂
LikeLike
Thanks. I have no experience of WinUAE in Windows 10, still using 8.1, so can’t really help. Probably worth checking that you have the latest version of the emulator. Hope you sort your problems.
LikeLike
Thanks very much for this guide. I’m a total novice and have found it easy to follow so far. I’m now at the point of trying to change my wallpaper and have set up a shared folder and created a new background image in it. The problem I’m having is that I can open them in the shared folder without issue from the Amiga side, but I cannot move them to any other Amiga location without them ‘changing’. Instead of the image icon it changes to the tools icon, and the file can no longer be opened. I’ve saved it as several different file types – one as a JPG, one as an IFF, and one as a PNG – but they all do the same thing. An ideas what might be going on there? Am I missing something really obvious? Thanks very much, Mark
LikeLike
Thanks, glad it’s useful. I think you may need to create the relevant .info file. The Amiga does this by default, but you need to do it manually for the PC. Easiest way to do it is to copy one from another file.
I explain how to do this under the “Setting up a shared directory with Windows” section:
“If you want to give a drawer an icon (or any file for that matter), right click in the window and select Icons>Filetypes. This should bring up two new windows. One window should display a range of icon styles, simply drag the desired icon to the “Source” box of the other window. Now drag the iconless drawer to the “Destination” box. This drawer should now have an associated .info file and you will be able to see it by default.”
LikeLike
Thanks very much for the quick reply. I’ll try that tonight and report back. I’m hoping that I can actually get the games to work after all of this effort – I haven’t actually got so far as to try that bit yet!! Thanks again, Mark
LikeLike
Good luck. The games are the most important part!
LikeLike
Hi again. Your previous advice worked thanks – wallpapers now working!
I have got stuck with the ROMs now! I’ve got them from AmigaForever and put them in the right place with the correct naming formats. I can’t find a rom.key file anywhere in the AmigaForever files though. Some games seem to work fine like this (e.g. Cannon Fodder) but when I try to boot some (e.g. Beneath a Steel Sky) I get a WHDLoad window pop up saying:
DOS-Error #205
(object not found)
on reading “devs:kickstarts/kickstart34005.a500
Is this because the rom.key file is missing? Or have I missed something else too?
If you could point me towards the rom.key so i can re-try I’d be very grateful.
Thanks again for all your help, it’s really appreciated. Can’t believe someone in the comments had the nerve to be rude when you’ve gone to all this effort to help others!!
LikeLike
Glad that helped. Yes you need to have the relevant kickstart files and different games require different ones. Do you have Amiga Forever? You can find them all in the AF install directory. For me that’s: C:\Users\Public\Documents\Amiga Files\Shared\rom. Just copy them all across to your shared drive then copy again into the devs:kickstarts folder on the Amiga’s system drive.
LikeLike
Thanks for the quick reply. I’ve got all the ROMs in the right place – the one that Beneath a Steel Sky can’t find is there. I don’t have the rom.key file you refer to though – I can’t find it anywhere and wonder if that’s what’s causing the problem? Thanks again, Mark
LikeLike
Sorry, I forgot to mention that they need to be renamed first. See this guide here: http://www.whdload.de/docs/en/need.html. So you need to copy amiga-os-130.rom across and then rename to: kick34005.A500
LikeLike
Thanks, but I’ve already renamed as per that guide, as you’ve explained in the tutorial above, and the relocation files are also present. Is the missing rom.key file the problem? Thanks very much, Mark
LikeLike
Yes, then that’s probably the issue. The rom key should be in the Amiga Forever roms directory. Copy that into the same folder.
LikeLike
It’s not there for some reason! It’s the 2016 edition – maybe they’ve changed something?
LikeLike
Go to the about page and contact me at the email address listed there.
LikeLike
Sorry, me again!
2 last questions – promise!!
1. Is there a way to get WinUAE to boot up straight to the Amiga screen with my config pre-loaded? When i run it currently each time I have to go to the configuration tab, load my configuration, then click start. Can I automate/bypass all of that somehow?
2. Is there a way to save Amiga window (drawer screen) sizes so that they stay the same when re-opened another time? I have my Amiga games looking all pretty in my shared folder – https://snag.gy/f95bEW.jpg – but every time I open it I have to stretch it out to full screen as it opens in a tiny window. I’m guessing it’s just an Amiga quirk with no workaround but here’s hoping!
Thanks very much
Mark
LikeLike
Hi again!
1. If you double click on the config file in the list it loads immediately, without having to also press load and then start. I’m not sure if you can set it up so it loads by default when you start WinUAE.
2. Yes. Right click in the relevant window and select snapshot>all.
LikeLike
Thanks Steve.
1. I found a way of doing this. Rename the config file as ‘default’. In the misc menu untick ‘show gui at startup’, and on the quickstart menu untick ‘start in quickstart mode’. Works pretty well, though for some reason the emulated hardware shown on the quickstart menu seems to reset to A500 sometimes.
2. Thanks for that. I was hoping for a solution that saved even after exit and restart of WinUAE, but think I’m perhaps being unreasonably demanding with that one!
Thanks again
Mark
LikeLike
1. That’s cool, didn’t know you can do that. Although I have multiple configurations that I switch between such as super fast ones and slower more compatible ones. If you encounter issues with the really old games you may need to slow down the emulation or check “wait for blitter”. I also have one set-up for running the CD32; mostly for playing the CD versions of The Chaos Engine and Diggers.
2. Yeah, it’s a bit annoying having to manually save the size, position and layout of each window! But what I always loved about Workbench is that there is no shutdown process, you could just literally pull the plug and everything would be fine when you booted it back up.
LikeLike
Yeah, I’ve had a few compatibility issues (sound and graphics going a bit dodgy) and so have been trying to make a second config file for the A500 by tweaking the A1200 one I set up using your guide but don’t really know what I’m doing. I got one working by adding the KS ROM v1.3 to my WinUAE folder, using the default A500 settings from the quickstart menu, and adding my system.hdf as DH0, and it boots to the white 1.3 screen with the hand on but there are no desktop folders and so I can’t load my hard drive games from there, just those I insert through the floppy drives in the gui. Am I missing something basic?
LikeLike
That system won’t work well/properly using an A500 rom. When I’m having issues, I slow down the emulation and enable some of the compatibility options. You’ll find these mostly in the “CPU and FPU tab” and “Chipset” tab.
In Chipset check the “Wait for blitter”, “Cycle-exact (FULL)” and “Cycle-exact (DMA/Memory accesses)” options. The blitter option usually works well when experiencing graphical corruption.
In the CPU tab make sure JIT and 24-bit addressing are disabled and that the CPU emulation speed is set to “Approximate A500/A1200 or cycle-exact”. You may also want set the CPU frequency as low as 2x (A500) – though this will take ages to load the desktop and you will need to be patient. However, the compatibility is very good. Also some games will run too fast, even if set to A1200 speed. For instance, Jaguar XJ220 is hilariously fast if you have the CPU frequency too high.
Anyway, you can experiment with different combinations of these options to find the best compromise between emulation speed and compatibility.
For one or two games, you may need to resort to running them from floppies (ADF) using a basic A500 set-up. You can use one of the quickstart configs for this and tweak to your taste (and then save after for repeated use).
LikeLike
Thanks Steve, that’s improved things for the majority of games – you’re right about the loading of the desktop being slooooooow though! Maybe I should try XJ220 at speed, give myself a challenge. I just ran North and South at high speed and the guy at the start blows his trumpet faster than I’ve ever seen anyone play an instrument! Haha! Still can’t get the sound right on one or two – I used to love Putty and Banshee but the crackling and distortion makes them horrid to play. Shame, but following the death of my Amiga (RIP) I’m just pleased to be able to play things again! Cheers, Mark
LikeLike
Does anyone know how to save game states from within the emulated Amiga? Obviously saving adf states are not going to work in this instance… Please help!
LikeLike
As far as I know you can’t, unfortunately. That is certainly one drawback to running games from a virtual HD instead of ADFs. But you can pause indefinitely by either pressing pause or F12 and then leaving WinUAE running in the background. Though far from ideal!
LikeLike
Would this be the same deal with actual hardware running games from CF card?
LikeLike
I’ve never used a CF card, but I assume it’s the same. I used to run an A1200 with an actual hard drive and there was no way I know of to save states like you can for ADFs in WinUAE.
LikeLike
Hello,
i my eyes is AmigaSYS a bit better, even despite that is outdated.
I was more hardcore and installed Vanilla WB 3.1 and installed all these items alone and to be honest without Amiga knowledge is task for 2 weeks.
LikeLike
It’s out of date now a bigger 11/11/2006 version is up for AMIGA on the TOSEC via same source and another update since on EAB file server under TOSEC Updates and Retroplay WHDLoad updates.
LikeLike
Thanks. I’ve updated the link.
LikeLike
About updating that “WHADLoad.slave” file you wrote to go to “http://whdload.de/download.html”. There are “Applications”, “Demos”, “Games, “Magazines” and “Cracktros” (I guess it was looking different here 2 years ago). It can’t be in the last 4 ones and under “Applications” there are only 3 other entries. I went to “Search” and looked for “slave”, but there are 3267 matches. Any hint where the find that “newer slave” file? (Is it just one file or more files, because in the title of point 9 in your tutorial you wrote about updating “files”…)
Thanks,
Alen
LikeLike
Hi, sorry, I should have made it clearer. On that page (http://whdload.de/download.html) you should see a section called games which is broken down into alphabetical groups (eg Am-aq). Click on the group that matches your game name, you should then see a list games ordered alphabetically.
When you click on the name of your game, it should download an lha archive file. If you open this archive (I do it in Windows with 7-zip) you’ll find a folder containing a bunch of files. The one you’re interested in will be called something like “GameName.slave”. That’s the file you want to copy across to the game folder in your Amiga game directory.
When you copy it across it needs to have exactly the same name as the old one on your Amiga (it’s worth keeping the old file just in case; you can rename it something like “GameName.slaveold”). So, for instance, if the original slave file was called “AlienBreed2AGA.slave”, then that is exactly what the new slave file should be called.
Also, you only need to update the slave file if you a get a message when you launch the game telling you that a newer slave file is available.
LikeLike
Are questions still answered. My setup is to use on an actual 1200. I completed a setup of a 3.1 system and all works fine; including the Scalos(?) Buttonmenu etc. iGame loads from whatever selection. It is all put on a CF card and bootable from there with no problems. Next was to setup a 3.9 system. At the beginning it asked for a ‘zip’ system file but what was in the directory was the ‘hdf’ file. Originally I used the OS3.9 CD version and installed from there but since it didn’t include WHDLoad etc I went and used that instead. To get to the point, I did finally get that installed with all the options, except this setup doesn’t have Scalos. In all this I’m only left with one issue. You have the dropdown menus and buttonmenu functions which will bring up WHDLoad, and from there select iGames but that doesn’t do anything. I had thought the issue was iGames wasn’t setup but it Will open with the program itself. Using the Buttonmenu application the link is: “WBrun A-Programs:iGame/iGame”. The assign is “A-Programs: sys:Programs” I do believe. So I’m at a loss why the application won’t run from Buttomenu or the drop-down menu. Any ideas.
LikeLike
I knew it Had to be something simple. So, I’m using DOpus to browse startup files etc. and noticed there is NO WBRun in the ‘C’ folder. It IS WBRun2. After changing all the links to That, now it works. It didn’t register that no other selections in that menu worked either. They were all using the wrong Run. The install on this OS 3.9 didn’t work in the same way as previously and I’m not even sure How it worked and what I did to make it work. Evidently the install didn’t do everything it should have, likely because it didn’t operate as it normally would have. I do think it was all due to that system file being ‘hdf’ and not ‘zip’. The bad part is I have so many configurations and system files through trial and error that now it’s a mess.
LikeLike
Hi. I have very little experience of OS3.9 and it’s very difficult for me to follow the thread of your comments. I think you’d probably have more luck taking your problem to one of the Amiga forums, such as the EAB: http://eab.abime.net/
Sorry I can’t be of more help.
LikeLike
any ideas how i can type {,[,]},\,|,~ in emulated machine?
LikeLiked by 1 person
Hi. I have no problem typing these characters in Shell and Final Writer on my emulated Workbench environment. I just use the corresponding keys on my keyboard.
You may need to set the locale preferences in Workbench to match the country of your keyboard. For example, I’m using using a British keyboard, so have the locale set to United Kingdom.
LikeLike